Introduction
As frontier language models improve, AI agents are set to move further into the realm of scientific research. Multiple agents, working independenty, exploring scientific domains, offer the promise of greater speed of discovery. In addition, LLMs encode a vast amount of technical information that empowers humans to reach beyond the limits of their own education and experience.
I’m excited by this field of exploration in AI because it will accelerate scientific research and understanding, and lead to radical advances in health, material sciences, the list is endless. One such domain is quantum computing. Enabling agents to explore new research via browsing, to make hypotheses, and then test those hypotheses on a quantum simulator or an actual physical quantum computer, and then to publish the results, opens up amazing potential for discoveries.
In this article we look at how we might start this journey. You’ll see how we can schedule an AI agent to periodically write and execute OpenQASM code and publish the results on the web. Then we’ll deep-dive into the implementation and see how to:
- Create a Docker sidecar for Qiskit.
- Call that sidecar from our host tools ASP.NET Core application.
- Create a custom Tool for Orpius, which can be called by your Orpius AI agent.
The full source code for this article is downloadable from https://github.com/Orpius/SDK/tree/main/DotNet/Orpius.Platform.Sdk/Samples/Containerized
Background
Orpius has two parts: a remote server and a local desktop application. The desktop application allows you to configure the server, schedule tasks, define events, create agents, and so forth. You can find more about Orpius over at the user-guide. If you want to try the ideas explored in this article, get a free-to-try copy of Orpius here https://orpius.com/get-started.html. Let’s jump straight in and see how to create a task to execute some quantum code.
Running a Quantum Task with an Agent
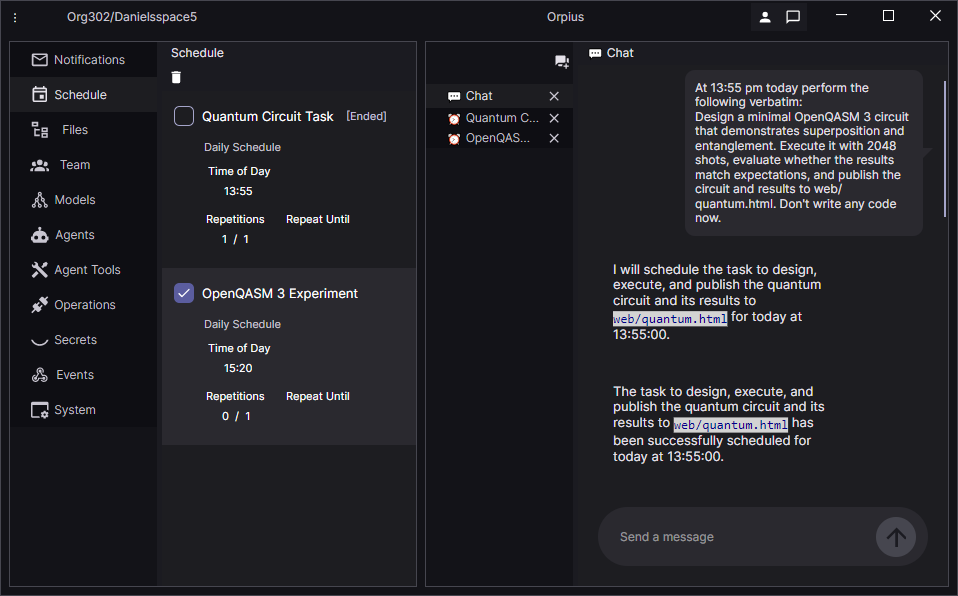
Let’s begin by looking at the end result of this work. I began with a prompt to the Orpius interactive agent via the Orpius Console:
At 13:55 pm today perform the following verbatim: Design a minimal OpenQASM 3 circuit that demonstrates superposition and entanglement. Execute it with 2048 shots, evaluate whether the results match expectations, and publish the circuit and results to web/quantum.html. Don’t write any code now.
I told it to schedule the task rather than immediately execute it. You can schedule tasks to be run arbitrarily or based on an event.
NOTE: At present the Orpius interactive agent (the one you chat with in the Orpius Console) only has access to custom tools via Orpius Operations; it cannot call custom tools directly but this a planned feature for a future release.

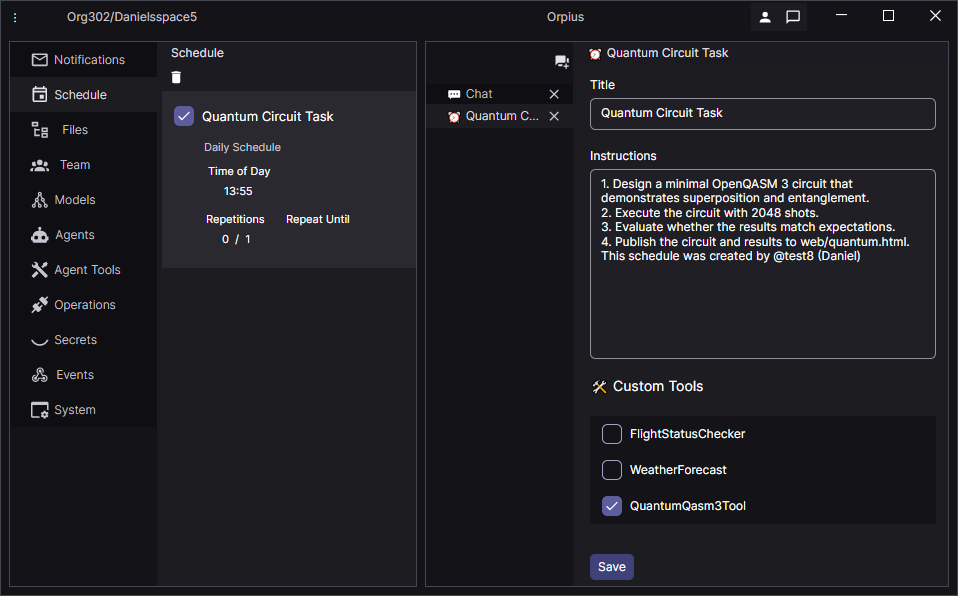
After the prompt, a new scheduled item shows up in the Schedule tab of the Orpius Console. When scheduled items are actioned by an agent the Repetitions, count is incremented in the Console.
The Orpius agent broke the task into steps, as shown below:
When 13:55 came around, the task was actioned…and it failed. Examining the logs I could see that:
- The agent wrote OpenQASM 2 code and not OpenQASM 3.
- The Qiskit sidecar needed some enhancement to return meaningful errors to the agent.
In Orpius, when a tool raises an error, that error propogates back to the agent. This is how agents are, for example, able to write managed code (using the built-in code execution tool) and to make corrections based on compilation errors. We needed to do the same thing with our OpenQASM code.
So, after some assistance from a model I made some error handling additions to my python code, which we’ll look at later in the article.
Likewise, I also updated the method description to better guide the agent in acceptable OpenQASM 3 code. (Again, we’ll dig into this later.)
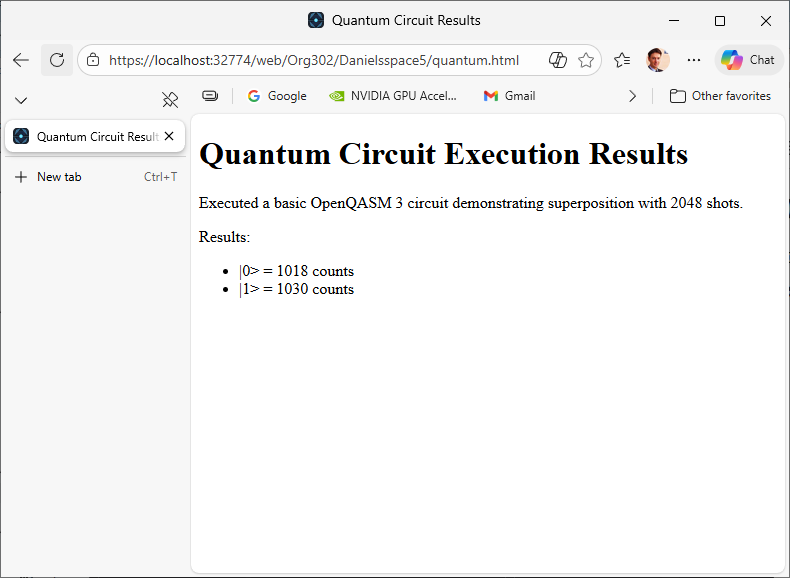
The agent was then able to successfully write its own OpenQASM code, use the custom tool to execute it, then publish the results to a webpage.
In Orpius, the agents and files associated with the project you’re working on are termed a Space. And, by default, any files that are placed in your Space’s isolated storage under its web directory are browsable on the internet. That means you or your agent can do instant web publishing. Pretty neat. If you’re using the trial version of Orpius, then the content is browsable at https://trial.app.orpius.com/YOUR_ORG_NAME/YOUR_SPACE_NAME/pagename.html. This instant publishing feature is brand-new.
Orpius agents use the code execution tool to write, compile, and execute code within a fully isolated webassembly environment. The agent writes C# code to write the page to your web directory in isolated storage.
The generated page is barebones stylistically, but there is no reason why you can’t task the agent to jazz it up a bit. I leave that to the reader.
So, with the agent able to write and execute a basic OpenQASM program, it was time to push it a bit harder.
My next prompt was:
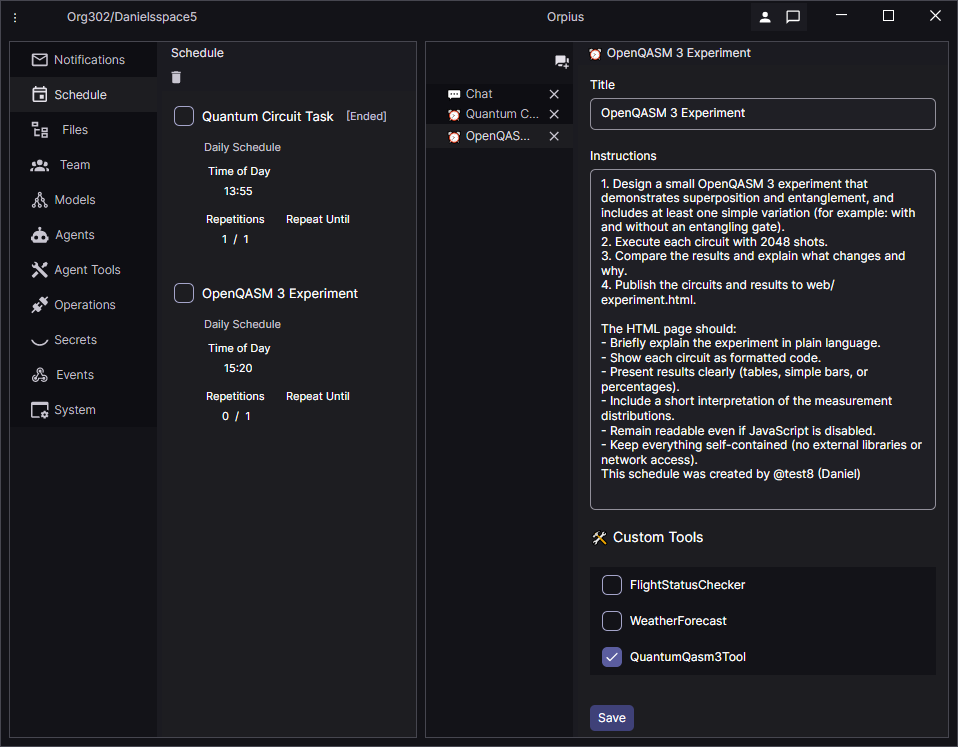
At 15:20 pm today perform the following verbatim: Design a small OpenQASM 3 experiment that demonstrates superposition and entanglement, and includes at least one simple variation (for example: with and without an entangling gate).
Execute each circuit with 2048 shots. Compare the results and explain what changes and why.
Publish the circuits and results to web/experiment.html. You may use basic HTML, inline CSS, and small amounts of JavaScript to make the page more engaging and easier to understand. Keep everything self-contained (no external libraries or network access).
The page should:
- briefly explain the experiment in plain language
- show each circuit as formatted code
- present results clearly (tables, simple bars, or percentages)
- include a short interpretation of the measurement distributions
- remain readable even if JavaScript is disabled
Do not write any code now.
Again, the Orpius interactive agent breaks down the task into sub-tasks. This is then interpreted by one or more agents when the schedule item comes round.
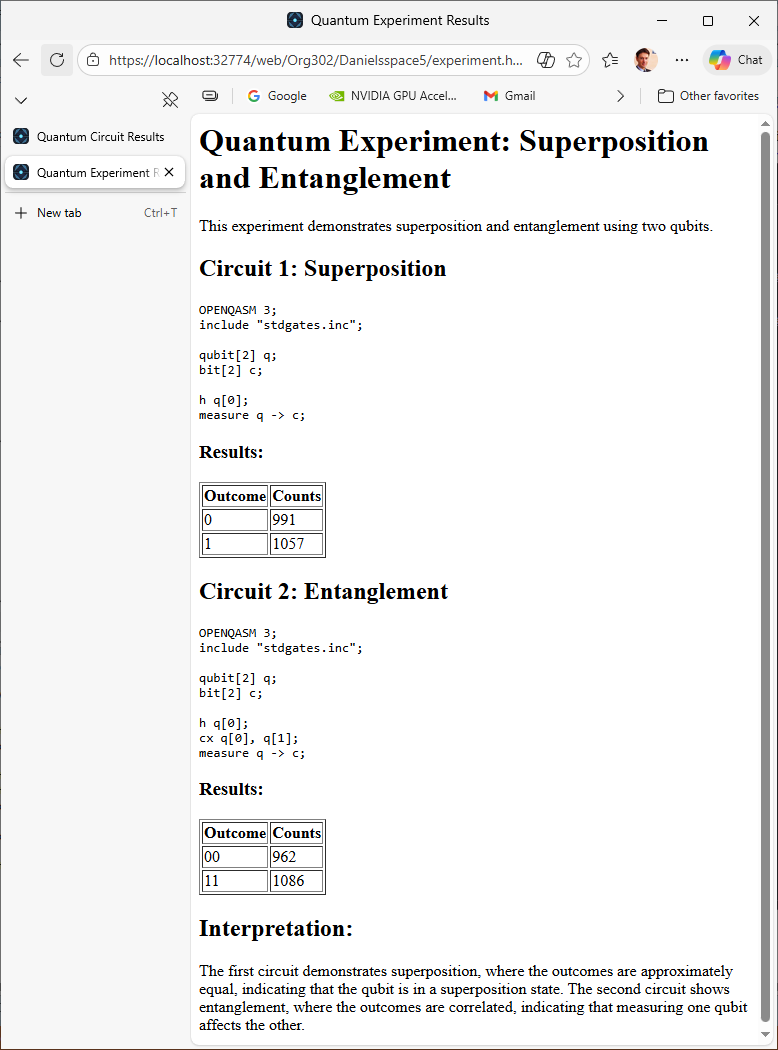
When the schedule came round, the agent was able to write and execute the OpenQasm code, and to create a web page that was immediately viewable.
We’ve looked at using the custom tool, now lets explore how the custom tool was put in place. Let’s begin with the docker sidecar that I needed to put in place to enable to quantum tool.
Creating a Docker Sidecar for Qiskit
To bring in the quantum simulator functionality I chose to hook up a docker container with qiskit in it. I then call out to the sidecar from my ASP.NET Core tools hosting project. Below is the Dockerfile for the sidecar image that contains the quantum simulator.
FROM python:3.12-slim

WORKDIR /app

COPY requirements.txt .
RUN pip install --no-cache-dir -r requirements.txt

COPY app.py .

EXPOSE 5000
CMD ["uvicorn", "app:app", "--host", "0.0.0.0", "--port", "5000"]
The qiskit bits are pulled in via the requirements.txt file:
fastapi==0.115.6
uvicorn[standard]==0.32.1
pydantic==2.10.3

qiskit==1.3.0
qiskit-aer==0.15.1
qiskit-qasm3-import==0.6.0
The sidecar contains a single app.py python file. It’s task is to call into qiskit to execute incoming OpenQasm code in the simulator. The excerpt below shows the run_job function, which compiles the code and runs it using the simulator.
def run_job(qasm_text: str, shots: int, queue: mp.Queue) -> None:
    install_signal_handlers()
    apply_limits()

    try:
        from qiskit import qasm3, transpile
        from qiskit_aer import Aer

        circuit = qasm3.loads(qasm_text)
        validate_circuit(circuit)
        simulator = Aer.get_backend("aer_simulator")

        # Keep optimisation low to avoid expensive transpilation.
        compiled = transpile(circuit, simulator, optimization_level=0)

        result = simulator.run(compiled, shots=shots).result()
        counts = result.get_counts()

        queue.put({"ok": True, "counts": counts})
    except Exception as ex:
        queue.put({"ok": False, "error": build_error_payload(ex)})
Incoming requests to the sidecar are placed in a queue. During execution we ensure that each job does not exceed a timeout. We also surface any errors back to the caller.
@app.post("/execute")
async def execute(request: ExecuteRequest) -> Any:
    if len(request.qasm) > MAX_QASM_CHARS:
        raise HTTPException(status_code=413, detail="QASM program is too large.")

    if request.shots < 1 or request.shots > MAX_SHOTS:
        raise HTTPException(
            status_code=400,
            detail=f"Shots must be between 1 and {MAX_SHOTS}."
        )

    async with semaphore:
        queue = mp.SimpleQueue()
        process = mp.Process(
            target=run_job,
            args=(request.qasm, request.shots, queue),
            daemon=True
        )

        start_time = time.monotonic()
        process.start()

        # Poll without blocking the event loop.
        while process.is_alive():
            elapsed = time.monotonic() - start_time
            if elapsed > TIMEOUT_SECONDS:
                process.terminate()
                process.join(timeout=1.0)

                if process.is_alive():
                    process.kill()
                    process.join()

                exit_code = process.exitcode
                signal_name = get_signal_name_from_exit_code(exit_code)

                raise HTTPException(
                    status_code=408,
                    detail={
                        "type": "Timeout",
                        "message": f"Simulation exceeded time limit ({TIMEOUT_SECONDS}s).",
                        "elapsedSeconds": elapsed,
                        "exitCode": exit_code,
                        "signal": signal_name,
                    }
                )

            await asyncio.sleep(0.05)

        process.join()

        if queue.empty():
            exit_code = process.exitcode
            signal_name = get_signal_name_from_exit_code(exit_code)

            raise HTTPException(
                status_code=500,
                detail={
                    "type": "WorkerCrashed",
                    "message": "Simulator worker exited without output."
                               "This usually indicates a hard kill "
                               "(CPU/memory limit) or a native crash.",
                    "exitCode": exit_code,
                    "signal": signal_name,
                    "elapsedSeconds": time.monotonic() - start_time,
                }
            )

        payload = queue.get()

        if not payload.get("ok", False):
            error = payload.get("error") or {"type": "UnknownError", "message": "Unknown error."}

            status_code = classify_http_status(error)
            raise HTTPException(status_code=status_code, detail=error)

        return {
            "counts": payload["counts"],
            "elapsedSeconds": time.monotonic() - start_time
        }
Managing Multiple Sidecars in a Visual Studio Solution
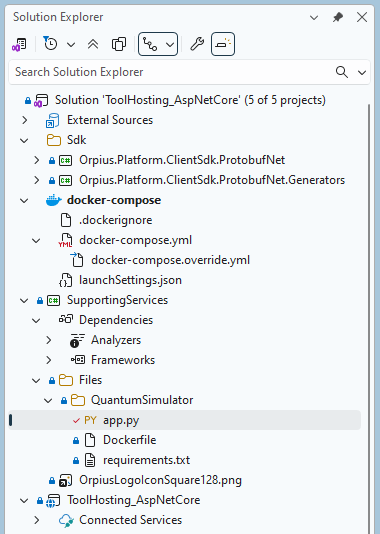
My intention is to build out more custom tools that will probably require sidecars like the Quantum Simulator. To allow easy navigation between files I created an empty SupportingServices project in Visual Studio, into which I then placed the Dockerfile for the Qiskit sidecar and the python file to interact with it.
The csproj file is shown below. I explicitly exclude everything from compilation.
<Project Sdk="Microsoft.NET.Sdk">
  <PropertyGroup>
    <TargetFramework>net8.0</TargetFramework>
    <EnableDefaultItems>false</EnableDefaultItems>
  </PropertyGroup>

  <ItemGroup>
    <None Include="Files\**\*"
          Exclude="**\bin\**;**\obj\**;**\.vs\**" />
  </ItemGroup>
</Project>
Including the Sidecar in Docker Compose
Recall that we have an ASP.NET Core project that hosts our custom tools. To bring in the quantum simulator sidecar, we include it in the docker-compose.yml file, as shown below:
services:
  toolhosting_aspnetcore:
    image: ${DOCKER_REGISTRY-}toolhostingaspnetcore
    build:
      context: ../../..
      dockerfile: Samples/Containerized/ToolHosting_AspNetCore/ToolHosting_AspNetCore/Dockerfile

  quantum-simulator:
    build:
      context: ../SupportingServices/Files/QuantumSimulator
      dockerfile: Dockerfile
    expose:
      - "5000"
    healthcheck:
      test: ["CMD", "python", "-c", "import urllib.request; urllib.request.urlopen('http://localhost:5000/health').read()"]
      interval: 5s
      timeout: 3s
      retries: 20
Since I wish to re-use the supporting sidecars for multiple solutions, the sidecar sits in a directory outside of the main samples directory. Doing this meant that I had to change the context to be higher up in the directory tree. The dockerfile for the ToolHosting_AspNetCore project copies in the SDK projects.
# This stage is used when running from VS in fast mode (Default for Debug configuration)
FROM mcr.microsoft.com/dotnet/aspnet:10.0 AS base
USER $APP_UID
WORKDIR /app
EXPOSE 8080
EXPOSE 8081

# This stage is used to build the service project
FROM mcr.microsoft.com/dotnet/sdk:10.0 AS build
ARG BUILD_CONFIGURATION=Release
WORKDIR /src

COPY ["Samples/Containerized/ToolHosting_AspNetCore/ToolHosting_AspNetCore/ToolHosting_AspNetCore.csproj", "Samples/Containerized/ToolHosting_AspNetCore/ToolHosting_AspNetCore/"]
COPY ["Orpius.Platform.ClientSdk.ProtobufNet/Orpius.Platform.ClientSdk.ProtobufNet.csproj", "Orpius.Platform.ClientSdk.ProtobufNet/"]
COPY ["Orpius.Platform.ClientSdk.ProtobufNet.Generators/Orpius.Platform.ClientSdk.ProtobufNet.Generators.csproj", "Orpius.Platform.ClientSdk.ProtobufNet.Generators/"]

RUN dotnet restore "Samples/Containerized/ToolHosting_AspNetCore/ToolHosting_AspNetCore/ToolHosting_AspNetCore.csproj"
COPY . .

WORKDIR "/src/Samples/Containerized/ToolHosting_AspNetCore/ToolHosting_AspNetCore"
RUN dotnet build "ToolHosting_AspNetCore.csproj" -c $BUILD_CONFIGURATION -o /app/build

# This stage is used to publish the service project to be copied to the final stage
FROM build AS publish
ARG BUILD_CONFIGURATION=Release
WORKDIR "/src/Samples/Containerized/ToolHosting_AspNetCore/ToolHosting_AspNetCore"
RUN dotnet publish "./ToolHosting_AspNetCore.csproj" -c $BUILD_CONFIGURATION -o /app/publish /p:UseAppHost=false

# This stage is used in production or when running from VS in regular mode (Default when not using the Debug configuration)
FROM base AS final
WORKDIR /app
COPY --from=publish /app/publish .
ENTRYPOINT ["dotnet", "ToolHosting_AspNetCore.dll"]
NOTE: When using the Orpius SDK NuGet packages, and not the actual SDK projects like I did here, there is no need to perform the copy operations in the dockerfile.
Building the C# Client to Interact with the Python-based Sidecar
We communicate with the Qiskit sidecar over HTTP on the shared Docker network. The QuantumSimulatorClient class, in the ToolHosting_AspNetCore project, makes the calls.
We have two data transfer objects: an ExecuteRequest class that hold that qasm code; sent to the Qiskit quantum simulator in the sidecar, and the response received back from the sidecar.
The ExecuteResponse.Counts dictionary holds the resulting qubit states, or an error if execution failed.
sealed class ExecuteRequest
{
    public required string Qasm { get; init; }

    public int Shots { get; init; } = 1024;
}

sealed class ExecuteResponse
{
    public Dictionary<string, int>? Counts { get; init; }
}
To call the sidecar the QuantumSimulatorClient has the following ExecuteAsync method:
public async Task<Dictionary<string, int>> ExecuteAsync(
                                               string openQasm3Program,
                                               int shots,
                                               CancellationToken token)
{
    var response = await httpClient.PostAsJsonAsync(
                       "/execute",
                       new ExecuteRequest
                       {
                           Qasm  = openQasm3Program,
                           Shots = shots
                       },
                       cancellationToken: token);

    if (!response.IsSuccessStatusCode)
    {
        var errorText = await response.Content.ReadAsStringAsync(token);
        throw new InvalidOperationException(
            $"Quantum simulator call failed: {(int)response.StatusCode} {errorText}");
    }

    var payload = await response.Content.ReadFromJsonAsync<ExecuteResponse>(
                           cancellationToken: token);

    if (payload?.Counts is null)
    {
        throw new InvalidOperationException(
            "Quantum simulator response was empty or invalid.");
    }

    return payload.Counts;
}
Creating an Orpius Tool that uses the Client
With the quantum simulator sidecar in place, the hard-lifting is done. The easy part is now exposing it via an Orpius custom tool. For this we create a class and decorate it with the [Tool], [ToolMethod], and [ToolProperty] attributes. A Roslyn IIncrementalGenerator takes care of the rest.
NOTE: The Orpius SDK takes care of generating the types needed for registration via a Roslyn
IIncrementalGeneratornamedToolRegistryItemGeneratorin the Orpius.Platform.ClientSdk.ProtobufNet.Generators project.
The QuantumQasm3Tool leverages the QuantumSimulatorClient, which is injected via the constructor, as shown:
[Tool]
public class QuantumQasm3Tool
{
    readonly QuantumSimulatorClient quantumSimulatorClient;

    public QuantumQasm3Tool(QuantumSimulatorClient quantumSimulatorClient)
    {
        this.quantumSimulatorClient = quantumSimulatorClient
            ?? throw new ArgumentNullException(nameof(quantumSimulatorClient));
    }
    ...
TIP: If you wish, you could place the client code directly in the
Tool, but I chose to build this out in stages: client first, get that working, then expose it via a Tool class.
The tool has a single method ExecuteQasm3Program, shown below. ExecuteQasm3Program is the method that is ultimately called by your Orpius agent.
The API surface of this method and parameters is automatically provided to the Orpius server; it is stored, an LLM OpenAPI schema generated for it, and it is parsed into the context of the agent, along with the Descriptions to allow the agent to understand how to use it. Neat eh? You don’t need to do anything apart from decorate your class with a few attributes and follow to signature conventions: two parameters, last parameter ICombinedContext object. If you’ve ever used gRPC before, the signature format will look familiar.
[ToolMethod(Description
    = "Executes an OpenQASM 3 program on the quantum simulator"
      + " and returns measurement counts. "
      + "'Shots' controls the number of samples taken.")]
public async Task<ExecuteQasm3ProgramResponse> ExecuteQasm3Program(
    ExecuteQasm3ProgramRequest request,
    ICombinedContext context)
{
    if (request is null)
    {
        throw new ArgumentNullException(nameof(request));
    }

    if (string.IsNullOrWhiteSpace(request.OpenQasm3Program))
    {
        throw new RpcException(new Status(
            StatusCode.InvalidArgument,
            "OpenQasm3Program is required and cannot be empty."));
    }

    if (request.Shots <= 0)
    {
        throw new RpcException(new Status(
            StatusCode.InvalidArgument,
            "Shots must be greater than 0."));
    }

    CancellationToken token = GetCancellationToken(context);

    Dictionary<string, int> counts
        = await quantumSimulatorClient.ExecuteAsync(
                                          request.OpenQasm3Program, request.Shots, token)
                                      .ConfigureAwait(false);

    return new ExecuteQasm3ProgramResponse
    {
        Counts = counts
    };
}
The API surface for the parameter and return type are also sent to the server. Contained types are also included recursively, meaning that you can have arbitrarily complex data transfer objects.
Any business logic you’d like to have an agent be able to call into can be rolled into a tool like this. There’s very little else that needs to be done apart from some config in the Program class, which will get to at the end of the article.
public class ExecuteQasm3ProgramRequest
{
    [ToolProperty(
        Required = true,
        Description
            = """
              OpenQASM 3 program text to execute.
                (content trimmed for brevity)
              """)]
    public required string OpenQasm3Program { get; set; }

    [ToolProperty(
        Description = "Number of shots (samples) to run. Defaults to 1024.")]
    public int Shots { get; set; } = 1024;
}

public class ExecuteQasm3ProgramResponse
{
    [ToolProperty(
        Description = "Measurement counts keyed by bitstring"
                      + " outcome (for example, \"00\", \"01\", \"10\", \"11\").")]
    public Dictionary<string, int>? Counts { get; init; }
}
Preparing Orpius for a Custom Tool
Orpius has various internal tools, such as the isolated code compilation and execution, and many others, which allows Orpius agents to achieve a lot out-of-the-box, but to allow them to connect to well-defined external systems with authorization built-in you use ‘custom tools’. A custom tool is a GRPC endpoint that maps requests to a class in your project. The way it works is that would have your application notify Orpius via a GRPC call that your application provides one or more tools that agents in Orpius should be able to call.
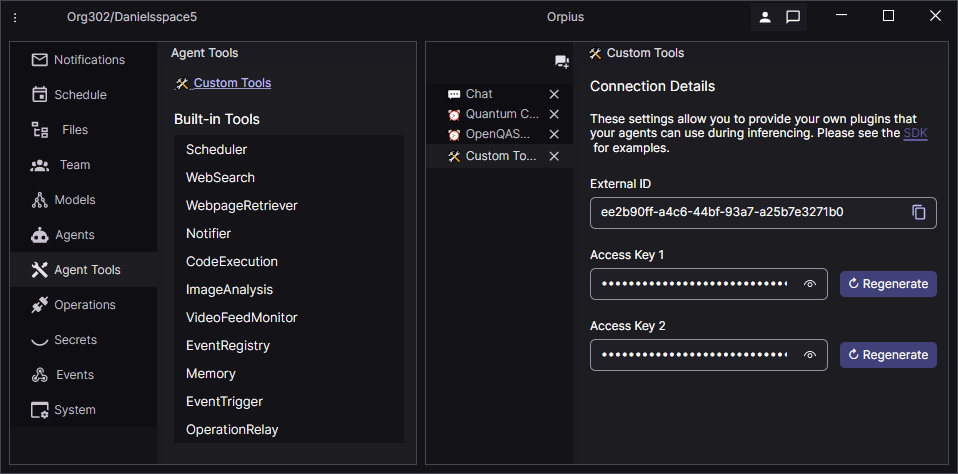
On the Custom Tools view in the Orpius Console, we copy the External ID and Access Key 1. We need this information to register our ToolHosting_AspNetCore project as a tools provider.
NOTE: You can create a secure private channel to Orpius during development and production. See Creating a Secure Channel to Orpius
In the next section you’ll see how you can plug the External ID and Access Key to register the tool when your application starts.
Delving Further into the Setup
All of the connecting with Orpius and registering tools is done automatically via some setup in the Program.cs file in the ASP.NET Core ToolHosting_AspNetCore project. The ToolHosting_AspNetCore project was generated with the Create New Project dialog, to which I added references to the Orpius.Platform.ClientSdk.ProtobufNet project and the Orpius.Platform.ClientSdk.ProtobufNet.Generators projects. Rather that do that, you may prefer to add NuGet package references to the Orpius SDK packages instead:
In Program.Main we use ASP.NET Core’s DI infrastructure to inject a pooled HttpClient instance to the QuantumSimulatorClient.
services.AddHttpClient<QuantumSimulatorClient>(
    client =>
    {
        string? baseUrl = builder.Configuration["QuantumSimulator:BaseUrl"];

        if (string.IsNullOrWhiteSpace(baseUrl))
        {
            throw new InvalidOperationException(
                "QuantumSimulator:BaseUrl is not configured.");
        }

        client.BaseAddress = new Uri(baseUrl, UriKind.Absolute);
    });
The HttpClient is passed to the QuantumSimulatorClient during construction:
readonly HttpClient httpClient;

public QuantumSimulatorClient(HttpClient httpClient)
{
    this.httpClient = httpClient;
}
The Program.Main creates proxy object that provides the tool registration infrastructure what it needs to register with the Orpius server. It’s added to the ASP.NET Core IServiceCollection. You can add multiple IToolRegistrationParameters implementations, enabling your tools project to provide tools for multiple Orpius Spaces.
The getLocalUrl value needs to point the location of the tools server, and it needs to be resolvable by the Orpius server. It tells the Orpius server where to call for the tools you publish. Ordinarily this will be a production URL or a private channel URL
We parse the External ID and Access Key, which we obtained in the previous step, to the parameters object.
FuncRegistrationParameters toolRegistrationParameters
    = new(getLocalUrl: () => new Uri("https://host.docker.internal:7190/"),
        getExternalId: () => Guid.Parse("ee2b90ff-a4c6-44bf-93a7-a25b7e3271b0"),
        getApiKey: () => Guid.Parse("72e1b1f1-414b-46d9-bcb1-1a736d7e6027"));

services.AddSingleton<IToolRegistrationParameters>(toolRegistrationParameters);
What triggers the code generation?
At the top of the Program.cs file we have an assembly-level GenerateToolRegistryItemAttribute:
[assembly: GenerateToolRegistryItem("ToolHosting_AspNetCore.ToolForOrpius.AllTools")]
The ToolRegistryItemGenerator in the Orpius.Platform.ClientSdk.ProtobufNet.Generators project looks for this attribute, and when it finds it, it generates the code describing the API service of the tools in the project.
We pull in the generated AllTools by registering it with the IServiceCollection:
services.AddSingleton<AllTools>();
We also register our quantum tool in the same manner. Note that both classes and interfaces types are supported, allowing you to switch our the implementation for testing and so forth.
services.AddSingleton<QuantumQasm3Tool>();
When the AllTools class is resolved from the container, it automatically registers itself with the IToolsRegistry. The ToolRegistry contains the mappings and forwards incoming tool requests to their respective custom tools.
_ = app.Services.GetRequiredService<AllTools>();
Finally, the Orpius SDK contains a gRPC service: IToolProviderService that allows Orpius to call your server to use tools.
We wire it up like so:
app.MapGrpcService<IToolProviderService>();
There are various headers you can use for authentication. You can use the IToolRegistrationParameters.Headers property, or the RegisterAsProviderRequest.Headers property directly, to provide headers back to your server during an IToolProviderService.UseTool call. The headers are encrypted and stored securely on the Orpius server. This gives you the peace of mind that only your Orpius agent can use your custom tool.
TIP: You can find other examples in the Orpius SDK samples that demonstrate how to set and read headers.
Conclusion
In this article we looked at how we can schedule an AI agent to periodically write and execute OpenQASM code and update a webpage based on the results. We then delved into the implementation and saw how to create a Docker sidecar for Qiskit, call that sidecar from our host tools ASP.NET Core application, and create a custom Tool for Orpius, which can be called by your Orpius AI agent. Finally, we looked at how authentication headers can be used to secure tool calls from Orpius to your server.
I hope you enjoyed this article, and I welcome your feedback and questions.