
Table of Contents
- Introduction
- Reserving an App Name
- Associating a UWP App with the Microsoft Store
- Marrying a UWP App with an Azure Function Application
- Declaring a Custom Protocol
- Using the Azure Mobile Services Client
- Creating a MobileClientService
- Detecting an Expired Token
- Receiving Notification that Authentication has Completed
- Calling Azure Functions with a MobileServiceClient
- Retrieving Security Credentials in the Cloud
- Conclusion
Introduction
I’ve been working on an Azure application that makes use of Azure Functions. I built out the front-end using UWP because the tooling is great and it allows me to create a minimal viable product in no time.
One aspect of this project includes authentication with a number of Azure Function applications. If you’re familiar with Azure Mobile Services you’ll know that you can configure authentication for an app, within Azure. You can require a user to log into his or her Microsoft, Facebook, Google, or Azure Active Directory account, and the user’s identity will flow through to Azure via the mobile service client. Since Azure Functions are built on the same infrastructure as Mobile Services, the same authentication bits are in place for Azure Functions.
There are, however, a few steps that need to be performed to get your UWP app authenticating via your Azure Function application. I found no single location showing all of the steps, and had to fly by the seat of my pants for some of it. I hope this blog post serves to decrease the time you’ll need to set everything up.
Here are the steps. We’ll dig deeper into each over the course of this post.
- Reserve a name for your UWP app.
- Associate your UWP app with the store registration.
- Find out your app secret and ID.
- Declare a custom protocol for your UWP app.
- Add authentication to your Azure Function application.
- Past your UWP’s ID and app secret into the relevant configuration section of your Azure Function application.
- Add an allowed redirect to your Azure Function application.
- Add an redirect URL for your UWP app via the Application Registration Portal.
Reserving an App Name
If you haven’t already done so, head over to the Windows Development Dashboard. There’s a button on the overview page that allows you to ‘Create a new app’. See Figure 1.
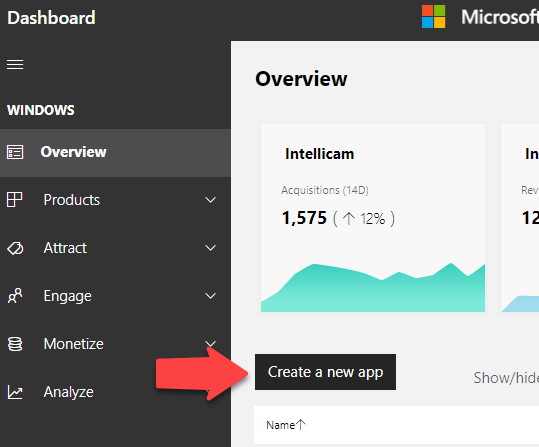
Figure 1. Create a new app in the Windows Developer Dashboard.
This is really just a step that allows you to reserve a name for your app and to get an ID and secret code to associate your UWP app with an Azure Function application.
Associating a UWP App with the Microsoft Store
Once you reserve the app’s name you can fire up Visual Studio 2017, create a new UWP app, and then associate the app with the one in the store. See Figure 2.
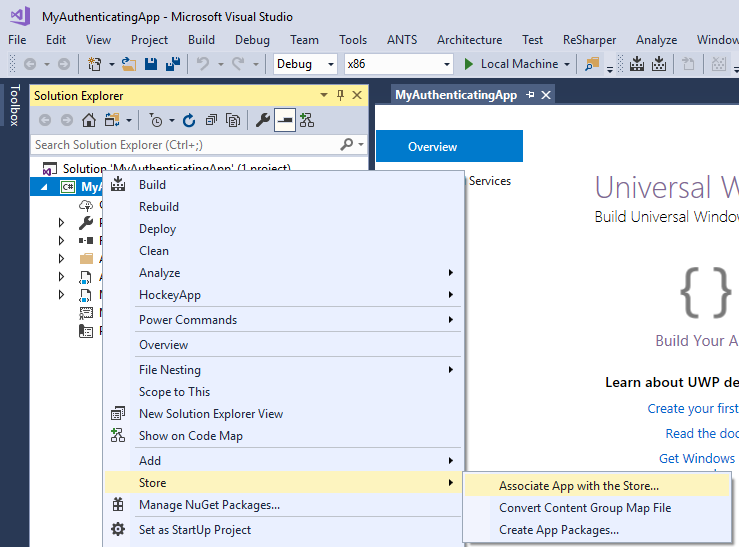
Figure 2. Associating an app with the store.
Marrying a UWP App with an Azure Function Application
To set up authentication in Azure you need to find out the two pieces of information about the UWP app: the application’s ID and its Secret code. You can find this information by expanding the App Management node for your app in the dashboard. See figure 3.
Surprisingly the link you want is buried down under WNS/MPNS. On the Push notifications page, click the link to the Live Services site. That opens a page on which the ID and the secret is displayed. Copy those two pieces of information to somewhere like notepad. You’ll need them in a minute.
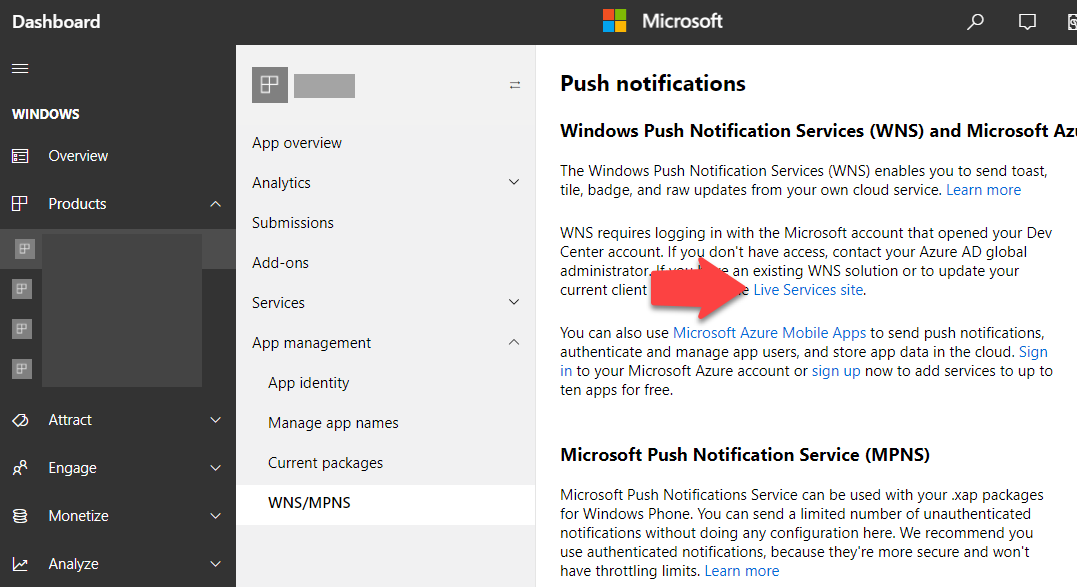
Figure 3. Select link to Live Services site.
There’s one other thing you need to do in the Application Registration Portal (the page with your application ID and application secrets), and that is to enter a Redirect URL in the Web section. The URL looks like this: https://[YourFunctionApp].azurewebsites.net/.auth/login/microsoftaccount/callback
Replace [YourFunctionApp] with the name of your function app. You can find this value in the Azure portal. If you haven’t already created an Azure Function application, via the Azure portal, now would be a good time. Just like the UWP app, you can create and deploy an Azure Function application to Azure after you’ve set it up via the Azure portal. You do that by right clicking on the Azure Function application node in Visual Studio, and select Deploy. You can then select the known Function application to deploy to.
Head over to the Azure portal and locate your Function application that you wish to associate with your UWP app. Notice the Authentication link in the Configured features section of the page. See Figure 4. Clicking that link opens the Authentication blade for your Function application.
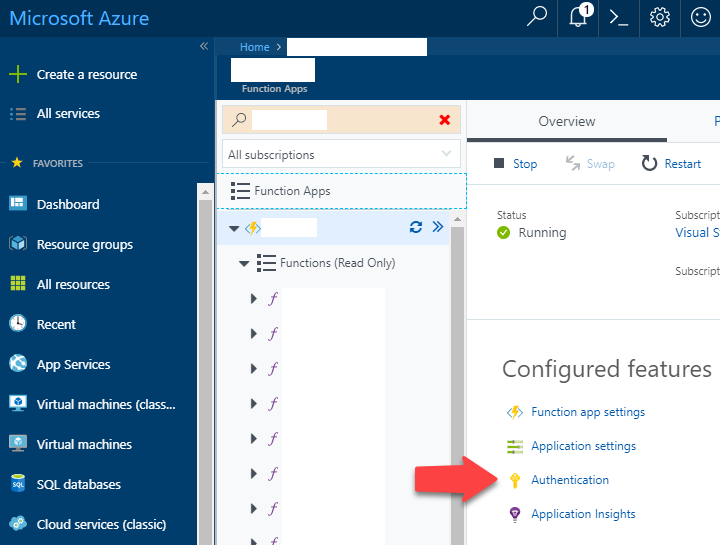
Figure 4. Azure Portal, authentication options for Function Application.
The authentication blade allows you to configure authentication using a number of first and third-party services. In this example we look only at using Microsoft, so that users can authenticate using a Microsoft account. See Figure 5.
The first thing to enable is App Services Authentication. I chose to have the user authenticate with his or her Microsoft account when the user is not authenticated. This applies to web scenarios and not so much mobile apps. I locked that in anyway.
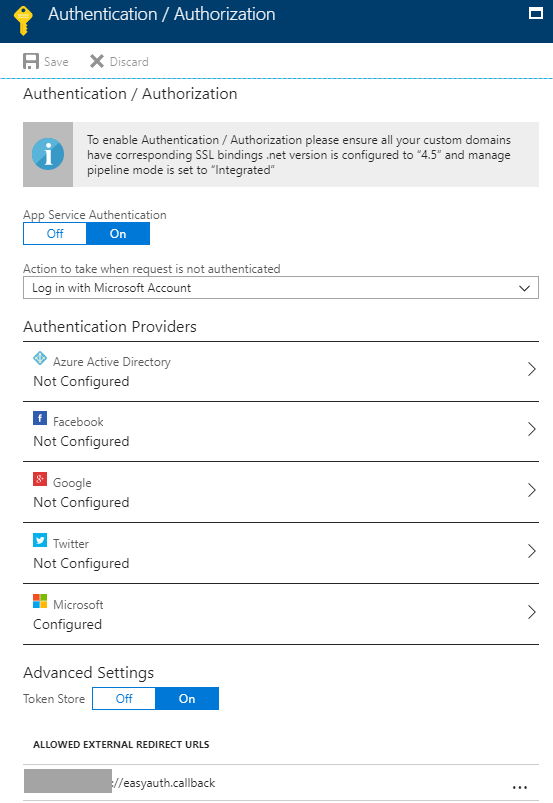
Figure 5. The authentication blade for an Azure Functions application.
Before we configure the Microsoft settings on the authentication blade, you need to enter an ‘Allowed External Redirect URL’. This is one of the steps that if you forget it, you’ll be pulling your hair out.
The value for this URL must be unique, and must use a custom protocol scheme of your invention. Rather than https:// or http:// it must be something that you can tell your UWP app to listen out for and to handle. So, make it unique and copy and paste it somewhere. You’ll be entering that into your UWP’s properties in a moment. Please note you only need the protocol scheme and not the whole URL. the ://easyauth.callback segment is appended to the protocol by the MobileServiceClient object that you see later in this article.
Click on the Microsoft row on the authentication blade. You’re presented with a place to enter the ID of the UWP app and its secret code. The ID should resemble: 0000000012345678 and the secret should look something like: aBCde15Fg3hijKLra8SIuSGwjt5Ba+J+
Select the scope that best suits the informational needs of your app, while maximizing privacy of your users.
Click the Okay button at the bottom of the blade to return to the authentication blade.
Click Save at the top of the authentication blade to lock in your authentication settings.
Azure now knows about your UWP app and will reject unauthenticated calls to your Azure Function application. In the following section we look at setting up the Azure Mobile services client in your UWP app and configuring a custom protocol declaration to respond to redirects from web based authentication.
Declaring a Custom Protocol
Recall the ‘Allowed External Redirect URL’ that we defined in the Authentication blade of our Azure Function app? You need to declare the scheme in the Package.appmanifest file of your UWP app. Double click on the Package.appmanifest file and select the Declarations tab. See Figure 6.
The value of the Name field is the protocol. E.g. mysuperduperapp
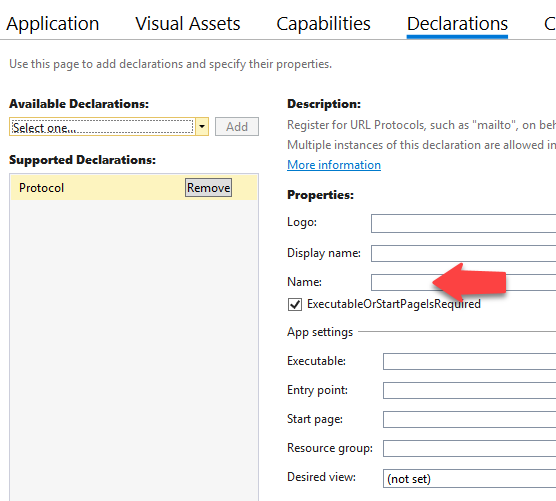
Figure 6. Adding a protocol declaration to the UWP app.
Using the Azure Mobile Services Client
The Azure Mobile Services Client allows your UWP app to call your Azure Function application, while seamlessly providing authentication and transmission of security tokens to your cloud service.
To add the Azure Mobile Services Client to your UWP project, install the NuGet package Microsoft.Azure.Mobile.Client.
The MobileServiceClient class is the main class for interacting with your Azure Functions.
You create a new instance of the MobileServiceClient in one of two ways. In production, you create a new instance of the MobileServiceClient using the URL of your Azure Function application. For example, https://yoursuperduperfunctions.azurewebsites.net If you are doing local development and you want to enable authentication while debugging, you create the MobileServiceClient using the local URL, e.g., http://localhost:7071. For this scenario, the MobileServiceClient API offers a convenient AlternateLoginHost property, which you populate with the Azure Function application. That way the UWP app uses the local URL for debugging your functions and the ‘real’ URL for authentication. See Listing 1.
Listing 1. Instantiating a MobileServiceClient
if (!string.IsNullOrWhiteSpace(localAppUrl))
{
	mobileServiceClient = new MobileServiceClient(localAppUrl);
	mobileServiceClient.AlternateLoginHost = new Uri(serviceClientAppUrl);
}
else
{
	mobileServiceClient = new MobileServiceClient(serviceClientAppUrl);
}
Creating a MobileClientService
To use the MobileServiceClient with a service that requires authentication, you must have the client perform authentication first. The MobileClientService class in Listing 2, demonstrates how to authenticate using the MobileServiceClient's LoginAsync method. The LoginAsync method accepts a known provider name: “Google”, “Facebook”, “Microsoft” and so forth; and the custom protocol scheme. The MobileServiceClient constructs the authentication URLs, embedding the completion redirect to a URL comprising the custom protocol.
Rather than perform an expensive login each time you wish to use the MobileServiceClient, the PasswordVault is used to cache the credentials.
The MobileServiceClient.LoginAsync method is awaitable. When the method is called, a browser opens the authentication page for whatever service your app is using. In this example, the Microsoft authentication provider is used. When the user completes authentication, the app is activated using the custom protocol.
Listing 2. MobileClientService Class
class MobileClientService : IMessageSubscriber<ProtocolActivationMessage>
{
	readonly string serviceClientAppUrl;
	readonly string localAppUrl;
	readonly string protocolActivationScheme;
	MobileServiceUser user;
	MobileServiceClient mobileServiceClient;
	bool authenticated;

	public MobileClientService(string protocolActivationScheme,
		string serviceClientAppUrl,
		string localAppUrl = null)
	{
		this.protocolActivationScheme = AssertArg.IsNotNullOrWhiteSpace(
				protocolActivationScheme, nameof(protocolActivationScheme));
		this.serviceClientAppUrl = AssertArg.IsNotNull(serviceClientAppUrl, nameof(serviceClientAppUrl));
		this.localAppUrl = localAppUrl;

		var messenger = Dependency.Resolve<IMessenger>();
		messenger.Subscribe(this);
	}

	public string Token => user?.MobileServiceAuthenticationToken;
	public string UserId => user?.UserId;

	public MobileServiceClient ServiceClient
	{
		get
		{
			if (mobileServiceClient == null)
			{
				if (!string.IsNullOrWhiteSpace(localAppUrl))
				{
					mobileServiceClient = new MobileServiceClient(localAppUrl);
					mobileServiceClient.AlternateLoginHost = new Uri(serviceClientAppUrl);
				}
				else
				{
					mobileServiceClient = new MobileServiceClient(serviceClientAppUrl);
				}
			}

			return mobileServiceClient;
		}
	}

	public async Task<bool> EnsureAuthenticatedAsync()
	{
		if (authenticated)
		{
			return true;
		}

		bool success = false;

		var provider = MobileServiceAuthenticationProvider.MicrosoftAccount;

		// Use the PasswordVault to securely store and access credentials.
		PasswordVault vault = new PasswordVault();
		PasswordCredential credential = null;

		try
		{
			// Try to get an existing credential from the vault.
			credential = vault.FindAllByResource(provider.ToString()).FirstOrDefault();
		}
		catch (Exception)
		{
			// When there is no matching resource an error occurs, which we ignore.
		}

		bool expired = false;

		if (credential != null)
		{
			// Create a user from the stored credentials.
			user = new MobileServiceUser(credential.UserName);
			credential.RetrievePassword();
			user.MobileServiceAuthenticationToken = credential.Password;

			// Set the user from the stored credentials.
			ServiceClient.CurrentUser = user;

			expired = ServiceClient.IsTokenExpired();

			success = true;

			var log = Dependency.Resolve<ILog>();
			log.Info(string.Format("Cached credentials for user - {0}", user.UserId));
		}

		if (credential == null || expired)
		{
			try
			{
				// Login with the identity provider.
				user = await ServiceClient.LoginAsync(provider, protocolActivationScheme);
				// Create and store the user credentials.
				credential = new PasswordCredential(provider.ToString(),
					user.UserId, user.MobileServiceAuthenticationToken);
				vault.Add(credential);

				success = true;
			}
			catch (MobileServiceInvalidOperationException ex)
			{
				var log = Dependency.Resolve<ILog>();
				log.Warn("Unable to log in.", ex);
			}
		}
		else
		{
			authenticated = true;
		}

		return success;
	}

	Task IMessageSubscriber<ProtocolActivationMessage>.ReceiveMessageAsync(
		ProtocolActivationMessage message)
	{
		ServiceClient.ResumeWithURL(message.Uri);

		return Task.CompletedTask;
	}
}
Detecting an Expired Token
The token representing the cached credentials of the user can expire, so you need to determine whether a cached credential is still valid. See Listing 3. The code for testing a token’s validity was taken verbatim from Glenn Gailey post over at http://aka.ms/jww5vp.
Listing 3. TokenExtension Class
public static class TokenExtension
{
	/// <summary>
	/// Returns true when the authentication token for the current user is expired.
	/// </summary>
	/// <param name="client">The current MobileServiceClient instance</param>
	/// <returns>true when the token is expired; otherwise false.</returns>
	public static bool IsTokenExpired(this IMobileServiceClient client)
	{
		// Check for a signed-in user.
		if (client.CurrentUser == null ||
			String.IsNullOrEmpty(client.CurrentUser.MobileServiceAuthenticationToken))
		{
			// Raise an exception if there is no token.
			throw new InvalidOperationException(
				"The client isn't signed-in or the token value isn't set.");
		}

		// Get just the JWT part of the token.
		var jwt = client.CurrentUser
			.MobileServiceAuthenticationToken
			.Split(new Char[] { '.' })[1];

		// Undo the URL encoding.
		jwt = jwt.Replace('-', '+');
		jwt = jwt.Replace('_', '/');
		switch (jwt.Length % 4)
		{
			case 0: break;
			case 2: jwt += "=="; break;
			case 3: jwt += "="; break;
			default: throw new System.Exception(
				"The base64url string is not valid.");
		}

		// Decode the bytes from base64 and write to a JSON string.
		var bytes = Convert.FromBase64String(jwt);
		string jsonString = UTF8Encoding.UTF8.GetString(bytes, 0, bytes.Length);

		// Parse as JSON object and get the exp field value,
		// which is the expiration date as a JavaScript primative date.
		JObject jsonObj = JObject.Parse(jsonString);
		var exp = Convert.ToDouble(jsonObj["exp"].ToString());

		// Calculate the expiration by adding the exp value (in seconds) to the
		// base date of 1/1/1970.
		DateTime minTime = new DateTime(1970, 1, 1, 0, 0, 0, 0, DateTimeKind.Utc);
		var expire = minTime.AddSeconds(exp);

		// If the expiration date is less than now, the token is expired and we return true.
		return expire < DateTime.UtcNow ? true : false;
	}
}
Receiving Notification that Authentication has Completed
In the example, I used Codon’s IMessageSubscriber interface to receive notification when the app is activated using a custom protocol. The app’s OnActivated method is called when the app is activated via a custom protocol. The Windows operating system knows about the protocol declarations of the apps installed, and automatically redirects requests using the custom protocol to their respective app/s. See Listing 4.
Listing 4. App.OnActivated Method
protected override void OnActivated(IActivatedEventArgs e)
{
	Frame rootFrame = Window.Current.Content as Frame;

	// Do not repeat app initialization when the Window already has content
	if (rootFrame == null)
	{
		// Create a Frame to act as the navigation context
		rootFrame = new Frame();

		rootFrame.NavigationFailed += OnNavigationFailed;

		if (e.PreviousExecutionState == ApplicationExecutionState.Terminated)
		{
			//TODO: Load state from previously suspended application
		}

		// Place the frame in the current Window
		Window.Current.Content = rootFrame;
	}

	// Ensure the current window is active
	Window.Current.Activate();

	// Handle protocol activation here
	activationProcessor.ProcessActivation(e);
}
The Kind property of the IActivatedEventArgs indicates if the app was activated via a custom protocol. Codon’s IMessenger signals to the MobileClientService that a protocol activation occurred. See Listing 5
Listing 5. AppActivationProcessor.ProcessActivation Method
public void ProcessActivation(IActivatedEventArgs e)
{
	var messenger = Dependency.Resolve<IMessenger>();

	if (e.Kind == ActivationKind.Protocol)
	{
		var protocolArgs = (ProtocolActivatedEventArgs)e;
		messenger.PublishAsync(
		    new ProtocolActivationMessage(this, protocolArgs?.Uri));
	}
	else
	{
		messenger.PublishAsync(
		    new ApplicationLifeCycleMessage(
		            this, ApplicationLifeCycleState.Activated));
	}
}
Calling Azure Functions with a MobileServiceClient
Before using the MobileServiceClient, you need to ensure that it has authenticated. Listing 6 demonstrates the retrieval of the MobileClientService from Codon’s IoC container and using its EnsureAuthenticated method to ensure that the user is authenticated.
Listing 6. GetMobileServiceClientAsync Method
async Task<MobileServiceClient> GetMobileServiceClientAsync()
{
	var service = Dependency.Resolve<MobileClientService>();

	bool authenticated = await service.EnsureAuthenticatedAsync();

	if (!authenticated)
	{
		throw new Exception("Unable to authenticate.");
	}

	return service.ServiceClient;
}
You make use of the GetMobileServiceClientAsync method whenever you wish to call an Azure Function that requires authentication. See Listing 7. The RetrieveMyObjectsAsync method uses the MobileServiceClient's InvokeApiAsync method to call the Azure Function named MyObject. It deserializes the result producing a list of MyObject instances.
Listing 7. Using the MobileServiceClient to Call a Azure Function
public async Task<ObservableCollection<MyObject>> RetrieveMyObjectsAsync()
{
	MobileServiceClient client = await GetMobileServiceClientAsync();

	HttpResponseMessage response = await client.InvokeApiAsync(
		"MyObject", new StringContent(string.Empty),
		HttpMethod.Get, headerDictionary, null);

	response.EnsureSuccessStatusCode();

	string json = await response.Content.ReadAsStringAsync();
	var items = JsonConvert.DeserializeObject<List<MyObject>>(json);
	myObjects.Clear();
	myObjects.AddRange(items);

	return myObjects;
}
Retrieving Security Credentials in the Cloud
Once a user has authenticated successfully, the MobileServiceClient automatically passes the security credentials to Azure so that you can determine the identity of the caller. You do this by examining the Current property of the ClaimsPrincipal object, as shown in the following example:
var principal = System.Security.Claims.ClaimsPrincipal.Current;
var result = new UserInfo
{
	Authenticated = principal.Identity.IsAuthenticated,
	Name = principal.FindFirst(ClaimTypes.NameIdentifier)?.Value,
	EmailAddress = principal.FindFirst(ClaimTypes.Email)?.Value
};
Please note that at the time of writing, it was not possible to retrieve the principal when running an Azure Function on your local machine. It is possible to achieve that with Azure Mobile Services but not yet Azure Functions. Until that capability is put in place, you can, as I did, resort to parsing test IDs and so forth via HTTP header values.
Conclusion
So, I think that about covers it. The thing to keep in mind is that if you forget to configure any of the following items, your MobileServiceClient won’t get past the LoginAsync method:
- Associate your app with the Microsoft Store
- Copy the App ID and Secret to your Azure Function’s authentication blade.
- Enter the Redirect URL in the Web section of your UWP app’s Application Registration Portal.
- Include the custom protocol URL in the ‘Allowed External Redirect calls’ in the Azure Function’s authentication blade.
- Declare the custom protocol in your UWP apps Package.appmanifest file.
- Respond to protocol activation in your UWP app by calling MobileServiceClient.ResumeWithURL.
With all these in place, you’ll be able to reliably determine who’s using your app, and adjust its behavior accordingly.