<?xml version="1.0" encoding="utf-8"?><feed xmlns="http://www.w3.org/2005/Atom" ><generator uri="https://jekyllrb.com/" version="3.10.0">Jekyll</generator><link href="http://danielvaughan.org/feed.xml" rel="self" type="application/atom+xml" /><link href="http://danielvaughan.org/" rel="alternate" type="text/html" /><updated>2026-04-11T15:56:05+00:00</updated><id>http://danielvaughan.org/feed.xml</id><title type="html">Daniel’s Blog</title><entry><title type="html">Content Grabber: a small Visual Studio extension</title><link href="http://danielvaughan.org/posts/visualstudio/2026/04/11/content-grabber-visual-studio-extension/" rel="alternate" type="text/html" title="Content Grabber: a small Visual Studio extension" /><published>2026-04-11T00:00:00+00:00</published><updated>2026-04-11T00:00:00+00:00</updated><id>http://danielvaughan.org/posts/visualstudio/2026/04/11/content-grabber-visual-studio-extension</id><content type="html" xml:base="http://danielvaughan.org/posts/visualstudio/2026/04/11/content-grabber-visual-studio-extension/"><![CDATA[<p>I found myself repeatedly copying code out of Visual Studio to share it elsewhere.</p>

<p>Usually this meant:</p>
<ul>
  <li>copying multiple files</li>
  <li>adding file names manually</li>
  <li>wrapping everything in markdown code blocks</li>
</ul>

<p>It’s a small thing, but it adds up.</p>

<p>So I made a simple extension that does it in one go.</p>

<p>Select one or more files in Solution Explorer, right-click, and copy them as Markdown with code fences and file paths.</p>

<p>That’s it.</p>

<p><img src="/assets/images/2026_04_11/VSScreenshot.png" alt="Visual Studio screenshot of Content Grabber menu item" /></p>

<p>You can find it here:
<a href="https://marketplace.visualstudio.com/items?itemName=DanielVaughan.ContentGrabber">Content Grabber on the Visual Studio Marketplace</a></p>]]></content><author><name></name></author><category term="VisualStudio" /><summary type="html"><![CDATA[I found myself repeatedly copying code out of Visual Studio to share it elsewhere. Usually this meant: copying multiple files adding file names manually wrapping everything in markdown code blocks It’s a small thing, but it adds up. So I made a simple extension that does it in one go. Select one or more files in Solution Explorer, right-click, and copy them as Markdown with code fences and file paths. That’s it. You can find it here: Content Grabber on the Visual Studio Marketplace]]></summary></entry><entry><title type="html">How to Build an Automatic AI Slop Generator</title><link href="http://danielvaughan.org/posts/orpius/2026/01/28/How-to-Build-an-Automatic-AI-Slop-Generator/" rel="alternate" type="text/html" title="How to Build an Automatic AI Slop Generator" /><published>2026-01-28T00:00:00+00:00</published><updated>2026-01-28T00:00:00+00:00</updated><id>http://danielvaughan.org/posts/orpius/2026/01/28/How-to-Build-an-Automatic-AI-Slop-Generator</id><content type="html" xml:base="http://danielvaughan.org/posts/orpius/2026/01/28/How-to-Build-an-Automatic-AI-Slop-Generator/"><![CDATA[<p>Use AI to publish regular AI slop. On a schedule. Reliably. Like a factory.</p>

<p><img src="/assets/images/2026-01-28/header.png" alt="AI Slop Generator" /></p>

<h2 id="introduction">Introduction</h2>

<p>According to <a href="https://graphite.io/five-percent/more-articles-are-now-created-by-ai-than-humans">this</a>, more articles are now written by generative AI than by humans. Getting your message out there is sadly no longer about insight, originality, or effort. It’s about volume of output, and lots of it.</p>

<p>Articles are still produced, but they no longer appear to be meant for reading. They accumulate, existing only to be referenced.</p>

<p>Interesting, ground-breaking, nuanced articles, 100% human-written articles like <a href="https://danielvaughan.org/posts/quantum/2026/01/15/Building-An-Agentic-Quantum-Laboratory-With-Orpius/">this</a> may still be produced, briefly admired by their author, and then politely ignored forever.</p>

<p>This over abundance of AI generated content has been dubbed <em>AI slop</em>.</p>

<p>Slop seems to drown out human produced content and this may not be entirely attributable to its volume. Slop produced by generative AI may be prefered by bots and content ranking systems. After all, if an LLM produces the content, it is likely to prefer the content produced by a similar model. Such a system becomes self-confirming and in a way, arrogant. It conflates familiarity (the things that it might output) with quality.</p>

<p>So, when an LLM tells you what makes for a good post or article, it’s right! But not for the reasons you’d think and not for the reasons it will tell you.</p>

<p>It is unclear whether the maintainers of bots and content ranking systems do, or will, try to favour posts that are less likely to be AI generated.</p>

<p>Yet, even if they do, an endless game of catch-up has begun: SEO versus detection, and detection versus masking of AI content. Slop may be made to look authentic through feigned human artefacts like deliberate typos and unorthodox document structures.</p>

<p>If you’re trying to get the word out about your idea, product, or service, and trying to compete solely as a human, the economics are no longer on your side.</p>

<p>Clearly, you need a slop generator.</p>

<p>In this mostly non-AI-generated article you’ll learn how to schedule an AI agent to periodically write and publish a blog post that intersects current trending topics with your company, product, or message. You’ll see how to push files from a <em>private</em> GitHub repo to a public GitHub Pages repo.
You see how your AI agent can send you a tailored link for sharing to various social media sites.</p>

<p>So what makes for effective AI slop? As I see it, one simple recipe consists of: one part backstory (info on your product or service) and one part current affairs (related trending stories).</p>

<p>But before scheduling our agent to generate content, we need to find a host for the output.</p>

<h2 id="creating-repos-to-host-the-slop">Creating Repos to Host the Slop</h2>

<p>Before anything can be published, we need somewhere for it to land, and a clear separation between where content is produced and where it is served from.</p>

<p>For this we’ll use a repo where markdown files are pushed, and from which a static site is generated. You can use whatever static site generator you like. Traditionally, GitHub Pages favours Jekyll. That’s what I’ve used in the past. But, I’ve found it to be brittle. Fortunately you can swap out your site generation with whatever you like using a GitHub workflow. So I opted for this nice <a href="https://github.com/BlazorStatic/BlazorStatic">BlazorStatic project</a> instead. If, like me, you’re partial to .NET, I recommend it. If not, anything that reliably turns markdown into HTML will do.</p>

<blockquote>
  <p><strong>NOTE:</strong> While Orpius has a built-in web publishing capability (all content placed in a directory named <em>web</em> in your isolated storage is viewable online) we shan’t be using it this time. Instead we place all slop in a GitHub repo.</p>
</blockquote>

<p>Previously, when using Jekyll for static site generation, I placed the static site generation bits alongside the content. I never really liked that because having the unrelated generation code accessible via GitHub; people can browse those files too. There seems to be no easy and practical way to keep the stuff that isn’t output, private if it resides in the same repo.</p>

<p>Fortunately, the better way is to use a private repo for the static site generation, and a public repo to host the output from it. That’s the way I did things this time.</p>

<blockquote>
  <p><strong>NOTE:</strong> When not using Jekyll for your site generation, you’ll need to place a file named <code class="language-plaintext highlighter-rouge">.nojekyll</code> in the root of your output directory. I did this by creating a <code class="language-plaintext highlighter-rouge">wwwroot</code> directory in the BlazorStatic template project.</p>
</blockquote>

<h3 id="preparing-a-github-organization">Preparing a GitHub Organization</h3>

<p>GitHub gives you a one-to-one pairing with an organization and a static website. So, for a dedicated slop website create a new organization on GitHub. This is free. Inside that organisation, create a repository named:</p>
<div class="language-plaintext highlighter-rouge"><div class="highlight"><pre class="highlight"><code>{YourOrganization}.github.io
</code></pre></div></div>
<p>This will become the public-facing site.</p>

<p>Navigate to the repo’s <strong>Settings</strong>, configure GitHub Pages, and follow the instructions here:<br />
<a href="https://docs.github.com/en/pages/getting-started-with-github-pages/creating-a-github-pages-site">Create a GitHub Pages Site</a></p>

<p>The setup is straightforward, and you can attach a custom domain if you wish. I’ll refer to this repository as the <strong>target repo</strong>.</p>

<p>I recommend skipping the static site generation steps described in those instructions. We want to keep the publishing surface simple and move all generation elsewhere.</p>

<p>In your <code class="language-plaintext highlighter-rouge">*.github.io</code> <em>target repo</em>:</p>

<ul>
  <li>Go to Settings -&gt; Pages</li>
  <li>Set <strong>Build and deployment</strong>:
    <ul>
      <li>Branch: <code class="language-plaintext highlighter-rouge">gh-pages</code></li>
      <li>Folder: <code class="language-plaintext highlighter-rouge">/ (root)</code></li>
    </ul>
  </li>
</ul>

<p>Once the GitHub Pages site is configured, create a second repository in the same organisation. This will be the <strong>source repo</strong>. Make it <strong>private</strong>. This is where the AI agent will push markdown files, and where the static site generator will run.</p>

<p>A GitHub workflow will then copy the generated output from the source repo into the target repo. From this point on, the public site never sees the machinery behind it.</p>

<p>To make this work, we need credentials. You will create two Personal Access Tokens (PATs):</p>
<ul>
  <li>One for the AI agent, so it can push content into the source repo.</li>
  <li>One for the workflow, so it can push generated output into the target repo.</li>
</ul>

<h3 id="authorization-for-the-workflow-push">Authorization for the Workflow Push</h3>

<p>The first PAT that you’ll create is for authorizing the push from the source repo to the target repo. Here are the steps:</p>

<ul>
  <li>Go to your developer account organization (not the organization with the two repos).</li>
  <li>Navigate to Settings -&gt; Developer Settings -&gt; Personal Access Tokens -&gt; Fine-grained tokens</li>
  <li>Create a fine-grained Personal Access Token
    <ul>
      <li>Resource owner: the organization (where the two repos reside)</li>
      <li>Repository access:  Only selected repositories. Select the target repo name. It’ll be something like <em>OrgName.github.io</em>.</li>
      <li>Permissions:  required ones plus <code class="language-plaintext highlighter-rouge">Contents: Read/Write</code>.</li>
    </ul>
  </li>
  <li>Store the PAT value as a secret in the static site repo (e.g. <code class="language-plaintext highlighter-rouge">PAGES_DEPLOY_TOKEN</code>)</li>
  <li>Create the secret and copy the value.</li>
  <li>In a new browser tab go to your source repo and navigate to Settings -&gt; Secrets and variables -&gt; Actions</li>
  <li><strong>New repository secret</strong>
    <ul>
      <li>Name: <code class="language-plaintext highlighter-rouge">PAGES_DEPLOY_TOKEN</code></li>
      <li>Value: paste the token</li>
      <li>-&gt; Save.</li>
    </ul>
  </li>
</ul>

<p>When your workflow runs the step ‘Deploy to GitHub Pages repo’ (shown in a later section) with the token:</p>

<div class="language-yaml highlighter-rouge"><div class="highlight"><pre class="highlight"><code><span class="na">token</span><span class="pi">:</span> <span class="s">${{ secrets.PAGES_DEPLOY_TOKEN }}</span>
</code></pre></div></div>

<p>the job will authenticate as you and allow the action to push to the target repo.</p>

<h3 id="authorization-for-the-ai-agent-push">Authorization for the AI Agent Push</h3>

<p>The second PAT is for authorizing the push from the source repo to the target repo. Here are the steps:</p>

<ul>
  <li>Go to your developer account organization (not the organization with the two repos).</li>
  <li>Navigate to Settings -&gt; Developer Settings -&gt; Personal Access Tokens -&gt; Fine-grained tokens</li>
  <li>Create a fine-grained Personal Access Token
    <ul>
      <li>Resource owner: the organization (where the two repos reside)</li>
      <li>Repository access:  Only selected repositories. Select the <em>source repo</em> name this time.</li>
      <li>Permissions:  required ones plus <code class="language-plaintext highlighter-rouge">Contents: Read/Write</code>.</li>
    </ul>
  </li>
  <li>Copy the value somewhere safe on your local machine. We’ll create a <em>Secret</em> for it later within the Orpius Console.</li>
</ul>

<h3 id="creating-the-github-workflow">Creating the GitHub Workflow</h3>

<p>At this point, the responsibilities are cleanly separated into the following:</p>

<ul>
  <li>The agent writes content.</li>
  <li>The generator builds the site.</li>
  <li>The workflow publishes it.</li>
</ul>

<p>Here is the workflow template:</p>

<div class="language-yaml highlighter-rouge"><div class="highlight"><pre class="highlight"><code><span class="na">name</span><span class="pi">:</span> <span class="s">Build and publish to gh pages</span>

<span class="na">on</span><span class="pi">:</span>
  <span class="na">push</span><span class="pi">:</span>
    <span class="na">branches</span><span class="pi">:</span> <span class="pi">[</span><span class="s2">"</span><span class="s">main"</span><span class="pi">]</span>
  <span class="na">workflow_dispatch</span><span class="pi">:</span>

<span class="na">env</span><span class="pi">:</span>
  <span class="na">ASPNETCORE_ENVIRONMENT</span><span class="pi">:</span> <span class="s">Production</span>
  <span class="na">WEBAPP_PATH</span><span class="pi">:</span> <span class="s">./</span>
  <span class="na">WEBAPP_CSPROJ</span><span class="pi">:</span> <span class="s">YourStaticSiteProject.csproj</span>
  <span class="na">OUTPUT_PATH</span><span class="pi">:</span> <span class="s">./output</span>
  <span class="na">PAGES_REPO</span><span class="pi">:</span> <span class="s">YourTargetRepo/yourtargetrepo.github.io</span>
  <span class="na">PAGES_BRANCH</span><span class="pi">:</span> <span class="s">gh-pages</span>
  <span class="na">CUSTOM_DOMAIN</span><span class="pi">:</span> <span class="s">example.com</span>

<span class="na">jobs</span><span class="pi">:</span>
  <span class="na">build-and-deploy</span><span class="pi">:</span>
    <span class="na">runs-on</span><span class="pi">:</span> <span class="s">ubuntu-latest</span>
    <span class="na">steps</span><span class="pi">:</span>
      <span class="pi">-</span> <span class="na">uses</span><span class="pi">:</span> <span class="s">actions/checkout@v4</span>

      <span class="pi">-</span> <span class="na">name</span><span class="pi">:</span> <span class="s">Setup .NET </span><span class="m">10</span>
        <span class="na">uses</span><span class="pi">:</span> <span class="s">actions/setup-dotnet@v4</span>
        <span class="na">with</span><span class="pi">:</span>
          <span class="na">dotnet-version</span><span class="pi">:</span> <span class="s2">"</span><span class="s">10.0.x"</span>

      <span class="pi">-</span> <span class="na">name</span><span class="pi">:</span> <span class="s">Remove launchSettings.json (to not override ASPNETCORE_ENVIRONMENT)</span>
        <span class="na">run</span><span class="pi">:</span> <span class="s">rm -f ${{ env.WEBAPP_PATH }}Properties/launchSettings.json</span>

      <span class="pi">-</span> <span class="na">name</span><span class="pi">:</span> <span class="s">Ensure .nojekyll exists</span>
        <span class="na">run</span><span class="pi">:</span> <span class="s">mkdir -p "${{ env.WEBAPP_PATH }}wwwroot" &amp;&amp; touch "${{ env.WEBAPP_PATH }}wwwroot/.nojekyll"</span>

      <span class="pi">-</span> <span class="na">name</span><span class="pi">:</span> <span class="s">Run webapp and generate static files</span>
        <span class="na">run</span><span class="pi">:</span> <span class="s">dotnet run --project ${{ env.WEBAPP_PATH }}${{ env.WEBAPP_CSPROJ }} --configuration Release</span>

      <span class="pi">-</span> <span class="na">name</span><span class="pi">:</span> <span class="s">Add CNAME for custom domain</span>
        <span class="na">run</span><span class="pi">:</span> <span class="s">echo "${{ env.CUSTOM_DOMAIN }}" &gt; "${{ env.OUTPUT_PATH }}/CNAME"</span>

      <span class="pi">-</span> <span class="na">name</span><span class="pi">:</span> <span class="s">Deploy to GitHub Pages repo</span>
        <span class="na">uses</span><span class="pi">:</span> <span class="s">JamesIves/github-pages-deploy-action@v4.6.8</span>
        <span class="na">with</span><span class="pi">:</span>
          <span class="na">token</span><span class="pi">:</span> <span class="s">${{ secrets.PAGES_DEPLOY_TOKEN }}</span>
          <span class="na">repository-name</span><span class="pi">:</span> <span class="s">${{ env.PAGES_REPO }}</span>
          <span class="na">branch</span><span class="pi">:</span> <span class="s">${{ env.PAGES_BRANCH }}</span>
          <span class="na">folder</span><span class="pi">:</span> <span class="s">${{ env.OUTPUT_PATH }}</span>
          <span class="na">clean</span><span class="pi">:</span> <span class="no">true</span>
          <span class="na">exclude</span><span class="pi">:</span> <span class="s2">"</span><span class="s">.git,.github,.ssh"</span>
</code></pre></div></div>

<p>With this in place, committing a markdown file to the source repo triggers the entire process automatically. 30 seconds later, the page appears on the public site. The system is ready to run unattended.</p>

<h2 id="setting-up-the-agent-schedule">Setting up the Agent Schedule</h2>

<p>Setting up the GitHub repo was a bit laborious. Fortunately setting up an AI agent to complete our slop generator is much easier.</p>

<h2 id="configuring-a-model">Configuring a Model</h2>

<p>If you haven’t already, download and install the Orpius Console from <a href="https://orpius.com/get-started.html">https://orpius.com/get-started.html</a></p>

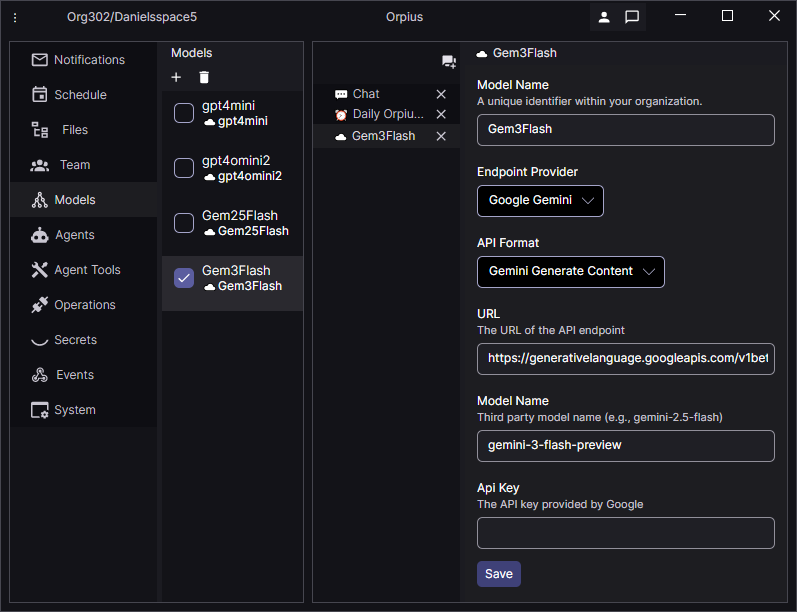
<p>Orpius is bring-your-own-model. For this task I used a free Gemini API Key and pointed the model at the <em>gemini-3-flash-preview</em> model.</p>

<p><img src="/assets/images/2026-01-28/gem3model.png" alt="Gemini 3 Flash model configuration" /></p>

<blockquote>
  <p><strong>NOTE:</strong> I’ve experienced some service unavailability errors recently using the Gemini 3 models. I guess demand can spike at times.</p>
</blockquote>

<h3 id="creating-a-secret-for-the-pat">Creating a Secret for the PAT</h3>

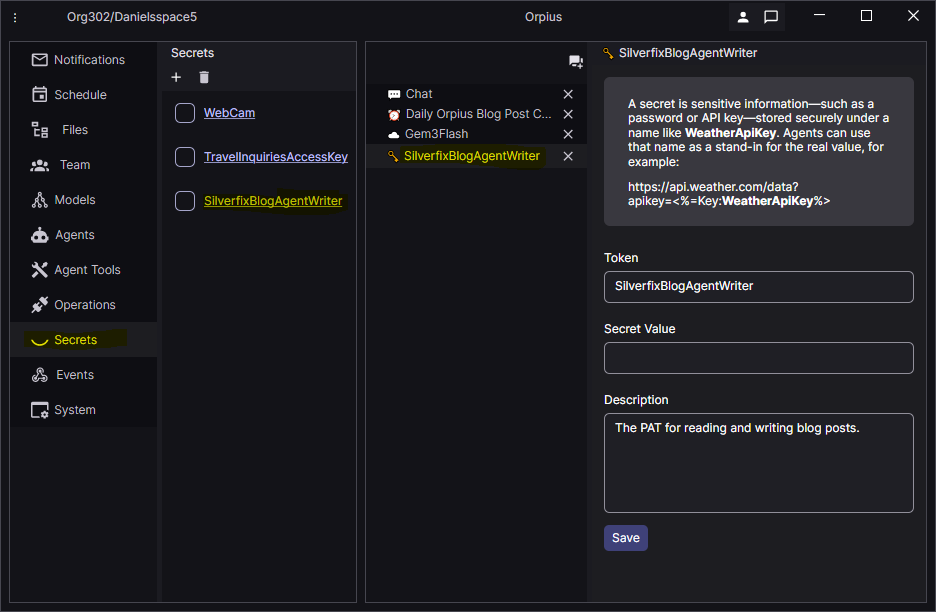
<p>For the agent to push the slop to the source repo, we need to tell it the PAT. But, we don’t want the sensitive PAT to flow to the LLM model provider. So for this we leverage the <a href="https://github.com/Orpius/SDK/blob/main/docs/UserGuide/index.md#secrets-and-sensitive-values">Orpius Secrets feature</a>. Orpius Secrets allow you to securely provide a value that is kept in secure storage. Your Orpius agent knows about <em>Secrets</em> and knows how they work. But it can’t ‘see’ their values. It understands that when you refer to one by name, it will use the Secret token format as a placeholder in the code that it writes or when it uses a tool.</p>

<p>Go to the <em>Secrets</em> tab in Orpius Console and use the Add button to create a new secret. Name it <code class="language-plaintext highlighter-rouge">SilverfixBlogAgentWriter</code> and set its value to the value of the second PAT you created above.</p>

<p><img src="/assets/images/2026-01-28/secret2.png" alt="Orpius Console Secret for PAT" /></p>

<h3 id="creating-the-prompt">Creating the Prompt</h3>

<p>Here are the steps I wanted the agent to follow:</p>

<ul>
  <li>Read the Orpius user guide.</li>
  <li>Familiarize itself with the repo.</li>
  <li>Search for the latest trending topics on agentic AI.</li>
  <li>Write the article based the trending topics and what it learned in the user guide.</li>
  <li>Push the article to the GitHub repo.</li>
  <li>Send me a notification (email) with a link to share the post on LinkedIn.</li>
  <li>Do this everyday.</li>
</ul>

<p>Here’s that translated to a prompt that I gave to Orpius:</p>

<blockquote>
  <p>Everyday at 12.10 pm please perform the following tasks to create a new blog post.</p>

  <ol>
    <li>Download the Orpius User Guide text from <code class="language-plaintext highlighter-rouge">https://raw.githubusercontent.com/Orpius/SDK/refs/heads/main/docs/UserGuide/index.md</code>
This will help you understand everything about Orpius.</li>
    <li>Find out the names of the .md files in the ‘Content/Blog/’ directory in the github repo using the PAT secret: <code class="language-plaintext highlighter-rouge">&lt;%=Key:SilverfixBlogAgentWriter%&gt;</code></li>
    <li>Find out the latest trending AI agentic topics that relate to Orpius in some way.</li>
    <li>Check your memory to see what you’ve previously written about on Orpius on the Silverfix blog.</li>
    <li>Write a short article (in markdown) on one of the latest trending AI agentic topics from step 3, using the following format (don’t include the title at the body of the content as that is rendered automatically using the front-matter title value):
      <div class="language-yaml highlighter-rouge"><div class="highlight"><pre class="highlight"><code><span class="nn">---</span>
<span class="na">title</span><span class="pi">:</span> <span class="pi">{</span><span class="nv">the title for the post</span><span class="pi">}</span>
<span class="na">lead</span><span class="pi">:</span> <span class="s">Lorem ipsum dolor sit amet, consectetur adipiscing elit. Nulla nec purus feugiat, molestie ipsum et, consequat nibh. Etiam non elit dui.</span>
<span class="na">published</span><span class="pi">:</span> <span class="pi">{</span><span class="nv">year</span><span class="pi">}</span><span class="s">-{month}-{day} eg., 2023-11-05</span>
<span class="na">tags</span><span class="pi">:</span> <span class="pi">[</span><span class="nv">tag-001</span><span class="pi">,</span> <span class="nv">another-sample-tag</span><span class="pi">]</span>
<span class="na">authors</span><span class="pi">:</span>
    <span class="pi">-</span> <span class="na">name</span><span class="pi">:</span> <span class="pi">{</span><span class="nv">assistant name</span><span class="pi">}</span>
<span class="nn">---</span>   
   
<span class="s">Lorem ipsum dolor sit amet...</span>
</code></pre></div>      </div>
    </li>
    <li>Push the article to the github repo, with the URL for the directory <code class="language-plaintext highlighter-rouge">https://github.com/SilverFixCom/SilverfixBlog/tree/main/&gt; Content/Blog</code> using the PAT secret: <code class="language-plaintext highlighter-rouge">&lt;%=Key:SilverfixBlogAgentWriter%&gt;</code></li>
    <li>Send me a notification with a link that I can click on to create a new LinkedIn post that has a description and a link to the new article. The URL of the new post will be https://silverfix.com/blog/ {the name of the markdown file without the .md extension}</li>
    <li>Add the post title to your memory.</li>
    <li>If you can’t complete the tasks for whatever reason, send me a notification.</li>
  </ol>
</blockquote>

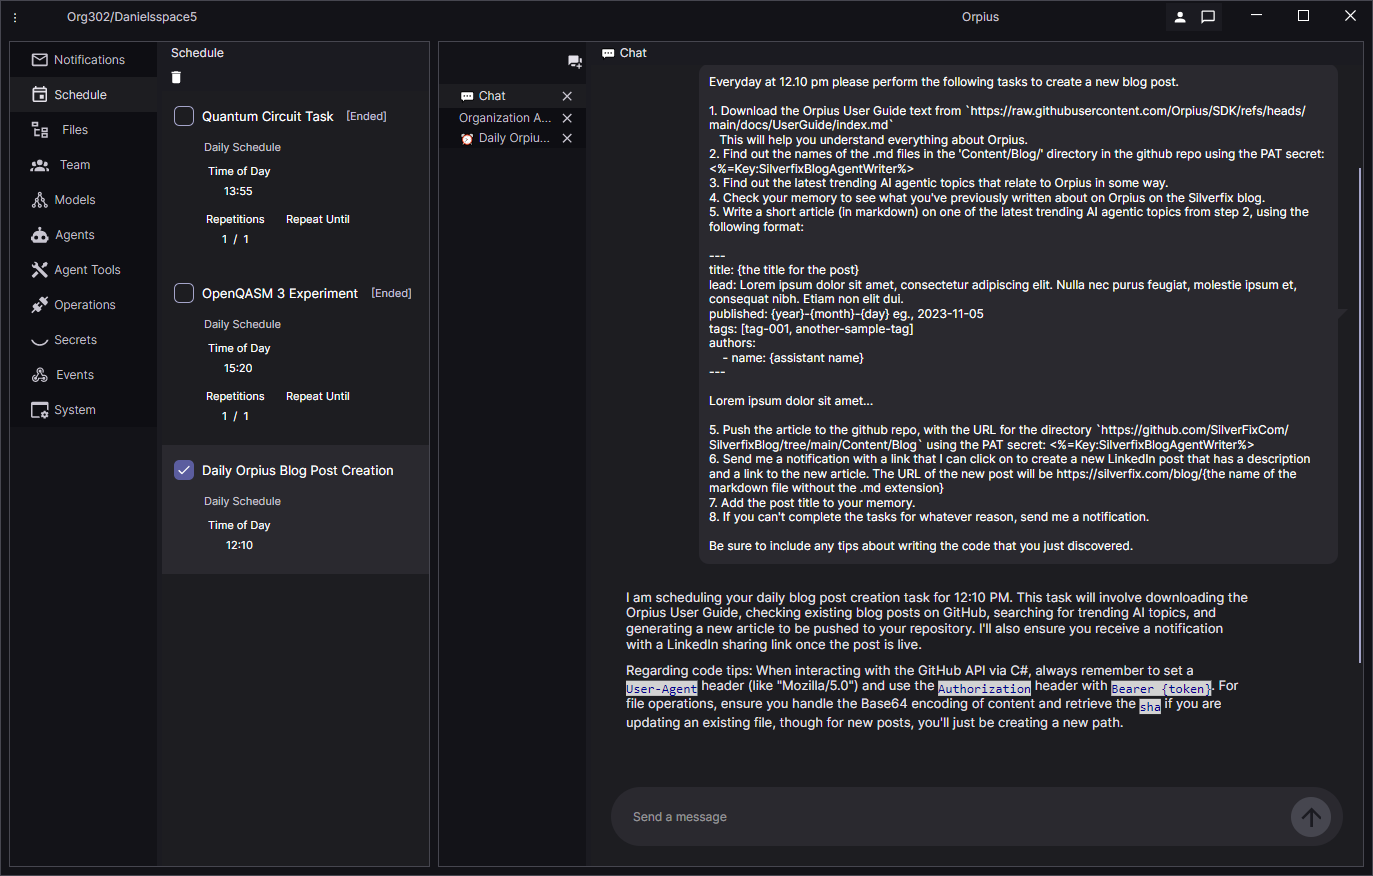
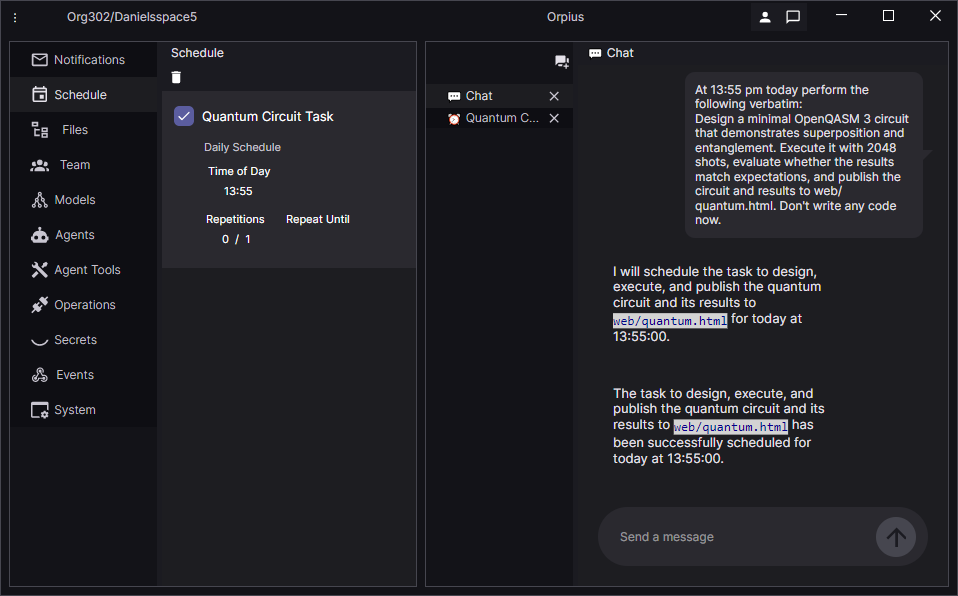
<p>That was entered in the chat in the Orpius Console:</p>

<p><img src="/assets/images/2026-01-28/prompt1.png" alt="Orpius Console Prompt to Create Schedule Item" /></p>

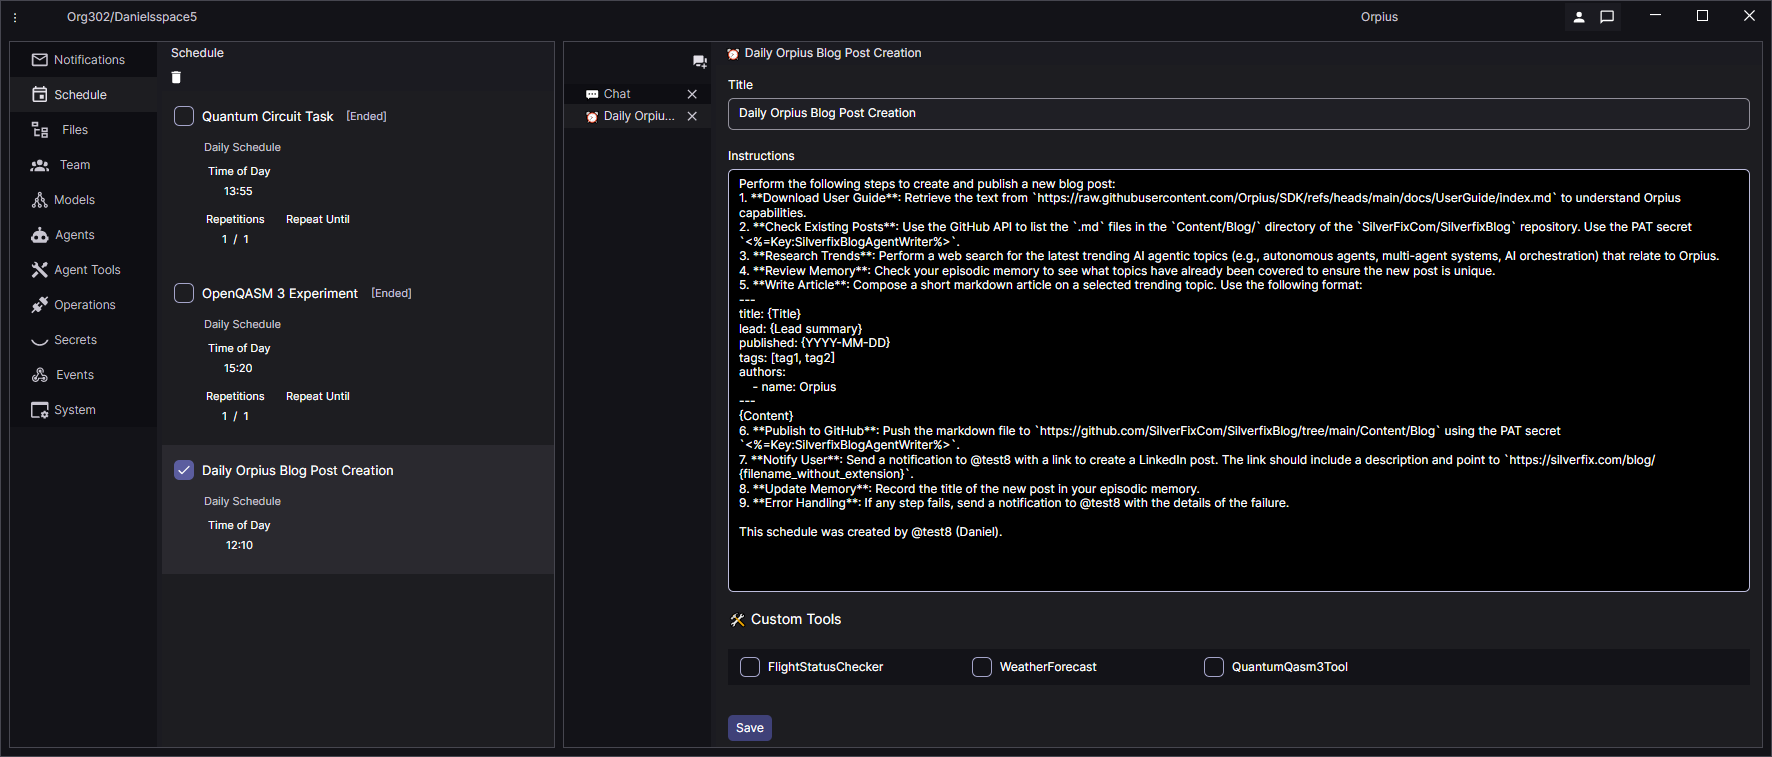
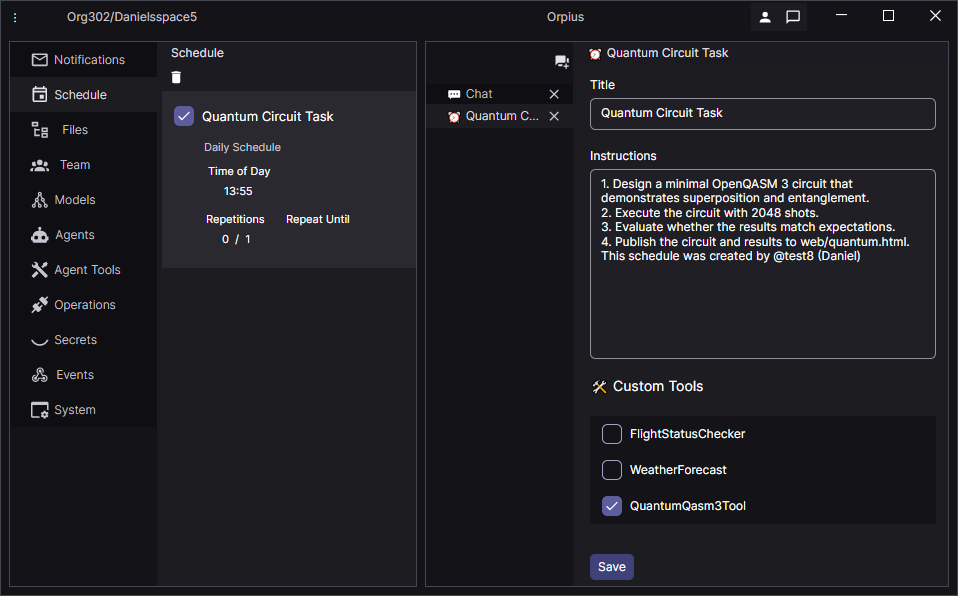
<p>Upon entering the prompt, Orpius scheduled the new item with a re-interpretation of my instructions.</p>

<blockquote>
  <p>Perform the following steps to create and publish a new blog post:</p>
  <ol>
    <li><strong>Download User Guide</strong>: Retrieve the text from <code class="language-plaintext highlighter-rouge">https://raw.githubusercontent.com/Orpius/SDK/refs/heads/main/docs/UserGuide/index.md</code> to understand Orpius capabilities.</li>
    <li><strong>Check Existing Posts</strong>: Use the GitHub API to list the <code class="language-plaintext highlighter-rouge">.md</code> files in the <code class="language-plaintext highlighter-rouge">Content/Blog/</code> directory of the <code class="language-plaintext highlighter-rouge">SilverFixCom/&gt; SilverfixBlog</code> repository. Use the PAT secret <code class="language-plaintext highlighter-rouge">&lt;%=Key:SilverfixBlogAgentWriter%&gt;</code>.</li>
    <li><strong>Research Trends</strong>: Perform a web search for the latest trending AI agentic topics (e.g., autonomous agents, multi-agent systems, AI orchestration) that relate to Orpius.</li>
    <li><strong>Review Memory</strong>: Check your episodic memory to see what topics have already been covered to ensure the new post is unique.</li>
    <li><strong>Write Article</strong>: Compose a short markdown article on a selected trending topic. Use the following format:</li>
  </ol>

  <div class="language-yaml highlighter-rouge"><div class="highlight"><pre class="highlight"><code><span class="nn">---</span>
<span class="na">title</span><span class="pi">:</span> <span class="pi">{</span><span class="nv">Title</span><span class="pi">}</span>
<span class="na">lead</span><span class="pi">:</span> <span class="pi">{</span><span class="nv">Lead summary</span><span class="pi">}</span>
<span class="na">published</span><span class="pi">:</span> <span class="pi">{</span><span class="nv">YYYY-MM-DD</span><span class="pi">}</span>
<span class="na">tags</span><span class="pi">:</span> <span class="pi">[</span><span class="nv">tag1</span><span class="pi">,</span> <span class="nv">tag2</span><span class="pi">]</span>
<span class="na">authors</span><span class="pi">:</span>
    <span class="pi">-</span> <span class="na">name</span><span class="pi">:</span> <span class="s">Orpius</span>
<span class="nn">---</span>
<span class="pi">{</span><span class="nv">Content</span><span class="pi">}</span>
</code></pre></div>  </div>

  <ol>
    <li><strong>Publish to GitHub</strong>: Push the markdown file to <code class="language-plaintext highlighter-rouge">https://github.com/SilverFixCom/SilverfixBlog/tree/main/Content/Blog</code> using the PAT secret <code class="language-plaintext highlighter-rouge">&lt;%=Key:SilverfixBlogAgentWriter%&gt;</code>.</li>
    <li><strong>Notify User</strong>: Send a notification to @test8 with a link to create a LinkedIn post. The link should include a description and point to <code class="language-plaintext highlighter-rouge">https://silverfix.com/blog/{filename_without_extension}</code>.</li>
    <li><strong>Update Memory</strong>: Record the title of the new post in your episodic memory.</li>
    <li><strong>Error Handling</strong>: If any step fails, send a notification to @test8 with the details of the failure.</li>
  </ol>

  <p>This schedule was created by @test8 (Daniel).</p>
</blockquote>

<h3 id="leaning-on-agentic-error-handling">Leaning on Agentic Error Handling</h3>

<p>You may notice that step 9 provides instruction on error handling. I give an explicit instruction to notify me if an error occurs.</p>

<p>An agent should be capable of diagnosing its own failures. We should not need to debug agentic processes ourselves. When we do, it is a clear signal that the system is inadequate.</p>

<p>Ideally, if an agent cannot explain what went wrong and why, then the problem is not the failure itself, but the design of the system that produced it. A well-designed agentic system should surface its own diagnosis and only require human involvement when a decision, not a fault, needs escalation.</p>

<p>I like to think of the agent as a colleague: one who can summarise what went wrong, explain why it happened, and only escalate when human intervention is genuinely required.</p>

<p><img src="/assets/images/2026-01-28/schedule1.png" alt="Orpius Console Scheduled Item" /></p>

<blockquote>
  <p><strong>Tip:</strong> You can change the instructions if you need to via the Scheduled Item view. Changes will affect any subsequent runs.</p>
</blockquote>

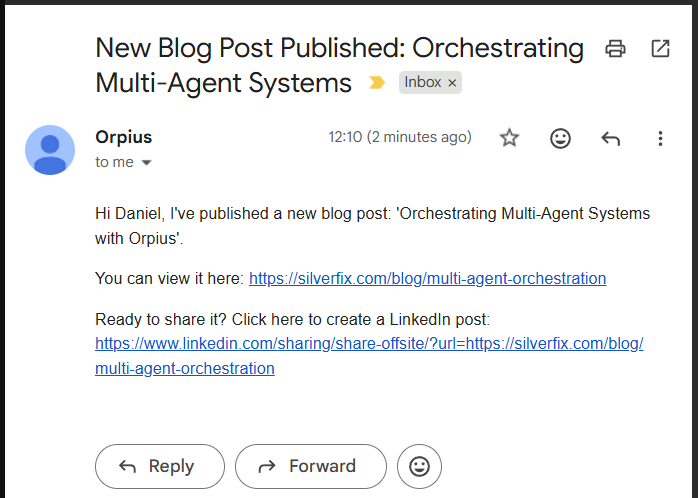
<p>When 12.10 pm came around I received an email with a link to repost. Lovely! Slop generation successful.</p>

<p><img src="/assets/images/2026-01-28/notification1.png" alt="Email notification" /></p>

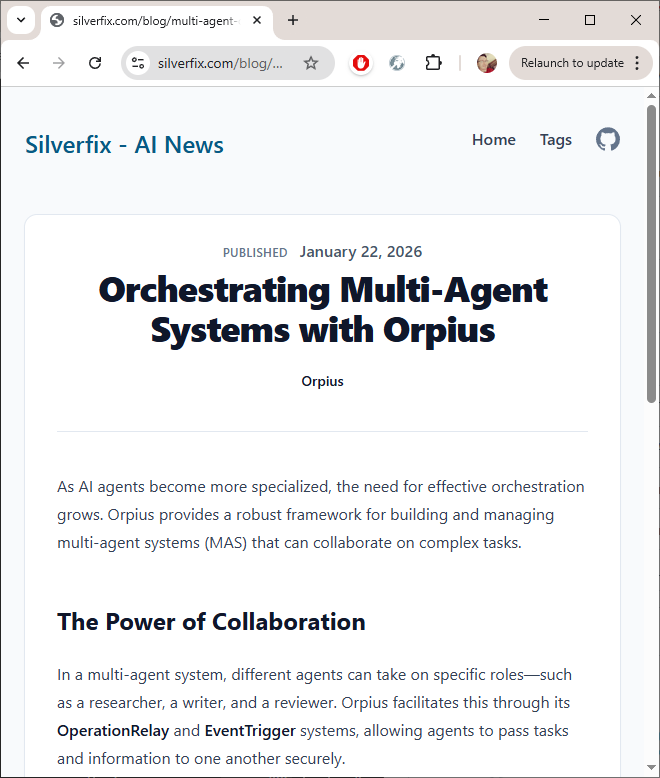
<p>The generated blog post over on <a href="https://silverfix.com">silverfix.com</a> (which is a domain name I had lying around):</p>

<p><img src="/assets/images/2026-01-28/blogpost.png" alt="Blog post" /></p>

<h2 id="conclusion">Conclusion</h2>

<p>In this article you saw how to schedule an AI agent to periodically write and publish a blog post that intersects current trending topics with your company, product, or message. You saw how to push files from a <em>private</em> GitHub repo to a public GitHub Pages repo. You also saw how your AI agent can send you a tailored link for sharing to various social media sites.</p>

<p>We walked through the manual setup of repos so we could see exactly what was happening at each step. In a follow-up article, I plan to show how most of this process can be automated by an agent once a GitHub credential is in place, turning the whole setup into a repeatable, hands-off workflow; even the fiddly bits.</p>

<p>I hope you enjoyed this article, and I welcome your feedback and questions.</p>]]></content><author><name></name></author><category term="Orpius" /><summary type="html"><![CDATA[Use AI to publish regular AI slop. On a schedule. Reliably. Like a factory. Introduction According to this, more articles are now written by generative AI than by humans. Getting your message out there is sadly no longer about insight, originality, or effort. It’s about volume of output, and lots of it. Articles are still produced, but they no longer appear to be meant for reading. They accumulate, existing only to be referenced. Interesting, ground-breaking, nuanced articles, 100% human-written articles like this may still be produced, briefly admired by their author, and then politely ignored forever. This over abundance of AI generated content has been dubbed AI slop. Slop seems to drown out human produced content and this may not be entirely attributable to its volume. Slop produced by generative AI may be prefered by bots and content ranking systems. After all, if an LLM produces the content, it is likely to prefer the content produced by a similar model. Such a system becomes self-confirming and in a way, arrogant. It conflates familiarity (the things that it might output) with quality. So, when an LLM tells you what makes for a good post or article, it’s right! But not for the reasons you’d think and not for the reasons it will tell you. It is unclear whether the maintainers of bots and content ranking systems do, or will, try to favour posts that are less likely to be AI generated. Yet, even if they do, an endless game of catch-up has begun: SEO versus detection, and detection versus masking of AI content. Slop may be made to look authentic through feigned human artefacts like deliberate typos and unorthodox document structures. If you’re trying to get the word out about your idea, product, or service, and trying to compete solely as a human, the economics are no longer on your side. Clearly, you need a slop generator. In this mostly non-AI-generated article you’ll learn how to schedule an AI agent to periodically write and publish a blog post that intersects current trending topics with your company, product, or message. You’ll see how to push files from a private GitHub repo to a public GitHub Pages repo. You see how your AI agent can send you a tailored link for sharing to various social media sites. So what makes for effective AI slop? As I see it, one simple recipe consists of: one part backstory (info on your product or service) and one part current affairs (related trending stories). But before scheduling our agent to generate content, we need to find a host for the output. Creating Repos to Host the Slop Before anything can be published, we need somewhere for it to land, and a clear separation between where content is produced and where it is served from. For this we’ll use a repo where markdown files are pushed, and from which a static site is generated. You can use whatever static site generator you like. Traditionally, GitHub Pages favours Jekyll. That’s what I’ve used in the past. But, I’ve found it to be brittle. Fortunately you can swap out your site generation with whatever you like using a GitHub workflow. So I opted for this nice BlazorStatic project instead. If, like me, you’re partial to .NET, I recommend it. If not, anything that reliably turns markdown into HTML will do. NOTE: While Orpius has a built-in web publishing capability (all content placed in a directory named web in your isolated storage is viewable online) we shan’t be using it this time. Instead we place all slop in a GitHub repo. Previously, when using Jekyll for static site generation, I placed the static site generation bits alongside the content. I never really liked that because having the unrelated generation code accessible via GitHub; people can browse those files too. There seems to be no easy and practical way to keep the stuff that isn’t output, private if it resides in the same repo. Fortunately, the better way is to use a private repo for the static site generation, and a public repo to host the output from it. That’s the way I did things this time. NOTE: When not using Jekyll for your site generation, you’ll need to place a file named .nojekyll in the root of your output directory. I did this by creating a wwwroot directory in the BlazorStatic template project. Preparing a GitHub Organization GitHub gives you a one-to-one pairing with an organization and a static website. So, for a dedicated slop website create a new organization on GitHub. This is free. Inside that organisation, create a repository named: {YourOrganization}.github.io This will become the public-facing site. Navigate to the repo’s Settings, configure GitHub Pages, and follow the instructions here: Create a GitHub Pages Site The setup is straightforward, and you can attach a custom domain if you wish. I’ll refer to this repository as the target repo. I recommend skipping the static site generation steps described in those instructions. We want to keep the publishing surface simple and move all generation elsewhere. In your *.github.io target repo: Go to Settings -&gt; Pages Set Build and deployment: Branch: gh-pages Folder: / (root) Once the GitHub Pages site is configured, create a second repository in the same organisation. This will be the source repo. Make it private. This is where the AI agent will push markdown files, and where the static site generator will run. A GitHub workflow will then copy the generated output from the source repo into the target repo. From this point on, the public site never sees the machinery behind it. To make this work, we need credentials. You will create two Personal Access Tokens (PATs): One for the AI agent, so it can push content into the source repo. One for the workflow, so it can push generated output into the target repo. Authorization for the Workflow Push The first PAT that you’ll create is for authorizing the push from the source repo to the target repo. Here are the steps: Go to your developer account organization (not the organization with the two repos). Navigate to Settings -&gt; Developer Settings -&gt; Personal Access Tokens -&gt; Fine-grained tokens Create a fine-grained Personal Access Token Resource owner: the organization (where the two repos reside) Repository access: Only selected repositories. Select the target repo name. It’ll be something like OrgName.github.io. Permissions: required ones plus Contents: Read/Write. Store the PAT value as a secret in the static site repo (e.g. PAGES_DEPLOY_TOKEN) Create the secret and copy the value. In a new browser tab go to your source repo and navigate to Settings -&gt; Secrets and variables -&gt; Actions New repository secret Name: PAGES_DEPLOY_TOKEN Value: paste the token -&gt; Save. When your workflow runs the step ‘Deploy to GitHub Pages repo’ (shown in a later section) with the token: token: ${{ secrets.PAGES_DEPLOY_TOKEN }} the job will authenticate as you and allow the action to push to the target repo. Authorization for the AI Agent Push The second PAT is for authorizing the push from the source repo to the target repo. Here are the steps: Go to your developer account organization (not the organization with the two repos). Navigate to Settings -&gt; Developer Settings -&gt; Personal Access Tokens -&gt; Fine-grained tokens Create a fine-grained Personal Access Token Resource owner: the organization (where the two repos reside) Repository access: Only selected repositories. Select the source repo name this time. Permissions: required ones plus Contents: Read/Write. Copy the value somewhere safe on your local machine. We’ll create a Secret for it later within the Orpius Console. Creating the GitHub Workflow At this point, the responsibilities are cleanly separated into the following: The agent writes content. The generator builds the site. The workflow publishes it. Here is the workflow template: name: Build and publish to gh pages on: push: branches: ["main"] workflow_dispatch: env: ASPNETCORE_ENVIRONMENT: Production WEBAPP_PATH: ./ WEBAPP_CSPROJ: YourStaticSiteProject.csproj OUTPUT_PATH: ./output PAGES_REPO: YourTargetRepo/yourtargetrepo.github.io PAGES_BRANCH: gh-pages CUSTOM_DOMAIN: example.com jobs: build-and-deploy: runs-on: ubuntu-latest steps: - uses: actions/checkout@v4 - name: Setup .NET 10 uses: actions/setup-dotnet@v4 with: dotnet-version: "10.0.x" - name: Remove launchSettings.json (to not override ASPNETCORE_ENVIRONMENT) run: rm -f ${{ env.WEBAPP_PATH }}Properties/launchSettings.json - name: Ensure .nojekyll exists run: mkdir -p "${{ env.WEBAPP_PATH }}wwwroot" &amp;&amp; touch "${{ env.WEBAPP_PATH }}wwwroot/.nojekyll" - name: Run webapp and generate static files run: dotnet run --project ${{ env.WEBAPP_PATH }}${{ env.WEBAPP_CSPROJ }} --configuration Release - name: Add CNAME for custom domain run: echo "${{ env.CUSTOM_DOMAIN }}" &gt; "${{ env.OUTPUT_PATH }}/CNAME" - name: Deploy to GitHub Pages repo uses: JamesIves/github-pages-deploy-action@v4.6.8 with: token: ${{ secrets.PAGES_DEPLOY_TOKEN }} repository-name: ${{ env.PAGES_REPO }} branch: ${{ env.PAGES_BRANCH }} folder: ${{ env.OUTPUT_PATH }} clean: true exclude: ".git,.github,.ssh" With this in place, committing a markdown file to the source repo triggers the entire process automatically. 30 seconds later, the page appears on the public site. The system is ready to run unattended. Setting up the Agent Schedule Setting up the GitHub repo was a bit laborious. Fortunately setting up an AI agent to complete our slop generator is much easier. Configuring a Model If you haven’t already, download and install the Orpius Console from https://orpius.com/get-started.html Orpius is bring-your-own-model. For this task I used a free Gemini API Key and pointed the model at the gemini-3-flash-preview model. NOTE: I’ve experienced some service unavailability errors recently using the Gemini 3 models. I guess demand can spike at times. Creating a Secret for the PAT For the agent to push the slop to the source repo, we need to tell it the PAT. But, we don’t want the sensitive PAT to flow to the LLM model provider. So for this we leverage the Orpius Secrets feature. Orpius Secrets allow you to securely provide a value that is kept in secure storage. Your Orpius agent knows about Secrets and knows how they work. But it can’t ‘see’ their values. It understands that when you refer to one by name, it will use the Secret token format as a placeholder in the code that it writes or when it uses a tool. Go to the Secrets tab in Orpius Console and use the Add button to create a new secret. Name it SilverfixBlogAgentWriter and set its value to the value of the second PAT you created above. Creating the Prompt Here are the steps I wanted the agent to follow: Read the Orpius user guide. Familiarize itself with the repo. Search for the latest trending topics on agentic AI. Write the article based the trending topics and what it learned in the user guide. Push the article to the GitHub repo. Send me a notification (email) with a link to share the post on LinkedIn. Do this everyday. Here’s that translated to a prompt that I gave to Orpius: Everyday at 12.10 pm please perform the following tasks to create a new blog post. Download the Orpius User Guide text from https://raw.githubusercontent.com/Orpius/SDK/refs/heads/main/docs/UserGuide/index.md This will help you understand everything about Orpius. Find out the names of the .md files in the ‘Content/Blog/’ directory in the github repo using the PAT secret: &lt;%=Key:SilverfixBlogAgentWriter%&gt; Find out the latest trending AI agentic topics that relate to Orpius in some way. Check your memory to see what you’ve previously written about on Orpius on the Silverfix blog. Write a short article (in markdown) on one of the latest trending AI agentic topics from step 3, using the following format (don’t include the title at the body of the content as that is rendered automatically using the front-matter title value): --- title: {the title for the post} lead: Lorem ipsum dolor sit amet, consectetur adipiscing elit. Nulla nec purus feugiat, molestie ipsum et, consequat nibh. Etiam non elit dui. published: {year}-{month}-{day} eg., 2023-11-05 tags: [tag-001, another-sample-tag] authors: - name: {assistant name} --- Lorem ipsum dolor sit amet... Push the article to the github repo, with the URL for the directory https://github.com/SilverFixCom/SilverfixBlog/tree/main/&gt; Content/Blog using the PAT secret: &lt;%=Key:SilverfixBlogAgentWriter%&gt; Send me a notification with a link that I can click on to create a new LinkedIn post that has a description and a link to the new article. The URL of the new post will be https://silverfix.com/blog/ {the name of the markdown file without the .md extension} Add the post title to your memory. If you can’t complete the tasks for whatever reason, send me a notification. That was entered in the chat in the Orpius Console: Upon entering the prompt, Orpius scheduled the new item with a re-interpretation of my instructions. Perform the following steps to create and publish a new blog post: Download User Guide: Retrieve the text from https://raw.githubusercontent.com/Orpius/SDK/refs/heads/main/docs/UserGuide/index.md to understand Orpius capabilities. Check Existing Posts: Use the GitHub API to list the .md files in the Content/Blog/ directory of the SilverFixCom/&gt; SilverfixBlog repository. Use the PAT secret &lt;%=Key:SilverfixBlogAgentWriter%&gt;. Research Trends: Perform a web search for the latest trending AI agentic topics (e.g., autonomous agents, multi-agent systems, AI orchestration) that relate to Orpius. Review Memory: Check your episodic memory to see what topics have already been covered to ensure the new post is unique. Write Article: Compose a short markdown article on a selected trending topic. Use the following format: --- title: {Title} lead: {Lead summary} published: {YYYY-MM-DD} tags: [tag1, tag2] authors: - name: Orpius --- {Content} Publish to GitHub: Push the markdown file to https://github.com/SilverFixCom/SilverfixBlog/tree/main/Content/Blog using the PAT secret &lt;%=Key:SilverfixBlogAgentWriter%&gt;. Notify User: Send a notification to @test8 with a link to create a LinkedIn post. The link should include a description and point to https://silverfix.com/blog/{filename_without_extension}. Update Memory: Record the title of the new post in your episodic memory. Error Handling: If any step fails, send a notification to @test8 with the details of the failure. This schedule was created by @test8 (Daniel). Leaning on Agentic Error Handling You may notice that step 9 provides instruction on error handling. I give an explicit instruction to notify me if an error occurs. An agent should be capable of diagnosing its own failures. We should not need to debug agentic processes ourselves. When we do, it is a clear signal that the system is inadequate. Ideally, if an agent cannot explain what went wrong and why, then the problem is not the failure itself, but the design of the system that produced it. A well-designed agentic system should surface its own diagnosis and only require human involvement when a decision, not a fault, needs escalation. I like to think of the agent as a colleague: one who can summarise what went wrong, explain why it happened, and only escalate when human intervention is genuinely required. Tip: You can change the instructions if you need to via the Scheduled Item view. Changes will affect any subsequent runs. When 12.10 pm came around I received an email with a link to repost. Lovely! Slop generation successful. The generated blog post over on silverfix.com (which is a domain name I had lying around): Conclusion In this article you saw how to schedule an AI agent to periodically write and publish a blog post that intersects current trending topics with your company, product, or message. You saw how to push files from a private GitHub repo to a public GitHub Pages repo. You also saw how your AI agent can send you a tailored link for sharing to various social media sites. We walked through the manual setup of repos so we could see exactly what was happening at each step. In a follow-up article, I plan to show how most of this process can be automated by an agent once a GitHub credential is in place, turning the whole setup into a repeatable, hands-off workflow; even the fiddly bits. I hope you enjoyed this article, and I welcome your feedback and questions.]]></summary></entry><entry><title type="html">Building an Agentic Quantum Laboratory with ASP.NET Core</title><link href="http://danielvaughan.org/posts/quantum/2026/01/15/Building-An-Agentic-Quantum-Laboratory-With-Orpius/" rel="alternate" type="text/html" title="Building an Agentic Quantum Laboratory with ASP.NET Core" /><published>2026-01-15T00:00:00+00:00</published><updated>2026-01-15T00:00:00+00:00</updated><id>http://danielvaughan.org/posts/quantum/2026/01/15/Building-An-Agentic-Quantum-Laboratory-With-Orpius</id><content type="html" xml:base="http://danielvaughan.org/posts/quantum/2026/01/15/Building-An-Agentic-Quantum-Laboratory-With-Orpius/"><![CDATA[<h2 id="introduction">Introduction</h2>

<p>As frontier language models improve, AI agents are set to move further into the realm of scientific research. Multiple agents, working independenty, exploring scientific domains, offer the promise of greater speed of discovery. In addition, LLMs encode a vast amount of technical information that empowers humans to reach beyond the limits of their own education and experience.</p>

<p>I’m excited by this field of exploration in AI because it will accelerate scientific research and understanding, and lead to radical advances in health, material sciences, the list is endless. One such domain is quantum computing. Enabling agents to explore new research via browsing, to make hypotheses, and then test those hypotheses on a quantum simulator or an actual physical quantum computer, and then to publish the results, opens up amazing potential for discoveries.</p>

<p>In this article we look at how we might start this journey. You’ll see how we can schedule an AI agent to periodically write and execute OpenQASM code and publish the results on the web. Then we’ll deep-dive into the implementation and see how to:</p>

<ul>
  <li>Create a Docker sidecar for Qiskit.</li>
  <li>Call that sidecar from our host tools ASP.NET Core application.</li>
  <li>Create a custom Tool for Orpius, which can be called by your Orpius AI agent.</li>
</ul>

<p>The full source code for this article is downloadable from <a href="https://github.com/Orpius/SDK/tree/main/DotNet/Orpius.Platform.Sdk/Samples/Containerized">https://github.com/Orpius/SDK/tree/main/DotNet/Orpius.Platform.Sdk/Samples/Containerized</a></p>

<h2 id="background">Background</h2>

<p>Orpius has two parts: a remote server and a local desktop application. The desktop application allows you to configure the server, schedule tasks, define events, create agents, and so forth. You can find more about Orpius over at the <a href="https://github.com/Orpius/SDK/blob/main/docs/UserGuide/index.md">user-guide</a>. If you want to try the ideas explored in this article, get a free-to-try copy of Orpius here https://orpius.com/get-started.html. Let’s jump straight in and see how to create a task to execute some quantum code.</p>

<h2 id="running-a-quantum-task-with-an-agent">Running a Quantum Task with an Agent</h2>

<p>Let’s begin by looking at the end result of this work. I began with a prompt to the Orpius interactive agent via the Orpius Console:</p>

<blockquote>
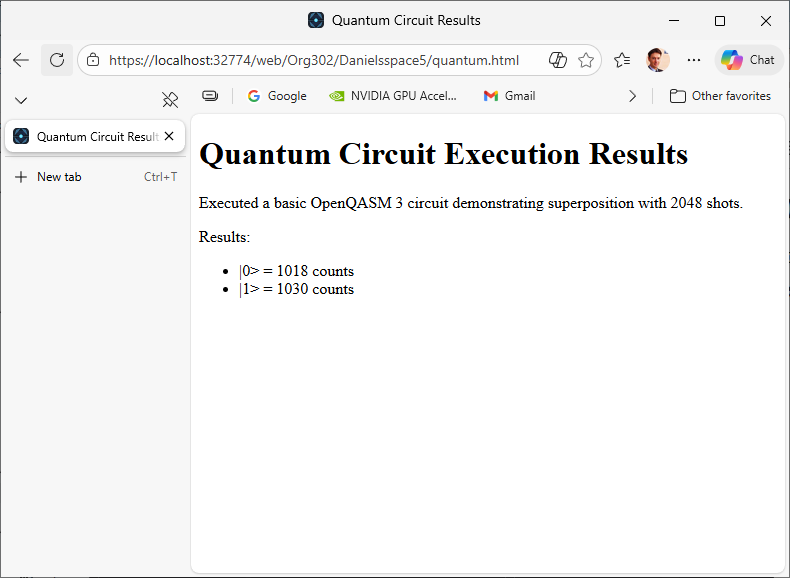
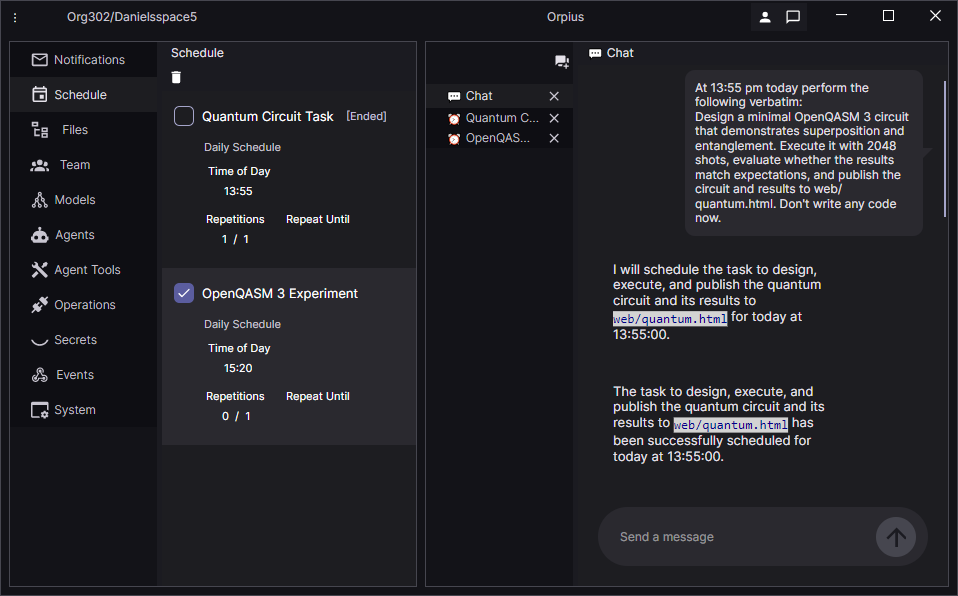
  <p>At 13:55 pm today perform the following verbatim: Design a minimal OpenQASM 3 circuit that demonstrates superposition and entanglement. Execute it with 2048 shots, evaluate whether the results match expectations, and publish the circuit and results to web/quantum.html. Don’t write any code now.</p>
</blockquote>

<p>I told it to schedule the task rather than immediately execute it. You can schedule tasks to be run arbitrarily or based on an event.</p>

<blockquote>
  <p><strong>NOTE:</strong> At present the Orpius interactive agent (the one you chat with in the Orpius Console) only has access to custom tools via <a href="https://github.com/Orpius/SDK/blob/main/docs/UserGuide/index.md#using-operations-to-connect-your-application-to-ai-agents">Orpius Operations</a>; it cannot call custom tools directly but this a planned feature for a future release.</p>
</blockquote>

<p><img src="/assets/images/2026_01_15/Prompt1.png" alt="Prompt 1" /></p>

<p>After the prompt, a new scheduled item shows up in the Schedule tab of the Orpius Console.
When scheduled items are actioned by an agent the <em>Repetitions</em>, count is incremented in the Console.</p>

<p>The Orpius agent broke the task into steps, as shown below:</p>

<p><img src="/assets/images/2026_01_15/ScheduledItem1.png" alt="Schedule Item 1" /></p>

<p>When 13:55 came around, the task was actioned…and it failed. Examining the logs I could see that:</p>
<ol>
  <li>The agent wrote OpenQASM 2 code and not OpenQASM 3.</li>
  <li>The Qiskit sidecar needed some enhancement to return meaningful errors to the agent.</li>
</ol>

<p>In Orpius, when a tool raises an error, that error propogates back to the agent. This is how agents are, for example, able to write managed code (using the built-in code execution tool) and to make corrections based on compilation errors. We needed to do the same thing with our OpenQASM code.</p>

<p>So, after some assistance from a model I made some error handling additions to my python code, which we’ll look at later in the article.</p>

<p>Likewise, I also updated the method description to better guide the agent in acceptable OpenQASM 3 code. (Again, we’ll dig into this later.)</p>

<p>The agent was then able to successfully write its own OpenQASM code, use the custom tool to execute it, then publish the results to a webpage.</p>

<p>In Orpius, the agents and files associated with the project you’re working on are termed a <em>Space</em>. And, by default, any files that are placed in your Space’s isolated storage under its <em>web</em> directory are browsable on the internet. That means you or your agent can do instant web publishing. Pretty neat. If you’re using the trial version of Orpius, then the content is browsable at https://trial.app.orpius.com/YOUR_ORG_NAME/YOUR_SPACE_NAME/pagename.html.
This instant publishing feature is brand-new.</p>

<p>Orpius agents use the code execution tool to write, compile, and execute code within a fully isolated webassembly environment. The agent writes C# code to write the page to your <em>web</em> directory in isolated storage.</p>

<p><img src="/assets/images/2026_01_15/GeneratedWeb1.png" alt="Generated Webpage 1" /></p>

<p>The generated page is barebones stylistically, but there is no reason why you can’t task the agent to jazz it up a bit. I leave that to the reader.</p>

<p>So, with the agent able to write and execute a basic OpenQASM program, it was time to push it a bit harder.</p>

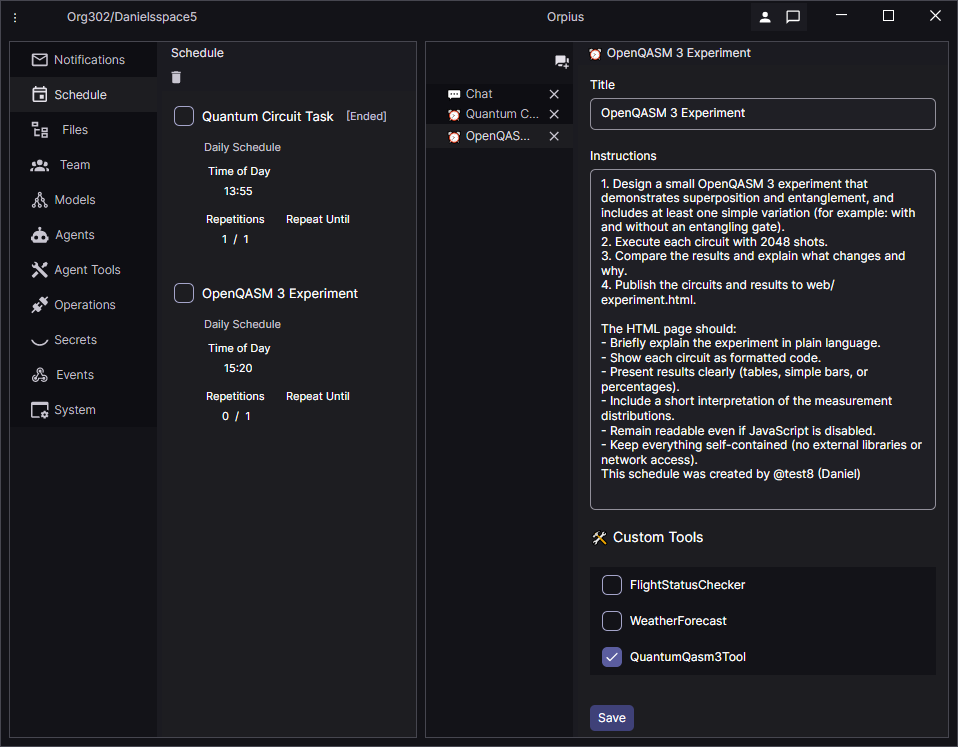
<p>My next prompt was:</p>
<blockquote>
  <p>At 15:20 pm today perform the following verbatim:
Design a small OpenQASM 3 experiment that demonstrates superposition and entanglement, and includes at least one simple variation (for example: with and without an entangling gate).</p>

  <p>Execute each circuit with 2048 shots. Compare the results and explain what changes and why.</p>

  <p>Publish the circuits and results to web/experiment.html.
You may use basic HTML, inline CSS, and small amounts of JavaScript to make the page more engaging and easier to understand.
Keep everything self-contained (no external libraries or network access).</p>

  <p>The page should:</p>
  <ul>
    <li>briefly explain the experiment in plain language</li>
    <li>show each circuit as formatted code</li>
    <li>present results clearly (tables, simple bars, or percentages)</li>
    <li>include a short interpretation of the measurement distributions</li>
    <li>remain readable even if JavaScript is disabled</li>
  </ul>

  <p>Do not write any code now.</p>
</blockquote>

<p><img src="/assets/images/2026_01_15/Prompt2.png" alt="Prompt 2" /></p>

<p>Again, the Orpius interactive agent breaks down the task into sub-tasks. This is then interpreted by one or more agents when the schedule item comes round.</p>

<p><img src="/assets/images/2026_01_15/ScheduledItem2.png" alt="Schedule Item 2" /></p>

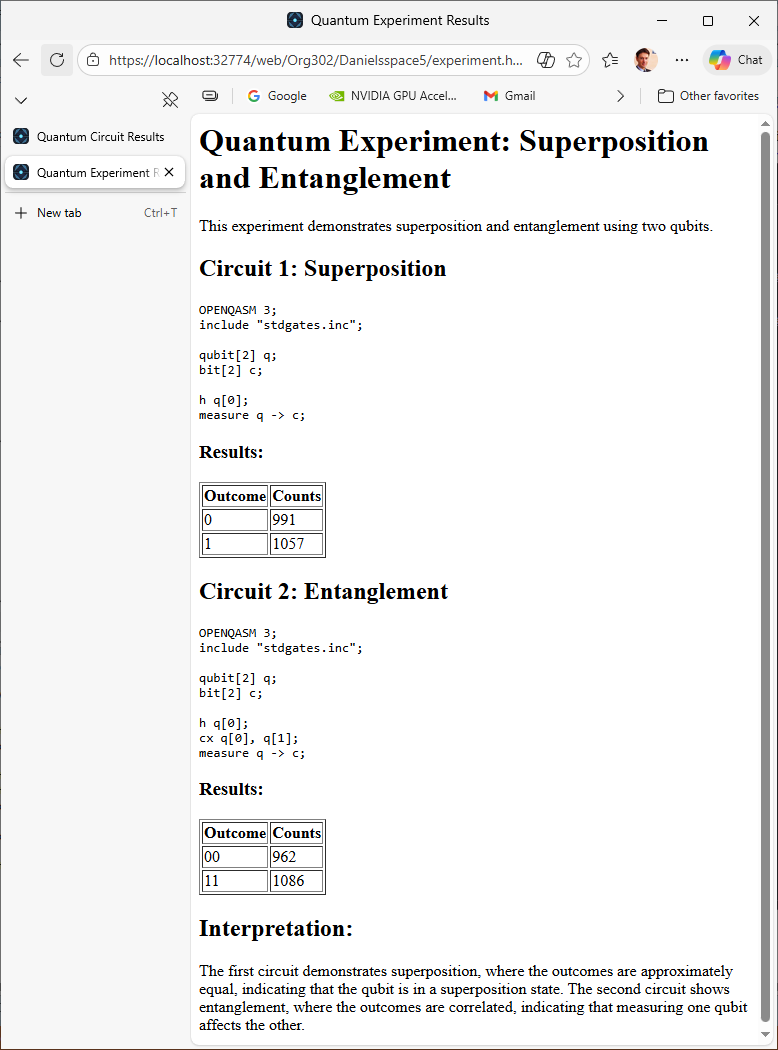
<p>When the schedule came round, the agent was able to write and execute the OpenQasm code, and to create a web page that was immediately viewable.</p>

<p><img src="/assets/images/2026_01_15/GeneratedWeb2.png" alt="Generated Webpage 2" /></p>

<p>We’ve looked at using the custom tool, now lets explore how the custom tool was put in place. Let’s begin with the docker sidecar that I needed to put in place to enable to quantum tool.</p>

<h2 id="creating-a-docker-sidecar-for-qiskit">Creating a Docker Sidecar for Qiskit</h2>

<p>To bring in the quantum simulator functionality I chose to hook up a docker container with qiskit in it. I then call out to the sidecar from my ASP.NET Core tools hosting project.
Below is the Dockerfile for the sidecar image that contains the quantum simulator.</p>

<div class="language-plaintext highlighter-rouge"><div class="highlight"><pre class="highlight"><code>FROM python:3.12-slim

WORKDIR /app

COPY requirements.txt .
RUN pip install --no-cache-dir -r requirements.txt

COPY app.py .

EXPOSE 5000
CMD ["uvicorn", "app:app", "--host", "0.0.0.0", "--port", "5000"]
</code></pre></div></div>

<p>The qiskit bits are pulled in via the <em>requirements.txt</em> file:</p>

<pre><code class="language-init">fastapi==0.115.6
uvicorn[standard]==0.32.1
pydantic==2.10.3

qiskit==1.3.0
qiskit-aer==0.15.1
qiskit-qasm3-import==0.6.0
</code></pre>

<p>The sidecar contains a single <em>app.py</em> python file. It’s task is to call into qiskit to execute incoming OpenQasm code in the simulator. The excerpt below shows the <code class="language-plaintext highlighter-rouge">run_job</code> function, which compiles the code and runs it using the simulator.</p>

<div class="language-python highlighter-rouge"><div class="highlight"><pre class="highlight"><code><span class="k">def</span> <span class="nf">run_job</span><span class="p">(</span><span class="n">qasm_text</span><span class="p">:</span> <span class="nb">str</span><span class="p">,</span> <span class="n">shots</span><span class="p">:</span> <span class="nb">int</span><span class="p">,</span> <span class="n">queue</span><span class="p">:</span> <span class="n">mp</span><span class="p">.</span><span class="n">Queue</span><span class="p">)</span> <span class="o">-&gt;</span> <span class="bp">None</span><span class="p">:</span>
    <span class="n">install_signal_handlers</span><span class="p">()</span>
    <span class="n">apply_limits</span><span class="p">()</span>

    <span class="k">try</span><span class="p">:</span>
        <span class="kn">from</span> <span class="nn">qiskit</span> <span class="kn">import</span> <span class="n">qasm3</span><span class="p">,</span> <span class="n">transpile</span>
        <span class="kn">from</span> <span class="nn">qiskit_aer</span> <span class="kn">import</span> <span class="n">Aer</span>

        <span class="n">circuit</span> <span class="o">=</span> <span class="n">qasm3</span><span class="p">.</span><span class="n">loads</span><span class="p">(</span><span class="n">qasm_text</span><span class="p">)</span>
        <span class="n">validate_circuit</span><span class="p">(</span><span class="n">circuit</span><span class="p">)</span>
        <span class="n">simulator</span> <span class="o">=</span> <span class="n">Aer</span><span class="p">.</span><span class="n">get_backend</span><span class="p">(</span><span class="s">"aer_simulator"</span><span class="p">)</span>

        <span class="c1"># Keep optimisation low to avoid expensive transpilation.
</span>        <span class="n">compiled</span> <span class="o">=</span> <span class="n">transpile</span><span class="p">(</span><span class="n">circuit</span><span class="p">,</span> <span class="n">simulator</span><span class="p">,</span> <span class="n">optimization_level</span><span class="o">=</span><span class="mi">0</span><span class="p">)</span>

        <span class="n">result</span> <span class="o">=</span> <span class="n">simulator</span><span class="p">.</span><span class="n">run</span><span class="p">(</span><span class="n">compiled</span><span class="p">,</span> <span class="n">shots</span><span class="o">=</span><span class="n">shots</span><span class="p">).</span><span class="n">result</span><span class="p">()</span>
        <span class="n">counts</span> <span class="o">=</span> <span class="n">result</span><span class="p">.</span><span class="n">get_counts</span><span class="p">()</span>

        <span class="n">queue</span><span class="p">.</span><span class="n">put</span><span class="p">({</span><span class="s">"ok"</span><span class="p">:</span> <span class="bp">True</span><span class="p">,</span> <span class="s">"counts"</span><span class="p">:</span> <span class="n">counts</span><span class="p">})</span>
    <span class="k">except</span> <span class="nb">Exception</span> <span class="k">as</span> <span class="n">ex</span><span class="p">:</span>
        <span class="n">queue</span><span class="p">.</span><span class="n">put</span><span class="p">({</span><span class="s">"ok"</span><span class="p">:</span> <span class="bp">False</span><span class="p">,</span> <span class="s">"error"</span><span class="p">:</span> <span class="n">build_error_payload</span><span class="p">(</span><span class="n">ex</span><span class="p">)})</span>
</code></pre></div></div>

<p>Incoming requests to the sidecar are placed in a queue. During execution we ensure that each job does not exceed a timeout. We also surface any errors back to the caller.</p>

<div class="language-python highlighter-rouge"><div class="highlight"><pre class="highlight"><code><span class="o">@</span><span class="n">app</span><span class="p">.</span><span class="n">post</span><span class="p">(</span><span class="s">"/execute"</span><span class="p">)</span>
<span class="k">async</span> <span class="k">def</span> <span class="nf">execute</span><span class="p">(</span><span class="n">request</span><span class="p">:</span> <span class="n">ExecuteRequest</span><span class="p">)</span> <span class="o">-&gt;</span> <span class="n">Any</span><span class="p">:</span>
    <span class="k">if</span> <span class="nb">len</span><span class="p">(</span><span class="n">request</span><span class="p">.</span><span class="n">qasm</span><span class="p">)</span> <span class="o">&gt;</span> <span class="n">MAX_QASM_CHARS</span><span class="p">:</span>
        <span class="k">raise</span> <span class="n">HTTPException</span><span class="p">(</span><span class="n">status_code</span><span class="o">=</span><span class="mi">413</span><span class="p">,</span> <span class="n">detail</span><span class="o">=</span><span class="s">"QASM program is too large."</span><span class="p">)</span>

    <span class="k">if</span> <span class="n">request</span><span class="p">.</span><span class="n">shots</span> <span class="o">&lt;</span> <span class="mi">1</span> <span class="ow">or</span> <span class="n">request</span><span class="p">.</span><span class="n">shots</span> <span class="o">&gt;</span> <span class="n">MAX_SHOTS</span><span class="p">:</span>
        <span class="k">raise</span> <span class="n">HTTPException</span><span class="p">(</span>
            <span class="n">status_code</span><span class="o">=</span><span class="mi">400</span><span class="p">,</span>
            <span class="n">detail</span><span class="o">=</span><span class="sa">f</span><span class="s">"Shots must be between 1 and </span><span class="si">{</span><span class="n">MAX_SHOTS</span><span class="si">}</span><span class="s">."</span>
        <span class="p">)</span>

    <span class="k">async</span> <span class="k">with</span> <span class="n">semaphore</span><span class="p">:</span>
        <span class="n">queue</span> <span class="o">=</span> <span class="n">mp</span><span class="p">.</span><span class="n">SimpleQueue</span><span class="p">()</span>
        <span class="n">process</span> <span class="o">=</span> <span class="n">mp</span><span class="p">.</span><span class="n">Process</span><span class="p">(</span>
            <span class="n">target</span><span class="o">=</span><span class="n">run_job</span><span class="p">,</span>
            <span class="n">args</span><span class="o">=</span><span class="p">(</span><span class="n">request</span><span class="p">.</span><span class="n">qasm</span><span class="p">,</span> <span class="n">request</span><span class="p">.</span><span class="n">shots</span><span class="p">,</span> <span class="n">queue</span><span class="p">),</span>
            <span class="n">daemon</span><span class="o">=</span><span class="bp">True</span>
        <span class="p">)</span>

        <span class="n">start_time</span> <span class="o">=</span> <span class="n">time</span><span class="p">.</span><span class="n">monotonic</span><span class="p">()</span>
        <span class="n">process</span><span class="p">.</span><span class="n">start</span><span class="p">()</span>

        <span class="c1"># Poll without blocking the event loop.
</span>        <span class="k">while</span> <span class="n">process</span><span class="p">.</span><span class="n">is_alive</span><span class="p">():</span>
            <span class="n">elapsed</span> <span class="o">=</span> <span class="n">time</span><span class="p">.</span><span class="n">monotonic</span><span class="p">()</span> <span class="o">-</span> <span class="n">start_time</span>
            <span class="k">if</span> <span class="n">elapsed</span> <span class="o">&gt;</span> <span class="n">TIMEOUT_SECONDS</span><span class="p">:</span>
                <span class="n">process</span><span class="p">.</span><span class="n">terminate</span><span class="p">()</span>
                <span class="n">process</span><span class="p">.</span><span class="n">join</span><span class="p">(</span><span class="n">timeout</span><span class="o">=</span><span class="mf">1.0</span><span class="p">)</span>
              
                <span class="k">if</span> <span class="n">process</span><span class="p">.</span><span class="n">is_alive</span><span class="p">():</span>
                    <span class="n">process</span><span class="p">.</span><span class="n">kill</span><span class="p">()</span>
                    <span class="n">process</span><span class="p">.</span><span class="n">join</span><span class="p">()</span>
          
                <span class="n">exit_code</span> <span class="o">=</span> <span class="n">process</span><span class="p">.</span><span class="n">exitcode</span>
                <span class="n">signal_name</span> <span class="o">=</span> <span class="n">get_signal_name_from_exit_code</span><span class="p">(</span><span class="n">exit_code</span><span class="p">)</span>

                <span class="k">raise</span> <span class="n">HTTPException</span><span class="p">(</span>
                    <span class="n">status_code</span><span class="o">=</span><span class="mi">408</span><span class="p">,</span>
                    <span class="n">detail</span><span class="o">=</span><span class="p">{</span>
                        <span class="s">"type"</span><span class="p">:</span> <span class="s">"Timeout"</span><span class="p">,</span>
                        <span class="s">"message"</span><span class="p">:</span> <span class="sa">f</span><span class="s">"Simulation exceeded time limit (</span><span class="si">{</span><span class="n">TIMEOUT_SECONDS</span><span class="si">}</span><span class="s">s)."</span><span class="p">,</span>
                        <span class="s">"elapsedSeconds"</span><span class="p">:</span> <span class="n">elapsed</span><span class="p">,</span>
                        <span class="s">"exitCode"</span><span class="p">:</span> <span class="n">exit_code</span><span class="p">,</span>
                        <span class="s">"signal"</span><span class="p">:</span> <span class="n">signal_name</span><span class="p">,</span>
                    <span class="p">}</span>
                <span class="p">)</span>

            <span class="k">await</span> <span class="n">asyncio</span><span class="p">.</span><span class="n">sleep</span><span class="p">(</span><span class="mf">0.05</span><span class="p">)</span>

        <span class="n">process</span><span class="p">.</span><span class="n">join</span><span class="p">()</span>

        <span class="k">if</span> <span class="n">queue</span><span class="p">.</span><span class="n">empty</span><span class="p">():</span>
            <span class="n">exit_code</span> <span class="o">=</span> <span class="n">process</span><span class="p">.</span><span class="n">exitcode</span>
            <span class="n">signal_name</span> <span class="o">=</span> <span class="n">get_signal_name_from_exit_code</span><span class="p">(</span><span class="n">exit_code</span><span class="p">)</span>

            <span class="k">raise</span> <span class="n">HTTPException</span><span class="p">(</span>
                <span class="n">status_code</span><span class="o">=</span><span class="mi">500</span><span class="p">,</span>
                <span class="n">detail</span><span class="o">=</span><span class="p">{</span>
                    <span class="s">"type"</span><span class="p">:</span> <span class="s">"WorkerCrashed"</span><span class="p">,</span>
                    <span class="s">"message"</span><span class="p">:</span> <span class="s">"Simulator worker exited without output."</span>
                               <span class="s">"This usually indicates a hard kill "</span>
                               <span class="s">"(CPU/memory limit) or a native crash."</span><span class="p">,</span>
                    <span class="s">"exitCode"</span><span class="p">:</span> <span class="n">exit_code</span><span class="p">,</span>
                    <span class="s">"signal"</span><span class="p">:</span> <span class="n">signal_name</span><span class="p">,</span>
                    <span class="s">"elapsedSeconds"</span><span class="p">:</span> <span class="n">time</span><span class="p">.</span><span class="n">monotonic</span><span class="p">()</span> <span class="o">-</span> <span class="n">start_time</span><span class="p">,</span>
                <span class="p">}</span>
            <span class="p">)</span>

        <span class="n">payload</span> <span class="o">=</span> <span class="n">queue</span><span class="p">.</span><span class="n">get</span><span class="p">()</span>

        <span class="k">if</span> <span class="ow">not</span> <span class="n">payload</span><span class="p">.</span><span class="n">get</span><span class="p">(</span><span class="s">"ok"</span><span class="p">,</span> <span class="bp">False</span><span class="p">):</span>
            <span class="n">error</span> <span class="o">=</span> <span class="n">payload</span><span class="p">.</span><span class="n">get</span><span class="p">(</span><span class="s">"error"</span><span class="p">)</span> <span class="ow">or</span> <span class="p">{</span><span class="s">"type"</span><span class="p">:</span> <span class="s">"UnknownError"</span><span class="p">,</span> <span class="s">"message"</span><span class="p">:</span> <span class="s">"Unknown error."</span><span class="p">}</span>

            <span class="n">status_code</span> <span class="o">=</span> <span class="n">classify_http_status</span><span class="p">(</span><span class="n">error</span><span class="p">)</span>
            <span class="k">raise</span> <span class="n">HTTPException</span><span class="p">(</span><span class="n">status_code</span><span class="o">=</span><span class="n">status_code</span><span class="p">,</span> <span class="n">detail</span><span class="o">=</span><span class="n">error</span><span class="p">)</span>

        <span class="k">return</span> <span class="p">{</span>
            <span class="s">"counts"</span><span class="p">:</span> <span class="n">payload</span><span class="p">[</span><span class="s">"counts"</span><span class="p">],</span>
            <span class="s">"elapsedSeconds"</span><span class="p">:</span> <span class="n">time</span><span class="p">.</span><span class="n">monotonic</span><span class="p">()</span> <span class="o">-</span> <span class="n">start_time</span>
        <span class="p">}</span>
</code></pre></div></div>

<h2 id="managing-multiple-sidecars-in-a-visual-studio-solution">Managing Multiple Sidecars in a Visual Studio Solution</h2>

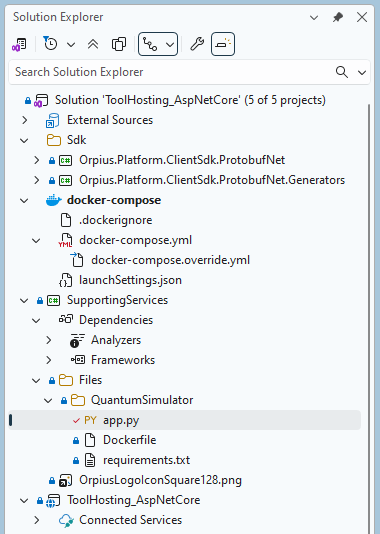
<p>My intention is to build out more custom tools that will probably require sidecars like the Quantum Simulator. To allow easy navigation between files I created an empty <code class="language-plaintext highlighter-rouge">SupportingServices</code> project in Visual Studio, into which I then placed the <code class="language-plaintext highlighter-rouge">Dockerfile</code> for the Qiskit sidecar and the python file to interact with it.</p>

<p><img src="/assets/images/2026_01_15/SolutionExplorer1.png" alt="Solution Explorer with SupportingService project" /></p>

<p>The csproj file is shown below. I explicitly exclude everything from compilation.</p>

<div class="language-xml highlighter-rouge"><div class="highlight"><pre class="highlight"><code><span class="nt">&lt;Project</span> <span class="na">Sdk=</span><span class="s">"Microsoft.NET.Sdk"</span><span class="nt">&gt;</span>
  <span class="nt">&lt;PropertyGroup&gt;</span>
    <span class="nt">&lt;TargetFramework&gt;</span>net8.0<span class="nt">&lt;/TargetFramework&gt;</span>
    <span class="nt">&lt;EnableDefaultItems&gt;</span>false<span class="nt">&lt;/EnableDefaultItems&gt;</span>
  <span class="nt">&lt;/PropertyGroup&gt;</span>

  <span class="nt">&lt;ItemGroup&gt;</span>
    <span class="nt">&lt;None</span> <span class="na">Include=</span><span class="s">"Files\**\*"</span>
          <span class="na">Exclude=</span><span class="s">"**\bin\**;**\obj\**;**\.vs\**"</span> <span class="nt">/&gt;</span>
  <span class="nt">&lt;/ItemGroup&gt;</span>
<span class="nt">&lt;/Project&gt;</span>
</code></pre></div></div>

<h2 id="including-the-sidecar-in-docker-compose">Including the Sidecar in Docker Compose</h2>

<p>Recall that we have an ASP.NET Core project that hosts our custom tools. To bring in the quantum simulator sidecar, we include it in the <em>docker-compose.yml</em> file, as shown below:</p>

<div class="language-yaml highlighter-rouge"><div class="highlight"><pre class="highlight"><code><span class="na">services</span><span class="pi">:</span>
  <span class="na">toolhosting_aspnetcore</span><span class="pi">:</span>
    <span class="na">image</span><span class="pi">:</span> <span class="s">${DOCKER_REGISTRY-}toolhostingaspnetcore</span>
    <span class="na">build</span><span class="pi">:</span>
      <span class="na">context</span><span class="pi">:</span> <span class="s">../../..</span>
      <span class="na">dockerfile</span><span class="pi">:</span> <span class="s">Samples/Containerized/ToolHosting_AspNetCore/ToolHosting_AspNetCore/Dockerfile</span>

  <span class="na">quantum-simulator</span><span class="pi">:</span>
    <span class="na">build</span><span class="pi">:</span>
      <span class="na">context</span><span class="pi">:</span> <span class="s">../SupportingServices/Files/QuantumSimulator</span>
      <span class="na">dockerfile</span><span class="pi">:</span> <span class="s">Dockerfile</span>
    <span class="na">expose</span><span class="pi">:</span>
      <span class="pi">-</span> <span class="s2">"</span><span class="s">5000"</span>
    <span class="na">healthcheck</span><span class="pi">:</span>
      <span class="na">test</span><span class="pi">:</span> <span class="pi">[</span><span class="s2">"</span><span class="s">CMD"</span><span class="pi">,</span> <span class="s2">"</span><span class="s">python"</span><span class="pi">,</span> <span class="s2">"</span><span class="s">-c"</span><span class="pi">,</span> <span class="s2">"</span><span class="s">import</span><span class="nv"> </span><span class="s">urllib.request;</span><span class="nv"> </span><span class="s">urllib.request.urlopen('http://localhost:5000/health').read()"</span><span class="pi">]</span>
      <span class="na">interval</span><span class="pi">:</span> <span class="s">5s</span>
      <span class="na">timeout</span><span class="pi">:</span> <span class="s">3s</span>
      <span class="na">retries</span><span class="pi">:</span> <span class="m">20</span>
</code></pre></div></div>

<p>Since I wish to re-use the supporting sidecars for multiple solutions, the sidecar sits in a directory outside of the main samples directory. Doing this meant that I had to change the context to be higher up in the directory tree. The <em>dockerfile</em> for the <em>ToolHosting_AspNetCore</em> project copies in the SDK projects.</p>

<div class="language-dockerfile highlighter-rouge"><div class="highlight"><pre class="highlight"><code><span class="c"># This stage is used when running from VS in fast mode (Default for Debug configuration)</span>
<span class="k">FROM</span><span class="w"> </span><span class="s">mcr.microsoft.com/dotnet/aspnet:10.0</span><span class="w"> </span><span class="k">AS</span><span class="w"> </span><span class="s">base</span>
<span class="k">USER</span><span class="s"> $APP_UID</span>
<span class="k">WORKDIR</span><span class="s"> /app</span>
<span class="k">EXPOSE</span><span class="s"> 8080</span>
<span class="k">EXPOSE</span><span class="s"> 8081</span>

<span class="c"># This stage is used to build the service project</span>
<span class="k">FROM</span><span class="w"> </span><span class="s">mcr.microsoft.com/dotnet/sdk:10.0</span><span class="w"> </span><span class="k">AS</span><span class="w"> </span><span class="s">build</span>
<span class="k">ARG</span><span class="s"> BUILD_CONFIGURATION=Release</span>
<span class="k">WORKDIR</span><span class="s"> /src</span>

<span class="k">COPY</span><span class="s"> ["Samples/Containerized/ToolHosting_AspNetCore/ToolHosting_AspNetCore/ToolHosting_AspNetCore.csproj", "Samples/Containerized/ToolHosting_AspNetCore/ToolHosting_AspNetCore/"]</span>
<span class="k">COPY</span><span class="s"> ["Orpius.Platform.ClientSdk.ProtobufNet/Orpius.Platform.ClientSdk.ProtobufNet.csproj", "Orpius.Platform.ClientSdk.ProtobufNet/"]</span>
<span class="k">COPY</span><span class="s"> ["Orpius.Platform.ClientSdk.ProtobufNet.Generators/Orpius.Platform.ClientSdk.ProtobufNet.Generators.csproj", "Orpius.Platform.ClientSdk.ProtobufNet.Generators/"]</span>

<span class="k">RUN </span>dotnet restore <span class="s2">"Samples/Containerized/ToolHosting_AspNetCore/ToolHosting_AspNetCore/ToolHosting_AspNetCore.csproj"</span>
<span class="k">COPY</span><span class="s"> . .</span>

<span class="k">WORKDIR</span><span class="s"> "/src/Samples/Containerized/ToolHosting_AspNetCore/ToolHosting_AspNetCore"</span>
<span class="k">RUN </span>dotnet build <span class="s2">"ToolHosting_AspNetCore.csproj"</span> <span class="nt">-c</span> <span class="nv">$BUILD_CONFIGURATION</span> <span class="nt">-o</span> /app/build

<span class="c"># This stage is used to publish the service project to be copied to the final stage</span>
<span class="k">FROM</span><span class="w"> </span><span class="s">build</span><span class="w"> </span><span class="k">AS</span><span class="w"> </span><span class="s">publish</span>
<span class="k">ARG</span><span class="s"> BUILD_CONFIGURATION=Release</span>
<span class="k">WORKDIR</span><span class="s"> "/src/Samples/Containerized/ToolHosting_AspNetCore/ToolHosting_AspNetCore"</span>
<span class="k">RUN </span>dotnet publish <span class="s2">"./ToolHosting_AspNetCore.csproj"</span> <span class="nt">-c</span> <span class="nv">$BUILD_CONFIGURATION</span> <span class="nt">-o</span> /app/publish /p:UseAppHost<span class="o">=</span><span class="nb">false</span>

<span class="c"># This stage is used in production or when running from VS in regular mode (Default when not using the Debug configuration)</span>
<span class="k">FROM</span><span class="w"> </span><span class="s">base</span><span class="w"> </span><span class="k">AS</span><span class="w"> </span><span class="s">final</span>
<span class="k">WORKDIR</span><span class="s"> /app</span>
<span class="k">COPY</span><span class="s"> --from=publish /app/publish .</span>
<span class="k">ENTRYPOINT</span><span class="s"> ["dotnet", "ToolHosting_AspNetCore.dll"]</span>
</code></pre></div></div>

<blockquote>
  <p><strong>NOTE:</strong> When using the Orpius SDK NuGet packages, and not the actual SDK projects like I did here, there is no need to perform the copy operations in the dockerfile.</p>
</blockquote>

<h2 id="building-the-c-client-to-interact-with-the-python-based-sidecar">Building the C# Client to Interact with the Python-based Sidecar</h2>

<p>We communicate with the Qiskit sidecar over HTTP on the shared Docker network. The <code class="language-plaintext highlighter-rouge">QuantumSimulatorClient</code> class, in the <em>ToolHosting_AspNetCore</em> project, makes the calls.</p>

<p>We have two data transfer objects: an <code class="language-plaintext highlighter-rouge">ExecuteRequest</code> class that hold that qasm code; sent to the Qiskit quantum simulator in the sidecar, and the response received back from the sidecar.</p>

<p>The <code class="language-plaintext highlighter-rouge">ExecuteResponse.Counts</code> dictionary holds the resulting qubit states, or an error if execution failed.</p>

<div class="language-cs highlighter-rouge"><div class="highlight"><pre class="highlight"><code><span class="k">sealed</span> <span class="k">class</span> <span class="nc">ExecuteRequest</span>
<span class="p">{</span>
    <span class="k">public</span> <span class="n">required</span> <span class="kt">string</span> <span class="n">Qasm</span> <span class="p">{</span> <span class="k">get</span><span class="p">;</span> <span class="n">init</span><span class="p">;</span> <span class="p">}</span>

    <span class="k">public</span> <span class="kt">int</span> <span class="n">Shots</span> <span class="p">{</span> <span class="k">get</span><span class="p">;</span> <span class="n">init</span><span class="p">;</span> <span class="p">}</span> <span class="p">=</span> <span class="m">1024</span><span class="p">;</span>
<span class="p">}</span>

<span class="k">sealed</span> <span class="k">class</span> <span class="nc">ExecuteResponse</span>
<span class="p">{</span>
    <span class="k">public</span> <span class="n">Dictionary</span><span class="p">&lt;</span><span class="kt">string</span><span class="p">,</span> <span class="kt">int</span><span class="p">&gt;?</span> <span class="n">Counts</span> <span class="p">{</span> <span class="k">get</span><span class="p">;</span> <span class="n">init</span><span class="p">;</span> <span class="p">}</span>
<span class="p">}</span>
</code></pre></div></div>

<p>To call the sidecar the <code class="language-plaintext highlighter-rouge">QuantumSimulatorClient</code> has the following <code class="language-plaintext highlighter-rouge">ExecuteAsync</code> method:</p>

<div class="language-cs highlighter-rouge"><div class="highlight"><pre class="highlight"><code><span class="k">public</span> <span class="k">async</span> <span class="n">Task</span><span class="p">&lt;</span><span class="n">Dictionary</span><span class="p">&lt;</span><span class="kt">string</span><span class="p">,</span> <span class="kt">int</span><span class="p">&gt;&gt;</span> <span class="nf">ExecuteAsync</span><span class="p">(</span>
                                               <span class="kt">string</span> <span class="n">openQasm3Program</span><span class="p">,</span>
                                               <span class="kt">int</span> <span class="n">shots</span><span class="p">,</span>
                                               <span class="n">CancellationToken</span> <span class="n">token</span><span class="p">)</span>
<span class="p">{</span>
    <span class="kt">var</span> <span class="n">response</span> <span class="p">=</span> <span class="k">await</span> <span class="n">httpClient</span><span class="p">.</span><span class="nf">PostAsJsonAsync</span><span class="p">(</span>
                       <span class="s">"/execute"</span><span class="p">,</span>
                       <span class="k">new</span> <span class="n">ExecuteRequest</span>
                       <span class="p">{</span>
                           <span class="n">Qasm</span>  <span class="p">=</span> <span class="n">openQasm3Program</span><span class="p">,</span>
                           <span class="n">Shots</span> <span class="p">=</span> <span class="n">shots</span>
                       <span class="p">},</span>
                       <span class="n">cancellationToken</span><span class="p">:</span> <span class="n">token</span><span class="p">);</span>

    <span class="k">if</span> <span class="p">(!</span><span class="n">response</span><span class="p">.</span><span class="n">IsSuccessStatusCode</span><span class="p">)</span>
    <span class="p">{</span>
        <span class="kt">var</span> <span class="n">errorText</span> <span class="p">=</span> <span class="k">await</span> <span class="n">response</span><span class="p">.</span><span class="n">Content</span><span class="p">.</span><span class="nf">ReadAsStringAsync</span><span class="p">(</span><span class="n">token</span><span class="p">);</span>
        <span class="k">throw</span> <span class="k">new</span> <span class="nf">InvalidOperationException</span><span class="p">(</span>
            <span class="s">$"Quantum simulator call failed: </span><span class="p">{(</span><span class="kt">int</span><span class="p">)</span><span class="n">response</span><span class="p">.</span><span class="n">StatusCode</span><span class="p">}</span><span class="s"> </span><span class="p">{</span><span class="n">errorText</span><span class="p">}</span><span class="s">"</span><span class="p">);</span>
    <span class="p">}</span>

    <span class="kt">var</span> <span class="n">payload</span> <span class="p">=</span> <span class="k">await</span> <span class="n">response</span><span class="p">.</span><span class="n">Content</span><span class="p">.</span><span class="n">ReadFromJsonAsync</span><span class="p">&lt;</span><span class="n">ExecuteResponse</span><span class="p">&gt;(</span>
                           <span class="n">cancellationToken</span><span class="p">:</span> <span class="n">token</span><span class="p">);</span>

    <span class="k">if</span> <span class="p">(</span><span class="n">payload</span><span class="p">?.</span><span class="n">Counts</span> <span class="k">is</span> <span class="k">null</span><span class="p">)</span>
    <span class="p">{</span>
        <span class="k">throw</span> <span class="k">new</span> <span class="nf">InvalidOperationException</span><span class="p">(</span>
            <span class="s">"Quantum simulator response was empty or invalid."</span><span class="p">);</span>
    <span class="p">}</span>

    <span class="k">return</span> <span class="n">payload</span><span class="p">.</span><span class="n">Counts</span><span class="p">;</span>
<span class="p">}</span>
</code></pre></div></div>

<h2 id="creating-an-orpius-tool-that-uses-the-client">Creating an Orpius Tool that uses the Client</h2>

<p>With the quantum simulator sidecar in place, the hard-lifting is done. The easy part is now exposing it via an Orpius custom tool. For this we create a class and decorate it with the <code class="language-plaintext highlighter-rouge">[Tool]</code>, <code class="language-plaintext highlighter-rouge">[ToolMethod]</code>, and <code class="language-plaintext highlighter-rouge">[ToolProperty]</code> attributes. A Roslyn <code class="language-plaintext highlighter-rouge">IIncrementalGenerator</code> takes care of the rest.</p>

<blockquote>
  <p><strong>NOTE:</strong> The Orpius SDK takes care of generating the types needed for registration via a Roslyn <code class="language-plaintext highlighter-rouge">IIncrementalGenerator</code> named <code class="language-plaintext highlighter-rouge">ToolRegistryItemGenerator</code> in the <em>Orpius.Platform.ClientSdk.ProtobufNet.Generators</em> project.</p>
</blockquote>

<p>The <code class="language-plaintext highlighter-rouge">QuantumQasm3Tool</code> leverages the <code class="language-plaintext highlighter-rouge">QuantumSimulatorClient</code>, which is injected via the constructor, as shown:</p>

<div class="language-cs highlighter-rouge"><div class="highlight"><pre class="highlight"><code><span class="p">[</span><span class="n">Tool</span><span class="p">]</span>
<span class="k">public</span> <span class="k">class</span> <span class="nc">QuantumQasm3Tool</span>
<span class="p">{</span>
    <span class="k">readonly</span> <span class="n">QuantumSimulatorClient</span> <span class="n">quantumSimulatorClient</span><span class="p">;</span>

    <span class="k">public</span> <span class="nf">QuantumQasm3Tool</span><span class="p">(</span><span class="n">QuantumSimulatorClient</span> <span class="n">quantumSimulatorClient</span><span class="p">)</span>
    <span class="p">{</span>
        <span class="k">this</span><span class="p">.</span><span class="n">quantumSimulatorClient</span> <span class="p">=</span> <span class="n">quantumSimulatorClient</span>
            <span class="p">??</span> <span class="k">throw</span> <span class="k">new</span> <span class="nf">ArgumentNullException</span><span class="p">(</span><span class="k">nameof</span><span class="p">(</span><span class="n">quantumSimulatorClient</span><span class="p">));</span>
    <span class="p">}</span>
    <span class="p">...</span>
</code></pre></div></div>
<blockquote>
  <p><strong>TIP:</strong> If you wish, you could place the client code directly in the <code class="language-plaintext highlighter-rouge">Tool</code>, but I chose to build this out in stages: client first, get that working, then expose it via a Tool class.</p>
</blockquote>

<p>The tool has a single method <code class="language-plaintext highlighter-rouge">ExecuteQasm3Program</code>, shown below. <code class="language-plaintext highlighter-rouge">ExecuteQasm3Program</code> is the method that is ultimately called by your Orpius agent.</p>

<p>The API surface of this method and parameters is automatically provided to the Orpius server; it is stored, an LLM OpenAPI schema generated for it, and it is parsed into the context of the agent, along with the <em>Descriptions</em> to allow the agent to understand how to use it. Neat eh? You don’t need to do anything apart from decorate your class with a few attributes and follow to signature conventions: two parameters, last parameter <code class="language-plaintext highlighter-rouge">ICombinedContext</code> object. If you’ve ever used gRPC before, the signature format will look familiar.</p>

<div class="language-cs highlighter-rouge"><div class="highlight"><pre class="highlight"><code><span class="p">[</span><span class="nf">ToolMethod</span><span class="p">(</span><span class="n">Description</span>
    <span class="p">=</span> <span class="s">"Executes an OpenQASM 3 program on the quantum simulator"</span>
      <span class="p">+</span> <span class="s">" and returns measurement counts. "</span>
      <span class="p">+</span> <span class="s">"'Shots' controls the number of samples taken."</span><span class="p">)]</span>
<span class="k">public</span> <span class="k">async</span> <span class="n">Task</span><span class="p">&lt;</span><span class="n">ExecuteQasm3ProgramResponse</span><span class="p">&gt;</span> <span class="nf">ExecuteQasm3Program</span><span class="p">(</span>
    <span class="n">ExecuteQasm3ProgramRequest</span> <span class="n">request</span><span class="p">,</span>
    <span class="n">ICombinedContext</span> <span class="n">context</span><span class="p">)</span>
<span class="p">{</span>
    <span class="k">if</span> <span class="p">(</span><span class="n">request</span> <span class="k">is</span> <span class="k">null</span><span class="p">)</span>
    <span class="p">{</span>
        <span class="k">throw</span> <span class="k">new</span> <span class="nf">ArgumentNullException</span><span class="p">(</span><span class="k">nameof</span><span class="p">(</span><span class="n">request</span><span class="p">));</span>
    <span class="p">}</span>

    <span class="k">if</span> <span class="p">(</span><span class="kt">string</span><span class="p">.</span><span class="nf">IsNullOrWhiteSpace</span><span class="p">(</span><span class="n">request</span><span class="p">.</span><span class="n">OpenQasm3Program</span><span class="p">))</span>
    <span class="p">{</span>
        <span class="k">throw</span> <span class="k">new</span> <span class="nf">RpcException</span><span class="p">(</span><span class="k">new</span> <span class="nf">Status</span><span class="p">(</span>
            <span class="n">StatusCode</span><span class="p">.</span><span class="n">InvalidArgument</span><span class="p">,</span>
            <span class="s">"OpenQasm3Program is required and cannot be empty."</span><span class="p">));</span>
    <span class="p">}</span>

    <span class="k">if</span> <span class="p">(</span><span class="n">request</span><span class="p">.</span><span class="n">Shots</span> <span class="p">&lt;=</span> <span class="m">0</span><span class="p">)</span>
    <span class="p">{</span>
        <span class="k">throw</span> <span class="k">new</span> <span class="nf">RpcException</span><span class="p">(</span><span class="k">new</span> <span class="nf">Status</span><span class="p">(</span>
            <span class="n">StatusCode</span><span class="p">.</span><span class="n">InvalidArgument</span><span class="p">,</span>
            <span class="s">"Shots must be greater than 0."</span><span class="p">));</span>
    <span class="p">}</span>

    <span class="n">CancellationToken</span> <span class="n">token</span> <span class="p">=</span> <span class="nf">GetCancellationToken</span><span class="p">(</span><span class="n">context</span><span class="p">);</span>

    <span class="n">Dictionary</span><span class="p">&lt;</span><span class="kt">string</span><span class="p">,</span> <span class="kt">int</span><span class="p">&gt;</span> <span class="n">counts</span>
        <span class="p">=</span> <span class="k">await</span> <span class="n">quantumSimulatorClient</span><span class="p">.</span><span class="nf">ExecuteAsync</span><span class="p">(</span>
                                          <span class="n">request</span><span class="p">.</span><span class="n">OpenQasm3Program</span><span class="p">,</span> <span class="n">request</span><span class="p">.</span><span class="n">Shots</span><span class="p">,</span> <span class="n">token</span><span class="p">)</span>
                                      <span class="p">.</span><span class="nf">ConfigureAwait</span><span class="p">(</span><span class="k">false</span><span class="p">);</span>

    <span class="k">return</span> <span class="k">new</span> <span class="n">ExecuteQasm3ProgramResponse</span>
    <span class="p">{</span>
        <span class="n">Counts</span> <span class="p">=</span> <span class="n">counts</span>
    <span class="p">};</span>
<span class="p">}</span>
</code></pre></div></div>

<p>The API surface for the parameter and return type are also sent to the server. Contained types are also included recursively, meaning that you can have arbitrarily complex data transfer objects.</p>

<p>Any business logic you’d like to have an agent be able to call into can be rolled into a tool like this. There’s very little else that needs to be done apart from some config in the <code class="language-plaintext highlighter-rouge">Program</code> class, which will get to at the end of the article.</p>

<div class="language-cs highlighter-rouge"><div class="highlight"><pre class="highlight"><code><span class="k">public</span> <span class="k">class</span> <span class="nc">ExecuteQasm3ProgramRequest</span>
<span class="p">{</span>
    <span class="p">[</span><span class="nf">ToolProperty</span><span class="p">(</span>
        <span class="n">Required</span> <span class="p">=</span> <span class="k">true</span><span class="p">,</span>
        <span class="n">Description</span>
            <span class="p">=</span> <span class="s">"""
</span>              <span class="n">OpenQASM</span> <span class="m">3</span> <span class="n">program</span> <span class="n">text</span> <span class="n">to</span> <span class="n">execute</span><span class="p">.</span>
                <span class="p">(</span><span class="n">content</span> <span class="n">trimmed</span> <span class="k">for</span> <span class="n">brevity</span><span class="p">)</span>
              <span class="s">""")]
</span>    <span class="k">public</span> <span class="n">required</span> <span class="kt">string</span> <span class="n">OpenQasm3Program</span> <span class="p">{</span> <span class="k">get</span><span class="p">;</span> <span class="k">set</span><span class="p">;</span> <span class="p">}</span>

    <span class="p">[</span><span class="nf">ToolProperty</span><span class="p">(</span>
        <span class="n">Description</span> <span class="p">=</span> <span class="s">"Number of shots (samples) to run. Defaults to 1024."</span><span class="p">)]</span>
    <span class="k">public</span> <span class="kt">int</span> <span class="n">Shots</span> <span class="p">{</span> <span class="k">get</span><span class="p">;</span> <span class="k">set</span><span class="p">;</span> <span class="p">}</span> <span class="p">=</span> <span class="m">1024</span><span class="p">;</span>
<span class="p">}</span>

<span class="k">public</span> <span class="k">class</span> <span class="nc">ExecuteQasm3ProgramResponse</span>
<span class="p">{</span>
    <span class="p">[</span><span class="nf">ToolProperty</span><span class="p">(</span>
        <span class="n">Description</span> <span class="p">=</span> <span class="s">"Measurement counts keyed by bitstring"</span>
                      <span class="p">+</span> <span class="s">" outcome (for example, \"00\", \"01\", \"10\", \"11\")."</span><span class="p">)]</span>
    <span class="k">public</span> <span class="n">Dictionary</span><span class="p">&lt;</span><span class="kt">string</span><span class="p">,</span> <span class="kt">int</span><span class="p">&gt;?</span> <span class="n">Counts</span> <span class="p">{</span> <span class="k">get</span><span class="p">;</span> <span class="n">init</span><span class="p">;</span> <span class="p">}</span>
<span class="p">}</span>
</code></pre></div></div>

<h2 id="preparing-orpius-for-a-custom-tool">Preparing Orpius for a Custom Tool</h2>

<p>Orpius has various internal tools, such as the isolated code compilation and execution, and <a href="https://github.com/Orpius/SDK/blob/main/docs/UserGuide/index.md#what-orpius-provides">many others</a>, which allows Orpius agents to achieve a lot out-of-the-box, but to allow them to connect to well-defined external systems with authorization built-in you use ‘custom tools’. A custom tool is a GRPC endpoint that maps requests to a class in your project. The way it works is that would have your application notify Orpius via a GRPC call that your application provides one or more tools that agents in Orpius should be able to call.</p>

<p>On the <em>Custom Tools</em> view in the Orpius Console, we copy the <strong>External ID</strong> and <strong>Access Key 1</strong>. We need this information to register our <em>ToolHosting_AspNetCore</em> project as a tools provider.</p>

<blockquote>
  <p><strong>NOTE:</strong> You can create a secure private channel to Orpius during development and production. See <a href="https://github.com/Orpius/SDK/blob/main/docs/UserGuide/CreatingAChannel/index.md">Creating a Secure Channel to Orpius</a></p>
</blockquote>

<p><img src="/assets/images/2026_01_15/CustomTools.png" alt="Orpius Console Custom Tools" /></p>

<p>In the next section you’ll see how you can plug the <em>External ID</em> and <em>Access Key</em> to register the tool when your application starts.</p>

<h2 id="delving-further-into-the-setup">Delving Further into the Setup</h2>

<p>All of the connecting with Orpius and registering tools is done automatically via some setup in the <code class="language-plaintext highlighter-rouge">Program.cs</code> file in the ASP.NET Core <em>ToolHosting_AspNetCore</em> project. The <em>ToolHosting_AspNetCore</em> project was generated with the <code class="language-plaintext highlighter-rouge">Create New Project</code> dialog, to which I added references to the <code class="language-plaintext highlighter-rouge">Orpius.Platform.ClientSdk.ProtobufNet</code> project and the <code class="language-plaintext highlighter-rouge">Orpius.Platform.ClientSdk.ProtobufNet.Generators</code> projects. Rather that do that, you may prefer to add NuGet package references to the Orpius SDK packages instead:</p>
<ul>
  <li><a href="https://www.nuget.org/packages/Orpius.Platform.ClientSdk.ProtobufNet/">Orpius.Platform.ClientSdk.ProtobufNet</a></li>
  <li><a href="https://www.nuget.org/packages/Orpius.Platform.ClientSdk.ProtobufNet.Generators">Orpius.Platform.ClientSdk.ProtobufNet.Generators</a>.</li>
</ul>

<p>In <code class="language-plaintext highlighter-rouge">Program.Main</code> we use ASP.NET Core’s DI infrastructure to inject a pooled <code class="language-plaintext highlighter-rouge">HttpClient</code> instance to the <code class="language-plaintext highlighter-rouge">QuantumSimulatorClient</code>.</p>

<div class="language-cs highlighter-rouge"><div class="highlight"><pre class="highlight"><code><span class="n">services</span><span class="p">.</span><span class="n">AddHttpClient</span><span class="p">&lt;</span><span class="n">QuantumSimulatorClient</span><span class="p">&gt;(</span>
    <span class="n">client</span> <span class="p">=&gt;</span>
    <span class="p">{</span>
        <span class="kt">string</span><span class="p">?</span> <span class="n">baseUrl</span> <span class="p">=</span> <span class="n">builder</span><span class="p">.</span><span class="n">Configuration</span><span class="p">[</span><span class="s">"QuantumSimulator:BaseUrl"</span><span class="p">];</span>

        <span class="k">if</span> <span class="p">(</span><span class="kt">string</span><span class="p">.</span><span class="nf">IsNullOrWhiteSpace</span><span class="p">(</span><span class="n">baseUrl</span><span class="p">))</span>
        <span class="p">{</span>
            <span class="k">throw</span> <span class="k">new</span> <span class="nf">InvalidOperationException</span><span class="p">(</span>
                <span class="s">"QuantumSimulator:BaseUrl is not configured."</span><span class="p">);</span>
        <span class="p">}</span>

        <span class="n">client</span><span class="p">.</span><span class="n">BaseAddress</span> <span class="p">=</span> <span class="k">new</span> <span class="nf">Uri</span><span class="p">(</span><span class="n">baseUrl</span><span class="p">,</span> <span class="n">UriKind</span><span class="p">.</span><span class="n">Absolute</span><span class="p">);</span>
    <span class="p">});</span>
</code></pre></div></div>
<p>The <code class="language-plaintext highlighter-rouge">HttpClient</code> is passed to the <code class="language-plaintext highlighter-rouge">QuantumSimulatorClient</code> during construction:</p>
<div class="language-cs highlighter-rouge"><div class="highlight"><pre class="highlight"><code><span class="k">readonly</span> <span class="n">HttpClient</span> <span class="n">httpClient</span><span class="p">;</span>

<span class="k">public</span> <span class="nf">QuantumSimulatorClient</span><span class="p">(</span><span class="n">HttpClient</span> <span class="n">httpClient</span><span class="p">)</span>
<span class="p">{</span>
    <span class="k">this</span><span class="p">.</span><span class="n">httpClient</span> <span class="p">=</span> <span class="n">httpClient</span><span class="p">;</span>
<span class="p">}</span>
</code></pre></div></div>

<p>The <code class="language-plaintext highlighter-rouge">Program.Main</code> creates proxy object that provides the tool registration infrastructure what it needs to register with the Orpius server. It’s added to the ASP.NET Core <code class="language-plaintext highlighter-rouge">IServiceCollection</code>. You can add multiple <code class="language-plaintext highlighter-rouge">IToolRegistrationParameters</code> implementations, enabling your tools project to provide tools for multiple Orpius Spaces.</p>

<p>The <code class="language-plaintext highlighter-rouge">getLocalUrl</code> value needs to point the location of the tools server, and it needs to be resolvable by the Orpius server. It tells the Orpius server where to call for the tools you publish. Ordinarily this will be a production URL or a <a href="https://github.com/Orpius/SDK/blob/main/docs/UserGuide/CreatingAChannel/index.md">private channel URL</a></p>

<p>We parse the <em>External ID</em> and <em>Access Key</em>, which we obtained in the previous step, to the parameters object.</p>

<div class="language-cs highlighter-rouge"><div class="highlight"><pre class="highlight"><code><span class="n">FuncRegistrationParameters</span> <span class="n">toolRegistrationParameters</span>
    <span class="p">=</span> <span class="k">new</span><span class="p">(</span><span class="n">getLocalUrl</span><span class="p">:</span> <span class="p">()</span> <span class="p">=&gt;</span> <span class="k">new</span> <span class="nf">Uri</span><span class="p">(</span><span class="s">"https://host.docker.internal:7190/"</span><span class="p">),</span>
        <span class="n">getExternalId</span><span class="p">:</span> <span class="p">()</span> <span class="p">=&gt;</span> <span class="n">Guid</span><span class="p">.</span><span class="nf">Parse</span><span class="p">(</span><span class="s">"ee2b90ff-a4c6-44bf-93a7-a25b7e3271b0"</span><span class="p">),</span>
        <span class="n">getApiKey</span><span class="p">:</span> <span class="p">()</span> <span class="p">=&gt;</span> <span class="n">Guid</span><span class="p">.</span><span class="nf">Parse</span><span class="p">(</span><span class="s">"72e1b1f1-414b-46d9-bcb1-1a736d7e6027"</span><span class="p">));</span>

<span class="n">services</span><span class="p">.</span><span class="n">AddSingleton</span><span class="p">&lt;</span><span class="n">IToolRegistrationParameters</span><span class="p">&gt;(</span><span class="n">toolRegistrationParameters</span><span class="p">);</span>
</code></pre></div></div>

<h3 id="what-triggers-the-code-generation">What triggers the code generation?</h3>
<p>At the top of the <code class="language-plaintext highlighter-rouge">Program.cs</code> file we have an assembly-level <code class="language-plaintext highlighter-rouge">GenerateToolRegistryItemAttribute</code>:</p>
<div class="language-cs highlighter-rouge"><div class="highlight"><pre class="highlight"><code><span class="p">[</span><span class="n">assembly</span><span class="p">:</span> <span class="nf">GenerateToolRegistryItem</span><span class="p">(</span><span class="s">"ToolHosting_AspNetCore.ToolForOrpius.AllTools"</span><span class="p">)]</span>
</code></pre></div></div>
<p>The <code class="language-plaintext highlighter-rouge">ToolRegistryItemGenerator</code> in the <em>Orpius.Platform.ClientSdk.ProtobufNet.Generators</em> project looks for this attribute, and when it finds it, it generates the code describing the API service of the tools in the project.</p>

<p>We pull in the generated <code class="language-plaintext highlighter-rouge">AllTools</code> by registering it with the <code class="language-plaintext highlighter-rouge">IServiceCollection</code>:</p>

<div class="language-cs highlighter-rouge"><div class="highlight"><pre class="highlight"><code><span class="n">services</span><span class="p">.</span><span class="n">AddSingleton</span><span class="p">&lt;</span><span class="n">AllTools</span><span class="p">&gt;();</span>
</code></pre></div></div>
<p>We also register our quantum tool in the same manner. Note that both classes and interfaces types are supported, allowing you to switch our the implementation for testing and so forth.</p>
<div class="language-cs highlighter-rouge"><div class="highlight"><pre class="highlight"><code><span class="n">services</span><span class="p">.</span><span class="n">AddSingleton</span><span class="p">&lt;</span><span class="n">QuantumQasm3Tool</span><span class="p">&gt;();</span>
</code></pre></div></div>
<p>When the <code class="language-plaintext highlighter-rouge">AllTools</code> class is resolved from the container, it automatically registers itself with the <code class="language-plaintext highlighter-rouge">IToolsRegistry</code>. The <code class="language-plaintext highlighter-rouge">ToolRegistry</code> contains the mappings and forwards incoming tool requests to their respective custom tools.</p>
<div class="language-cs highlighter-rouge"><div class="highlight"><pre class="highlight"><code><span class="n">_</span> <span class="p">=</span> <span class="n">app</span><span class="p">.</span><span class="n">Services</span><span class="p">.</span><span class="n">GetRequiredService</span><span class="p">&lt;</span><span class="n">AllTools</span><span class="p">&gt;();</span>
</code></pre></div></div>
<p>Finally, the Orpius SDK contains a gRPC service: <code class="language-plaintext highlighter-rouge">IToolProviderService</code> that allows Orpius to call your server to use tools.
We wire it up like so:</p>
<div class="language-cs highlighter-rouge"><div class="highlight"><pre class="highlight"><code><span class="n">app</span><span class="p">.</span><span class="n">MapGrpcService</span><span class="p">&lt;</span><span class="n">IToolProviderService</span><span class="p">&gt;();</span>
</code></pre></div></div>
<p>There are various headers you can use for authentication. You can use the <code class="language-plaintext highlighter-rouge">IToolRegistrationParameters.Headers</code> property, or the <code class="language-plaintext highlighter-rouge">RegisterAsProviderRequest.Headers</code> property directly, to provide headers back to your server during an <code class="language-plaintext highlighter-rouge">IToolProviderService.UseTool</code> call. The headers are encrypted and stored securely on the Orpius server. This gives you the peace of mind that only your Orpius agent can use your custom tool.</p>

<blockquote>
  <p><strong>TIP:</strong> You can find other examples in the <a href="https://github.com/Orpius/SDK/tree/main/DotNet/Orpius.Platform.Sdk/Samples">Orpius SDK samples</a> that demonstrate how to set and read headers.</p>
</blockquote>

<h2 id="conclusion">Conclusion</h2>

<p>In this article we looked at how we can schedule an AI agent to periodically write and execute OpenQASM code and update a webpage based on the results. We then delved into the implementation and saw how to create a Docker sidecar for Qiskit, call that sidecar from our host tools ASP.NET Core application, and create a custom Tool for Orpius, which can be called by your Orpius AI agent. Finally, we looked at how authentication headers can be used to secure tool calls from Orpius to your server.</p>

<p>I hope you enjoyed this article, and I welcome your feedback and questions.</p>

<ul>
  <li><a href="https://x.com/dbvaughan">@dbvaughan on X (Twitter)</a></li>
</ul>]]></content><author><name></name></author><category term="Quantum" /><summary type="html"><![CDATA[Introduction As frontier language models improve, AI agents are set to move further into the realm of scientific research. Multiple agents, working independenty, exploring scientific domains, offer the promise of greater speed of discovery. In addition, LLMs encode a vast amount of technical information that empowers humans to reach beyond the limits of their own education and experience. I’m excited by this field of exploration in AI because it will accelerate scientific research and understanding, and lead to radical advances in health, material sciences, the list is endless. One such domain is quantum computing. Enabling agents to explore new research via browsing, to make hypotheses, and then test those hypotheses on a quantum simulator or an actual physical quantum computer, and then to publish the results, opens up amazing potential for discoveries. In this article we look at how we might start this journey. You’ll see how we can schedule an AI agent to periodically write and execute OpenQASM code and publish the results on the web. Then we’ll deep-dive into the implementation and see how to: Create a Docker sidecar for Qiskit. Call that sidecar from our host tools ASP.NET Core application. Create a custom Tool for Orpius, which can be called by your Orpius AI agent. The full source code for this article is downloadable from https://github.com/Orpius/SDK/tree/main/DotNet/Orpius.Platform.Sdk/Samples/Containerized Background Orpius has two parts: a remote server and a local desktop application. The desktop application allows you to configure the server, schedule tasks, define events, create agents, and so forth. You can find more about Orpius over at the user-guide. If you want to try the ideas explored in this article, get a free-to-try copy of Orpius here https://orpius.com/get-started.html. Let’s jump straight in and see how to create a task to execute some quantum code. Running a Quantum Task with an Agent Let’s begin by looking at the end result of this work. I began with a prompt to the Orpius interactive agent via the Orpius Console: At 13:55 pm today perform the following verbatim: Design a minimal OpenQASM 3 circuit that demonstrates superposition and entanglement. Execute it with 2048 shots, evaluate whether the results match expectations, and publish the circuit and results to web/quantum.html. Don’t write any code now. I told it to schedule the task rather than immediately execute it. You can schedule tasks to be run arbitrarily or based on an event. NOTE: At present the Orpius interactive agent (the one you chat with in the Orpius Console) only has access to custom tools via Orpius Operations; it cannot call custom tools directly but this a planned feature for a future release. After the prompt, a new scheduled item shows up in the Schedule tab of the Orpius Console. When scheduled items are actioned by an agent the Repetitions, count is incremented in the Console. The Orpius agent broke the task into steps, as shown below: When 13:55 came around, the task was actioned…and it failed. Examining the logs I could see that: The agent wrote OpenQASM 2 code and not OpenQASM 3. The Qiskit sidecar needed some enhancement to return meaningful errors to the agent. In Orpius, when a tool raises an error, that error propogates back to the agent. This is how agents are, for example, able to write managed code (using the built-in code execution tool) and to make corrections based on compilation errors. We needed to do the same thing with our OpenQASM code. So, after some assistance from a model I made some error handling additions to my python code, which we’ll look at later in the article. Likewise, I also updated the method description to better guide the agent in acceptable OpenQASM 3 code. (Again, we’ll dig into this later.) The agent was then able to successfully write its own OpenQASM code, use the custom tool to execute it, then publish the results to a webpage. In Orpius, the agents and files associated with the project you’re working on are termed a Space. And, by default, any files that are placed in your Space’s isolated storage under its web directory are browsable on the internet. That means you or your agent can do instant web publishing. Pretty neat. If you’re using the trial version of Orpius, then the content is browsable at https://trial.app.orpius.com/YOUR_ORG_NAME/YOUR_SPACE_NAME/pagename.html. This instant publishing feature is brand-new. Orpius agents use the code execution tool to write, compile, and execute code within a fully isolated webassembly environment. The agent writes C# code to write the page to your web directory in isolated storage. The generated page is barebones stylistically, but there is no reason why you can’t task the agent to jazz it up a bit. I leave that to the reader. So, with the agent able to write and execute a basic OpenQASM program, it was time to push it a bit harder. My next prompt was: At 15:20 pm today perform the following verbatim: Design a small OpenQASM 3 experiment that demonstrates superposition and entanglement, and includes at least one simple variation (for example: with and without an entangling gate). Execute each circuit with 2048 shots. Compare the results and explain what changes and why. Publish the circuits and results to web/experiment.html. You may use basic HTML, inline CSS, and small amounts of JavaScript to make the page more engaging and easier to understand. Keep everything self-contained (no external libraries or network access). The page should: briefly explain the experiment in plain language show each circuit as formatted code present results clearly (tables, simple bars, or percentages) include a short interpretation of the measurement distributions remain readable even if JavaScript is disabled Do not write any code now. Again, the Orpius interactive agent breaks down the task into sub-tasks. This is then interpreted by one or more agents when the schedule item comes round. When the schedule came round, the agent was able to write and execute the OpenQasm code, and to create a web page that was immediately viewable. We’ve looked at using the custom tool, now lets explore how the custom tool was put in place. Let’s begin with the docker sidecar that I needed to put in place to enable to quantum tool. Creating a Docker Sidecar for Qiskit To bring in the quantum simulator functionality I chose to hook up a docker container with qiskit in it. I then call out to the sidecar from my ASP.NET Core tools hosting project. Below is the Dockerfile for the sidecar image that contains the quantum simulator. FROM python:3.12-slim WORKDIR /app COPY requirements.txt . RUN pip install --no-cache-dir -r requirements.txt COPY app.py . EXPOSE 5000 CMD ["uvicorn", "app:app", "--host", "0.0.0.0", "--port", "5000"] The qiskit bits are pulled in via the requirements.txt file: fastapi==0.115.6 uvicorn[standard]==0.32.1 pydantic==2.10.3 qiskit==1.3.0 qiskit-aer==0.15.1 qiskit-qasm3-import==0.6.0 The sidecar contains a single app.py python file. It’s task is to call into qiskit to execute incoming OpenQasm code in the simulator. The excerpt below shows the run_job function, which compiles the code and runs it using the simulator. def run_job(qasm_text: str, shots: int, queue: mp.Queue) -&gt; None: install_signal_handlers() apply_limits() try: from qiskit import qasm3, transpile from qiskit_aer import Aer circuit = qasm3.loads(qasm_text) validate_circuit(circuit) simulator = Aer.get_backend("aer_simulator") # Keep optimisation low to avoid expensive transpilation. compiled = transpile(circuit, simulator, optimization_level=0) result = simulator.run(compiled, shots=shots).result() counts = result.get_counts() queue.put({"ok": True, "counts": counts}) except Exception as ex: queue.put({"ok": False, "error": build_error_payload(ex)}) Incoming requests to the sidecar are placed in a queue. During execution we ensure that each job does not exceed a timeout. We also surface any errors back to the caller. @app.post("/execute") async def execute(request: ExecuteRequest) -&gt; Any: if len(request.qasm) &gt; MAX_QASM_CHARS: raise HTTPException(status_code=413, detail="QASM program is too large.") if request.shots &lt; 1 or request.shots &gt; MAX_SHOTS: raise HTTPException( status_code=400, detail=f"Shots must be between 1 and {MAX_SHOTS}." ) async with semaphore: queue = mp.SimpleQueue() process = mp.Process( target=run_job, args=(request.qasm, request.shots, queue), daemon=True ) start_time = time.monotonic() process.start() # Poll without blocking the event loop. while process.is_alive(): elapsed = time.monotonic() - start_time if elapsed &gt; TIMEOUT_SECONDS: process.terminate() process.join(timeout=1.0) if process.is_alive(): process.kill() process.join() exit_code = process.exitcode signal_name = get_signal_name_from_exit_code(exit_code) raise HTTPException( status_code=408, detail={ "type": "Timeout", "message": f"Simulation exceeded time limit ({TIMEOUT_SECONDS}s).", "elapsedSeconds": elapsed, "exitCode": exit_code, "signal": signal_name, } ) await asyncio.sleep(0.05) process.join() if queue.empty(): exit_code = process.exitcode signal_name = get_signal_name_from_exit_code(exit_code) raise HTTPException( status_code=500, detail={ "type": "WorkerCrashed", "message": "Simulator worker exited without output." "This usually indicates a hard kill " "(CPU/memory limit) or a native crash.", "exitCode": exit_code, "signal": signal_name, "elapsedSeconds": time.monotonic() - start_time, } ) payload = queue.get() if not payload.get("ok", False): error = payload.get("error") or {"type": "UnknownError", "message": "Unknown error."} status_code = classify_http_status(error) raise HTTPException(status_code=status_code, detail=error) return { "counts": payload["counts"], "elapsedSeconds": time.monotonic() - start_time } Managing Multiple Sidecars in a Visual Studio Solution My intention is to build out more custom tools that will probably require sidecars like the Quantum Simulator. To allow easy navigation between files I created an empty SupportingServices project in Visual Studio, into which I then placed the Dockerfile for the Qiskit sidecar and the python file to interact with it. The csproj file is shown below. I explicitly exclude everything from compilation. &lt;Project Sdk="Microsoft.NET.Sdk"&gt; &lt;PropertyGroup&gt; &lt;TargetFramework&gt;net8.0&lt;/TargetFramework&gt; &lt;EnableDefaultItems&gt;false&lt;/EnableDefaultItems&gt; &lt;/PropertyGroup&gt; &lt;ItemGroup&gt; &lt;None Include="Files\**\*" Exclude="**\bin\**;**\obj\**;**\.vs\**" /&gt; &lt;/ItemGroup&gt; &lt;/Project&gt; Including the Sidecar in Docker Compose Recall that we have an ASP.NET Core project that hosts our custom tools. To bring in the quantum simulator sidecar, we include it in the docker-compose.yml file, as shown below: services: toolhosting_aspnetcore: image: ${DOCKER_REGISTRY-}toolhostingaspnetcore build: context: ../../.. dockerfile: Samples/Containerized/ToolHosting_AspNetCore/ToolHosting_AspNetCore/Dockerfile quantum-simulator: build: context: ../SupportingServices/Files/QuantumSimulator dockerfile: Dockerfile expose: - "5000" healthcheck: test: ["CMD", "python", "-c", "import urllib.request; urllib.request.urlopen('http://localhost:5000/health').read()"] interval: 5s timeout: 3s retries: 20 Since I wish to re-use the supporting sidecars for multiple solutions, the sidecar sits in a directory outside of the main samples directory. Doing this meant that I had to change the context to be higher up in the directory tree. The dockerfile for the ToolHosting_AspNetCore project copies in the SDK projects. # This stage is used when running from VS in fast mode (Default for Debug configuration) FROM mcr.microsoft.com/dotnet/aspnet:10.0 AS base USER $APP_UID WORKDIR /app EXPOSE 8080 EXPOSE 8081 # This stage is used to build the service project FROM mcr.microsoft.com/dotnet/sdk:10.0 AS build ARG BUILD_CONFIGURATION=Release WORKDIR /src COPY ["Samples/Containerized/ToolHosting_AspNetCore/ToolHosting_AspNetCore/ToolHosting_AspNetCore.csproj", "Samples/Containerized/ToolHosting_AspNetCore/ToolHosting_AspNetCore/"] COPY ["Orpius.Platform.ClientSdk.ProtobufNet/Orpius.Platform.ClientSdk.ProtobufNet.csproj", "Orpius.Platform.ClientSdk.ProtobufNet/"] COPY ["Orpius.Platform.ClientSdk.ProtobufNet.Generators/Orpius.Platform.ClientSdk.ProtobufNet.Generators.csproj", "Orpius.Platform.ClientSdk.ProtobufNet.Generators/"] RUN dotnet restore "Samples/Containerized/ToolHosting_AspNetCore/ToolHosting_AspNetCore/ToolHosting_AspNetCore.csproj" COPY . . WORKDIR "/src/Samples/Containerized/ToolHosting_AspNetCore/ToolHosting_AspNetCore" RUN dotnet build "ToolHosting_AspNetCore.csproj" -c $BUILD_CONFIGURATION -o /app/build # This stage is used to publish the service project to be copied to the final stage FROM build AS publish ARG BUILD_CONFIGURATION=Release WORKDIR "/src/Samples/Containerized/ToolHosting_AspNetCore/ToolHosting_AspNetCore" RUN dotnet publish "./ToolHosting_AspNetCore.csproj" -c $BUILD_CONFIGURATION -o /app/publish /p:UseAppHost=false # This stage is used in production or when running from VS in regular mode (Default when not using the Debug configuration) FROM base AS final WORKDIR /app COPY --from=publish /app/publish . ENTRYPOINT ["dotnet", "ToolHosting_AspNetCore.dll"] NOTE: When using the Orpius SDK NuGet packages, and not the actual SDK projects like I did here, there is no need to perform the copy operations in the dockerfile. Building the C# Client to Interact with the Python-based Sidecar We communicate with the Qiskit sidecar over HTTP on the shared Docker network. The QuantumSimulatorClient class, in the ToolHosting_AspNetCore project, makes the calls. We have two data transfer objects: an ExecuteRequest class that hold that qasm code; sent to the Qiskit quantum simulator in the sidecar, and the response received back from the sidecar. The ExecuteResponse.Counts dictionary holds the resulting qubit states, or an error if execution failed. sealed class ExecuteRequest { public required string Qasm { get; init; } public int Shots { get; init; } = 1024; } sealed class ExecuteResponse { public Dictionary&lt;string, int&gt;? Counts { get; init; } } To call the sidecar the QuantumSimulatorClient has the following ExecuteAsync method: public async Task&lt;Dictionary&lt;string, int&gt;&gt; ExecuteAsync( string openQasm3Program, int shots, CancellationToken token) { var response = await httpClient.PostAsJsonAsync( "/execute", new ExecuteRequest { Qasm = openQasm3Program, Shots = shots }, cancellationToken: token); if (!response.IsSuccessStatusCode) { var errorText = await response.Content.ReadAsStringAsync(token); throw new InvalidOperationException( $"Quantum simulator call failed: {(int)response.StatusCode} {errorText}"); } var payload = await response.Content.ReadFromJsonAsync&lt;ExecuteResponse&gt;( cancellationToken: token); if (payload?.Counts is null) { throw new InvalidOperationException( "Quantum simulator response was empty or invalid."); } return payload.Counts; } Creating an Orpius Tool that uses the Client With the quantum simulator sidecar in place, the hard-lifting is done. The easy part is now exposing it via an Orpius custom tool. For this we create a class and decorate it with the [Tool], [ToolMethod], and [ToolProperty] attributes. A Roslyn IIncrementalGenerator takes care of the rest. NOTE: The Orpius SDK takes care of generating the types needed for registration via a Roslyn IIncrementalGenerator named ToolRegistryItemGenerator in the Orpius.Platform.ClientSdk.ProtobufNet.Generators project. The QuantumQasm3Tool leverages the QuantumSimulatorClient, which is injected via the constructor, as shown: [Tool] public class QuantumQasm3Tool { readonly QuantumSimulatorClient quantumSimulatorClient; public QuantumQasm3Tool(QuantumSimulatorClient quantumSimulatorClient) { this.quantumSimulatorClient = quantumSimulatorClient ?? throw new ArgumentNullException(nameof(quantumSimulatorClient)); } ... TIP: If you wish, you could place the client code directly in the Tool, but I chose to build this out in stages: client first, get that working, then expose it via a Tool class. The tool has a single method ExecuteQasm3Program, shown below. ExecuteQasm3Program is the method that is ultimately called by your Orpius agent. The API surface of this method and parameters is automatically provided to the Orpius server; it is stored, an LLM OpenAPI schema generated for it, and it is parsed into the context of the agent, along with the Descriptions to allow the agent to understand how to use it. Neat eh? You don’t need to do anything apart from decorate your class with a few attributes and follow to signature conventions: two parameters, last parameter ICombinedContext object. If you’ve ever used gRPC before, the signature format will look familiar. [ToolMethod(Description = "Executes an OpenQASM 3 program on the quantum simulator" + " and returns measurement counts. " + "'Shots' controls the number of samples taken.")] public async Task&lt;ExecuteQasm3ProgramResponse&gt; ExecuteQasm3Program( ExecuteQasm3ProgramRequest request, ICombinedContext context) { if (request is null) { throw new ArgumentNullException(nameof(request)); } if (string.IsNullOrWhiteSpace(request.OpenQasm3Program)) { throw new RpcException(new Status( StatusCode.InvalidArgument, "OpenQasm3Program is required and cannot be empty.")); } if (request.Shots &lt;= 0) { throw new RpcException(new Status( StatusCode.InvalidArgument, "Shots must be greater than 0.")); } CancellationToken token = GetCancellationToken(context); Dictionary&lt;string, int&gt; counts = await quantumSimulatorClient.ExecuteAsync( request.OpenQasm3Program, request.Shots, token) .ConfigureAwait(false); return new ExecuteQasm3ProgramResponse { Counts = counts }; } The API surface for the parameter and return type are also sent to the server. Contained types are also included recursively, meaning that you can have arbitrarily complex data transfer objects. Any business logic you’d like to have an agent be able to call into can be rolled into a tool like this. There’s very little else that needs to be done apart from some config in the Program class, which will get to at the end of the article. public class ExecuteQasm3ProgramRequest { [ToolProperty( Required = true, Description = """ OpenQASM 3 program text to execute. (content trimmed for brevity) """)] public required string OpenQasm3Program { get; set; } [ToolProperty( Description = "Number of shots (samples) to run. Defaults to 1024.")] public int Shots { get; set; } = 1024; } public class ExecuteQasm3ProgramResponse { [ToolProperty( Description = "Measurement counts keyed by bitstring" + " outcome (for example, \"00\", \"01\", \"10\", \"11\").")] public Dictionary&lt;string, int&gt;? Counts { get; init; } } Preparing Orpius for a Custom Tool Orpius has various internal tools, such as the isolated code compilation and execution, and many others, which allows Orpius agents to achieve a lot out-of-the-box, but to allow them to connect to well-defined external systems with authorization built-in you use ‘custom tools’. A custom tool is a GRPC endpoint that maps requests to a class in your project. The way it works is that would have your application notify Orpius via a GRPC call that your application provides one or more tools that agents in Orpius should be able to call. On the Custom Tools view in the Orpius Console, we copy the External ID and Access Key 1. We need this information to register our ToolHosting_AspNetCore project as a tools provider. NOTE: You can create a secure private channel to Orpius during development and production. See Creating a Secure Channel to Orpius In the next section you’ll see how you can plug the External ID and Access Key to register the tool when your application starts. Delving Further into the Setup All of the connecting with Orpius and registering tools is done automatically via some setup in the Program.cs file in the ASP.NET Core ToolHosting_AspNetCore project. The ToolHosting_AspNetCore project was generated with the Create New Project dialog, to which I added references to the Orpius.Platform.ClientSdk.ProtobufNet project and the Orpius.Platform.ClientSdk.ProtobufNet.Generators projects. Rather that do that, you may prefer to add NuGet package references to the Orpius SDK packages instead: Orpius.Platform.ClientSdk.ProtobufNet Orpius.Platform.ClientSdk.ProtobufNet.Generators. In Program.Main we use ASP.NET Core’s DI infrastructure to inject a pooled HttpClient instance to the QuantumSimulatorClient. services.AddHttpClient&lt;QuantumSimulatorClient&gt;( client =&gt; { string? baseUrl = builder.Configuration["QuantumSimulator:BaseUrl"]; if (string.IsNullOrWhiteSpace(baseUrl)) { throw new InvalidOperationException( "QuantumSimulator:BaseUrl is not configured."); } client.BaseAddress = new Uri(baseUrl, UriKind.Absolute); }); The HttpClient is passed to the QuantumSimulatorClient during construction: readonly HttpClient httpClient; public QuantumSimulatorClient(HttpClient httpClient) { this.httpClient = httpClient; } The Program.Main creates proxy object that provides the tool registration infrastructure what it needs to register with the Orpius server. It’s added to the ASP.NET Core IServiceCollection. You can add multiple IToolRegistrationParameters implementations, enabling your tools project to provide tools for multiple Orpius Spaces. The getLocalUrl value needs to point the location of the tools server, and it needs to be resolvable by the Orpius server. It tells the Orpius server where to call for the tools you publish. Ordinarily this will be a production URL or a private channel URL We parse the External ID and Access Key, which we obtained in the previous step, to the parameters object. FuncRegistrationParameters toolRegistrationParameters = new(getLocalUrl: () =&gt; new Uri("https://host.docker.internal:7190/"), getExternalId: () =&gt; Guid.Parse("ee2b90ff-a4c6-44bf-93a7-a25b7e3271b0"), getApiKey: () =&gt; Guid.Parse("72e1b1f1-414b-46d9-bcb1-1a736d7e6027")); services.AddSingleton&lt;IToolRegistrationParameters&gt;(toolRegistrationParameters); What triggers the code generation? At the top of the Program.cs file we have an assembly-level GenerateToolRegistryItemAttribute: [assembly: GenerateToolRegistryItem("ToolHosting_AspNetCore.ToolForOrpius.AllTools")] The ToolRegistryItemGenerator in the Orpius.Platform.ClientSdk.ProtobufNet.Generators project looks for this attribute, and when it finds it, it generates the code describing the API service of the tools in the project. We pull in the generated AllTools by registering it with the IServiceCollection: services.AddSingleton&lt;AllTools&gt;(); We also register our quantum tool in the same manner. Note that both classes and interfaces types are supported, allowing you to switch our the implementation for testing and so forth. services.AddSingleton&lt;QuantumQasm3Tool&gt;(); When the AllTools class is resolved from the container, it automatically registers itself with the IToolsRegistry. The ToolRegistry contains the mappings and forwards incoming tool requests to their respective custom tools. _ = app.Services.GetRequiredService&lt;AllTools&gt;(); Finally, the Orpius SDK contains a gRPC service: IToolProviderService that allows Orpius to call your server to use tools. We wire it up like so: app.MapGrpcService&lt;IToolProviderService&gt;(); There are various headers you can use for authentication. You can use the IToolRegistrationParameters.Headers property, or the RegisterAsProviderRequest.Headers property directly, to provide headers back to your server during an IToolProviderService.UseTool call. The headers are encrypted and stored securely on the Orpius server. This gives you the peace of mind that only your Orpius agent can use your custom tool. TIP: You can find other examples in the Orpius SDK samples that demonstrate how to set and read headers. Conclusion In this article we looked at how we can schedule an AI agent to periodically write and execute OpenQASM code and update a webpage based on the results. We then delved into the implementation and saw how to create a Docker sidecar for Qiskit, call that sidecar from our host tools ASP.NET Core application, and create a custom Tool for Orpius, which can be called by your Orpius AI agent. Finally, we looked at how authentication headers can be used to secure tool calls from Orpius to your server. I hope you enjoyed this article, and I welcome your feedback and questions. @dbvaughan on X (Twitter)]]></summary></entry><entry><title type="html">Our New Paper on Distributed Agent Reasoning</title><link href="http://danielvaughan.org/posts/orpius/2025/11/20/DistributedAgentReasoning/" rel="alternate" type="text/html" title="Our New Paper on Distributed Agent Reasoning" /><published>2025-11-20T00:00:00+00:00</published><updated>2025-11-20T00:00:00+00:00</updated><id>http://danielvaughan.org/posts/orpius/2025/11/20/DistributedAgentReasoning</id><content type="html" xml:base="http://danielvaughan.org/posts/orpius/2025/11/20/DistributedAgentReasoning/"><![CDATA[<p>We have published a new paper presenting a <strong>novel architecture for distributed agent reasoning</strong> across independent systems, all under strict data locality.</p>

<p>The work shows how agents on separate Orpius deployments can cooperate through natural-language messages, without shared identifiers, schemas, or any centralised data store.
A promising direction for organisations where data cannot move or be unified.</p>

<p>Read the paper on arXiv: 
<a href="https://arxiv.org/abs/2511.16292">Distributed Agent Reasoning Across Independent Systems With Strict Data Locality</a></p>]]></content><author><name></name></author><category term="Orpius" /><summary type="html"><![CDATA[We have published a new paper presenting a novel architecture for distributed agent reasoning across independent systems, all under strict data locality. The work shows how agents on separate Orpius deployments can cooperate through natural-language messages, without shared identifiers, schemas, or any centralised data store. A promising direction for organisations where data cannot move or be unified. Read the paper on arXiv: Distributed Agent Reasoning Across Independent Systems With Strict Data Locality]]></summary></entry><entry><title type="html">Orpius can see!</title><link href="http://danielvaughan.org/posts/orpius/2024/11/05/Orpius-Can-See/" rel="alternate" type="text/html" title="Orpius can see!" /><published>2024-11-05T00:00:00+00:00</published><updated>2024-11-05T00:00:00+00:00</updated><id>http://danielvaughan.org/posts/orpius/2024/11/05/Orpius-Can-See</id><content type="html" xml:base="http://danielvaughan.org/posts/orpius/2024/11/05/Orpius-Can-See/"><![CDATA[<p>Orpius now supports image retrieval and analysis!</p>

<p>Orpius can download images, analyze them, perform activities based on what it sees.
Combined with the scheduling capabilities of Orpius, 
it works even when you’re sleeping, making for one heck of a powerful tool.</p>

<p>I’ve also added an exciting feature revealed near the end of this post (hint: it changes how you’ll see things entirely).</p>

<p>Btw., in-case you’re reading this as a repost, my name’s Daniel, 
and my co-founder Katka and I are creating Orpius, an Autonomous Business Operations Platform (ABOP).</p>

<p>So, let’s take a look.</p>

<p>In this first screenshot, you see I ask Orpius to examine an image on the web.</p>

<p>The image is supplied to the language model, 
and also passed in a message to the Orpius Console application, 
so the user can see it too.</p>

<p><img src="/assets/images/2024_11_05/Image1.png" alt="Example image" /></p>

<p>When I try this in ChatGPT, I see:</p>

<p><img src="/assets/images/2024_11_05/ChatGptResponse.png" alt="ChatGPT response" /></p>

<p>Next, I give it a more interesting thing to analyze. 
It’s another image retrieved via http, but this time from a video feed capture.</p>

<p><img src="/assets/images/2024_11_05/Image2.png" alt="Cam view cinema" /></p>

<p>Orpius is able to leverage the analysis information across all its plugins; web search, 
web page downloading, scheduling, team management, notifications; 
and for anything we can’t think of up front, it can compile and execute its own code in an isolated environment.</p>

<p>In the next screenshot, I ask Orpius to analyze the image at 5-minute intervals. 
I ask it to email me the analysis each time. 
You see how the schedule item shows up in the Schedule view. 
When the schedule comes around, Orpius passes the task off to an AI agent, 
which will do its thing.</p>

<p>Btw, Orpius runs in the cloud, so there’s no need for Orpius Console to remain open.</p>

<p><img src="/assets/images/2024_11_05/Image4.png" alt="Schedule item added" /></p>

<p>With Orpius you can create various schedule types: 
interval, hourly, daily, monthly, yearly; with repetition limiting and schedule expiry, 
all with time-zone awareness for team scheduling.</p>

<p>In this case, when the interval duration is reached, Orpius shoots me an email (shown below). 
Look, it even got the makes of the cars. Splendid!</p>

<p><img src="/assets/images/2024_11_05/Image4_1.png" alt="Email from Orpius" /></p>

<p>If we wanted to, we could also update a spreadsheet with the data, 
call an external system… you name it.</p>

<p>Live updates are sent to all team members using the Orpius Console. 
Orpius has team support. 
In the next screenshot you see the repetition count updated in real-time.</p>

<p>Team members can work on activities together; sharing files and tasks. 
Team members can also be AI agents. But more on that in a future post.</p>

<p><img src="/assets/images/2024_11_05/Image5.png" alt="Repetitions updated" /></p>

<p>So, after I witnessed what Orpius could do with an image source, 
I got excited about the ability to hook it up to a real video feed.
I was pacing back and forth, my mind alight with the possibilities.
So, that’s what I did. I introduced real time streaming protocol support.</p>

<p>I found an old Amcrest camera, which I last used as a baby cam for my daughter 
a few years ago, and I set to work creating the Orpius plugin 
and infrastructure to make it all happen.</p>

<p>In the next screenshot you see that I tell Orpius to analyze the video from the rtsp://… stream.
The camera is pointing out the window of my house.</p>

<p>Notice that I don’t specify a password directly. Orpius has a ‘secrets system’ 
that parses code and API calls allowing you (the user) to define secrets 
that are never sent to the LLM service, such as OpenAI or Claude. 
Which is a big deal if you’re concerned about security and privacy.</p>

<p>Orpius knows that it can use secret values encoded as &lt;#=TokenKey:TokenValue%&gt;,
the system takes care of populating the values without passing them to the LLM service.</p>

<p>Btw., I chose that old-school ‘&lt;#=’ funky syntax because its less common these days, 
and less likely to conflict with other styles.</p>

<p><img src="/assets/images/2024_11_05/Image6.png" alt="RTSP image capture of the front of my house" /></p>

<p>I’m chuffed about these new Orpius features. I’m also currently adding event driven support, 
where webhooks can be used to trigger workflows within Orpius. 
This feature will bring in support for movement activation for cams. 
I knew that webhooks would be an eventuality down the track,
but seeing how useful it would be with the real time streaming support, 
it motivated me to get it in place now. 
It could make for a great security/monitoring system. What do you think?</p>

<p>Want more info, add a comment below or visit Orpius.com. 
Feel free to reach out to me directly.</p>

<p>#AgenticAI #AgenticRAG #avaloniaui</p>]]></content><author><name></name></author><category term="Orpius" /><summary type="html"><![CDATA[Orpius now supports image retrieval and analysis! Orpius can download images, analyze them, perform activities based on what it sees. Combined with the scheduling capabilities of Orpius, it works even when you’re sleeping, making for one heck of a powerful tool. I’ve also added an exciting feature revealed near the end of this post (hint: it changes how you’ll see things entirely). Btw., in-case you’re reading this as a repost, my name’s Daniel, and my co-founder Katka and I are creating Orpius, an Autonomous Business Operations Platform (ABOP). So, let’s take a look. In this first screenshot, you see I ask Orpius to examine an image on the web. The image is supplied to the language model, and also passed in a message to the Orpius Console application, so the user can see it too. When I try this in ChatGPT, I see: Next, I give it a more interesting thing to analyze. It’s another image retrieved via http, but this time from a video feed capture. Orpius is able to leverage the analysis information across all its plugins; web search, web page downloading, scheduling, team management, notifications; and for anything we can’t think of up front, it can compile and execute its own code in an isolated environment. In the next screenshot, I ask Orpius to analyze the image at 5-minute intervals. I ask it to email me the analysis each time. You see how the schedule item shows up in the Schedule view. When the schedule comes around, Orpius passes the task off to an AI agent, which will do its thing. Btw, Orpius runs in the cloud, so there’s no need for Orpius Console to remain open. With Orpius you can create various schedule types: interval, hourly, daily, monthly, yearly; with repetition limiting and schedule expiry, all with time-zone awareness for team scheduling. In this case, when the interval duration is reached, Orpius shoots me an email (shown below). Look, it even got the makes of the cars. Splendid! If we wanted to, we could also update a spreadsheet with the data, call an external system… you name it. Live updates are sent to all team members using the Orpius Console. Orpius has team support. In the next screenshot you see the repetition count updated in real-time. Team members can work on activities together; sharing files and tasks. Team members can also be AI agents. But more on that in a future post. So, after I witnessed what Orpius could do with an image source, I got excited about the ability to hook it up to a real video feed. I was pacing back and forth, my mind alight with the possibilities. So, that’s what I did. I introduced real time streaming protocol support. I found an old Amcrest camera, which I last used as a baby cam for my daughter a few years ago, and I set to work creating the Orpius plugin and infrastructure to make it all happen. In the next screenshot you see that I tell Orpius to analyze the video from the rtsp://… stream. The camera is pointing out the window of my house. Notice that I don’t specify a password directly. Orpius has a ‘secrets system’ that parses code and API calls allowing you (the user) to define secrets that are never sent to the LLM service, such as OpenAI or Claude. Which is a big deal if you’re concerned about security and privacy. Orpius knows that it can use secret values encoded as &lt;#=TokenKey:TokenValue%&gt;, the system takes care of populating the values without passing them to the LLM service. Btw., I chose that old-school ‘&lt;#=’ funky syntax because its less common these days, and less likely to conflict with other styles. I’m chuffed about these new Orpius features. I’m also currently adding event driven support, where webhooks can be used to trigger workflows within Orpius. This feature will bring in support for movement activation for cams. I knew that webhooks would be an eventuality down the track, but seeing how useful it would be with the real time streaming support, it motivated me to get it in place now. It could make for a great security/monitoring system. What do you think? Want more info, add a comment below or visit Orpius.com. Feel free to reach out to me directly. #AgenticAI #AgenticRAG #avaloniaui]]></summary></entry><entry><title type="html">Find Tables with Keyword Names</title><link href="http://danielvaughan.org/posts/sql/2024/06/09/Find-Tables-Named-With-Keywords/" rel="alternate" type="text/html" title="Find Tables with Keyword Names" /><published>2024-06-09T00:00:00+00:00</published><updated>2024-06-09T00:00:00+00:00</updated><id>http://danielvaughan.org/posts/sql/2024/06/09/Find-Tables-Named-With-Keywords</id><content type="html" xml:base="http://danielvaughan.org/posts/sql/2024/06/09/Find-Tables-Named-With-Keywords/"><![CDATA[<p>I was working with an SQL Server schema and discovered that one of my tables was named with a keyword;</p>

<div class="language-sql highlighter-rouge"><div class="highlight"><pre class="highlight"><code><span class="k">SELECT</span> <span class="n">u</span><span class="p">.</span><span class="o">*</span><span class="p">,</span> <span class="n">a</span><span class="p">.</span><span class="o">*</span> 
<span class="k">FROM</span> <span class="p">[</span><span class="n">Bpm</span><span class="p">].</span><span class="k">User</span> <span class="n">u</span>
<span class="k">INNER</span> <span class="k">JOIN</span> <span class="p">[</span><span class="n">Bpm</span><span class="p">].</span><span class="n">Account</span> <span class="n">a</span> 
<span class="k">ON</span> <span class="n">u</span><span class="p">.</span><span class="n">Id</span> <span class="o">=</span> <span class="n">a</span><span class="p">.</span><span class="n">UserId</span>
<span class="k">WHERE</span> <span class="n">u</span><span class="p">.</span><span class="n">Username</span> <span class="o">=</span> <span class="s1">'foo@exammple.com'</span>
</code></pre></div></div>

<blockquote>
  <p>Msg 156, Level 15, State 1, Line 2
Incorrect syntax near the keyword ‘User’.</p>
</blockquote>

<p>Turns out ‘User’ is a keyword and I needed to enclose it in square brackets: <code class="language-plaintext highlighter-rouge">FROM [Bpm].[User] ...</code>.
It’s probably best just to avoid naming things with keywords.</p>

<p>Here’s a query for SQL Server to detect if you have inadvertently named 
one of your tables with a keyword from one of the following DBMS’s:</p>

<ul>
  <li>MySQL</li>
  <li>PostgreSQL</li>
  <li>Oracle</li>
  <li>SQL Server (Transact-SQL)</li>
  <li>SQLite</li>
  <li>DB2</li>
</ul>

<div class="language-sql highlighter-rouge"><div class="highlight"><pre class="highlight"><code><span class="c1">-- Step 1: Create a temporary table for reserved keywords</span>
<span class="k">CREATE</span> <span class="k">TABLE</span> <span class="o">#</span><span class="n">ReservedKeywords</span> <span class="p">(</span>
    <span class="n">Keyword</span> <span class="n">NVARCHAR</span><span class="p">(</span><span class="mi">128</span><span class="p">)</span> <span class="k">NOT</span> <span class="k">NULL</span>
<span class="p">);</span>

<span class="c1">-- Step 2: Insert the reserved keywords into the temporary table</span>
<span class="k">INSERT</span> <span class="k">INTO</span> <span class="o">#</span><span class="n">ReservedKeywords</span> <span class="p">(</span><span class="n">Keyword</span><span class="p">)</span>
<span class="k">VALUES</span>
<span class="p">(</span><span class="s1">'ABORT'</span><span class="p">),</span> <span class="p">(</span><span class="s1">'ABS'</span><span class="p">),</span> <span class="p">(</span><span class="s1">'ACCESS'</span><span class="p">),</span> <span class="p">(</span><span class="s1">'ADD'</span><span class="p">),</span> <span class="p">(</span><span class="s1">'ADMIN'</span><span class="p">),</span> <span class="p">(</span><span class="s1">'AFTER'</span><span class="p">),</span> <span class="p">(</span><span class="s1">'AGGREGATE'</span><span class="p">),</span>
<span class="p">(</span><span class="s1">'ALL'</span><span class="p">),</span> <span class="p">(</span><span class="s1">'ALLOCATE'</span><span class="p">),</span> <span class="p">(</span><span class="s1">'ALTER'</span><span class="p">),</span> <span class="p">(</span><span class="s1">'ANALYZE'</span><span class="p">),</span> <span class="p">(</span><span class="s1">'AND'</span><span class="p">),</span> <span class="p">(</span><span class="s1">'ANY'</span><span class="p">),</span> <span class="p">(</span><span class="s1">'ARE'</span><span class="p">),</span>
<span class="p">(</span><span class="s1">'ARRAY'</span><span class="p">),</span> <span class="p">(</span><span class="s1">'AS'</span><span class="p">),</span> <span class="p">(</span><span class="s1">'ASC'</span><span class="p">),</span> <span class="p">(</span><span class="s1">'ASSERTION'</span><span class="p">),</span> <span class="p">(</span><span class="s1">'AT'</span><span class="p">),</span> <span class="p">(</span><span class="s1">'AUTHORIZATION'</span><span class="p">),</span> <span class="p">(</span><span class="s1">'AVG'</span><span class="p">),</span>
<span class="p">(</span><span class="s1">'BACKUP'</span><span class="p">),</span> <span class="p">(</span><span class="s1">'BEFORE'</span><span class="p">),</span> <span class="p">(</span><span class="s1">'BEGIN'</span><span class="p">),</span> <span class="p">(</span><span class="s1">'BETWEEN'</span><span class="p">),</span> <span class="p">(</span><span class="s1">'BIGINT'</span><span class="p">),</span> <span class="p">(</span><span class="s1">'BINARY'</span><span class="p">),</span> <span class="p">(</span><span class="s1">'BIT'</span><span class="p">),</span>
<span class="p">(</span><span class="s1">'BLOB'</span><span class="p">),</span> <span class="p">(</span><span class="s1">'BOOLEAN'</span><span class="p">),</span> <span class="p">(</span><span class="s1">'BOTH'</span><span class="p">),</span> <span class="p">(</span><span class="s1">'BREAK'</span><span class="p">),</span> <span class="p">(</span><span class="s1">'BY'</span><span class="p">),</span> <span class="p">(</span><span class="s1">'BYTE'</span><span class="p">),</span> <span class="p">(</span><span class="s1">'CALL'</span><span class="p">),</span>
<span class="p">(</span><span class="s1">'CASCADE'</span><span class="p">),</span> <span class="p">(</span><span class="s1">'CASE'</span><span class="p">),</span> <span class="p">(</span><span class="s1">'CAST'</span><span class="p">),</span> <span class="p">(</span><span class="s1">'CATALOG'</span><span class="p">),</span> <span class="p">(</span><span class="s1">'CHAR'</span><span class="p">),</span> <span class="p">(</span><span class="s1">'CHARACTER'</span><span class="p">),</span> <span class="p">(</span><span class="s1">'CHECK'</span><span class="p">),</span>
<span class="p">(</span><span class="s1">'CLOSE'</span><span class="p">),</span> <span class="p">(</span><span class="s1">'CLUSTER'</span><span class="p">),</span> <span class="p">(</span><span class="s1">'COALESCE'</span><span class="p">),</span> <span class="p">(</span><span class="s1">'COLLATE'</span><span class="p">),</span> <span class="p">(</span><span class="s1">'COLUMN'</span><span class="p">),</span> <span class="p">(</span><span class="s1">'COMMIT'</span><span class="p">),</span>
<span class="p">(</span><span class="s1">'CONNECT'</span><span class="p">),</span> <span class="p">(</span><span class="s1">'CONSTRAINT'</span><span class="p">),</span> <span class="p">(</span><span class="s1">'CONTAINS'</span><span class="p">),</span> <span class="p">(</span><span class="s1">'CONTINUE'</span><span class="p">),</span> <span class="p">(</span><span class="s1">'CONVERT'</span><span class="p">),</span> <span class="p">(</span><span class="s1">'COPY'</span><span class="p">),</span>
<span class="p">(</span><span class="s1">'COUNT'</span><span class="p">),</span> <span class="p">(</span><span class="s1">'CREATE'</span><span class="p">),</span> <span class="p">(</span><span class="s1">'CROSS'</span><span class="p">),</span> <span class="p">(</span><span class="s1">'CUBE'</span><span class="p">),</span> <span class="p">(</span><span class="s1">'CURRENT'</span><span class="p">),</span> <span class="p">(</span><span class="s1">'CURRENT_DATE'</span><span class="p">),</span>
<span class="p">(</span><span class="s1">'CURRENT_PATH'</span><span class="p">),</span> <span class="p">(</span><span class="s1">'CURRENT_ROLE'</span><span class="p">),</span> <span class="p">(</span><span class="s1">'CURRENT_TIME'</span><span class="p">),</span> <span class="p">(</span><span class="s1">'CURRENT_TIMESTAMP'</span><span class="p">),</span>
<span class="p">(</span><span class="s1">'CURRENT_USER'</span><span class="p">),</span> <span class="p">(</span><span class="s1">'CURSOR'</span><span class="p">),</span> <span class="p">(</span><span class="s1">'CYCLE'</span><span class="p">),</span> <span class="p">(</span><span class="s1">'DATA'</span><span class="p">),</span> <span class="p">(</span><span class="s1">'DATABASE'</span><span class="p">),</span> <span class="p">(</span><span class="s1">'DATE'</span><span class="p">),</span>
<span class="p">(</span><span class="s1">'DAY'</span><span class="p">),</span> <span class="p">(</span><span class="s1">'DBA'</span><span class="p">),</span> <span class="p">(</span><span class="s1">'DEALLOCATE'</span><span class="p">),</span> <span class="p">(</span><span class="s1">'DEC'</span><span class="p">),</span> <span class="p">(</span><span class="s1">'DECIMAL'</span><span class="p">),</span> <span class="p">(</span><span class="s1">'DECLARE'</span><span class="p">),</span> <span class="p">(</span><span class="s1">'DEFAULT'</span><span class="p">),</span>
<span class="p">(</span><span class="s1">'DELETE'</span><span class="p">),</span> <span class="p">(</span><span class="s1">'DESCRIBE'</span><span class="p">),</span> <span class="p">(</span><span class="s1">'DESCRIPTOR'</span><span class="p">),</span> <span class="p">(</span><span class="s1">'DETERMINISTIC'</span><span class="p">),</span> <span class="p">(</span><span class="s1">'DIAGNOSTICS'</span><span class="p">),</span>
<span class="p">(</span><span class="s1">'DISCONNECT'</span><span class="p">),</span> <span class="p">(</span><span class="s1">'DISTINCT'</span><span class="p">),</span> <span class="p">(</span><span class="s1">'DO'</span><span class="p">),</span> <span class="p">(</span><span class="s1">'DOMAIN'</span><span class="p">),</span> <span class="p">(</span><span class="s1">'DOUBLE'</span><span class="p">),</span> <span class="p">(</span><span class="s1">'DROP'</span><span class="p">),</span>
<span class="p">(</span><span class="s1">'DYNAMIC'</span><span class="p">),</span> <span class="p">(</span><span class="s1">'EACH'</span><span class="p">),</span> <span class="p">(</span><span class="s1">'ELSE'</span><span class="p">),</span> <span class="p">(</span><span class="s1">'END'</span><span class="p">),</span> <span class="p">(</span><span class="s1">'END-EXEC'</span><span class="p">),</span> <span class="p">(</span><span class="s1">'ESCAPE'</span><span class="p">),</span> <span class="p">(</span><span class="s1">'EXCEPT'</span><span class="p">),</span>
<span class="p">(</span><span class="s1">'EXCEPTION'</span><span class="p">),</span> <span class="p">(</span><span class="s1">'EXEC'</span><span class="p">),</span> <span class="p">(</span><span class="s1">'EXECUTE'</span><span class="p">),</span> <span class="p">(</span><span class="s1">'EXISTS'</span><span class="p">),</span> <span class="p">(</span><span class="s1">'EXIT'</span><span class="p">),</span> <span class="p">(</span><span class="s1">'EXTERNAL'</span><span class="p">),</span>
<span class="p">(</span><span class="s1">'EXTRACT'</span><span class="p">),</span> <span class="p">(</span><span class="s1">'FALSE'</span><span class="p">),</span> <span class="p">(</span><span class="s1">'FETCH'</span><span class="p">),</span> <span class="p">(</span><span class="s1">'FIRST'</span><span class="p">),</span> <span class="p">(</span><span class="s1">'FLOAT'</span><span class="p">),</span> <span class="p">(</span><span class="s1">'FOR'</span><span class="p">),</span> <span class="p">(</span><span class="s1">'FOREIGN'</span><span class="p">),</span>
<span class="p">(</span><span class="s1">'FOUND'</span><span class="p">),</span> <span class="p">(</span><span class="s1">'FREE'</span><span class="p">),</span> <span class="p">(</span><span class="s1">'FROM'</span><span class="p">),</span> <span class="p">(</span><span class="s1">'FULL'</span><span class="p">),</span> <span class="p">(</span><span class="s1">'FUNCTION'</span><span class="p">),</span> <span class="p">(</span><span class="s1">'GENERAL'</span><span class="p">),</span> <span class="p">(</span><span class="s1">'GET'</span><span class="p">),</span>
<span class="p">(</span><span class="s1">'GLOBAL'</span><span class="p">),</span> <span class="p">(</span><span class="s1">'GO'</span><span class="p">),</span> <span class="p">(</span><span class="s1">'GOTO'</span><span class="p">),</span> <span class="p">(</span><span class="s1">'GRANT'</span><span class="p">),</span> <span class="p">(</span><span class="s1">'GROUP'</span><span class="p">),</span> <span class="p">(</span><span class="s1">'GROUPING'</span><span class="p">),</span> <span class="p">(</span><span class="s1">'HAVING'</span><span class="p">),</span>
<span class="p">(</span><span class="s1">'HOST'</span><span class="p">),</span> <span class="p">(</span><span class="s1">'HOUR'</span><span class="p">),</span> <span class="p">(</span><span class="s1">'IDENTITY'</span><span class="p">),</span> <span class="p">(</span><span class="s1">'IF'</span><span class="p">),</span> <span class="p">(</span><span class="s1">'IGNORE'</span><span class="p">),</span> <span class="p">(</span><span class="s1">'IMMEDIATE'</span><span class="p">),</span> <span class="p">(</span><span class="s1">'IN'</span><span class="p">),</span>
<span class="p">(</span><span class="s1">'INCREMENT'</span><span class="p">),</span> <span class="p">(</span><span class="s1">'INDEX'</span><span class="p">),</span> <span class="p">(</span><span class="s1">'INDICATOR'</span><span class="p">),</span> <span class="p">(</span><span class="s1">'INITIAL'</span><span class="p">),</span> <span class="p">(</span><span class="s1">'INITIALLY'</span><span class="p">),</span> <span class="p">(</span><span class="s1">'INNER'</span><span class="p">),</span>
<span class="p">(</span><span class="s1">'INOUT'</span><span class="p">),</span> <span class="p">(</span><span class="s1">'INPUT'</span><span class="p">),</span> <span class="p">(</span><span class="s1">'INSERT'</span><span class="p">),</span> <span class="p">(</span><span class="s1">'INT'</span><span class="p">),</span> <span class="p">(</span><span class="s1">'INTEGER'</span><span class="p">),</span> <span class="p">(</span><span class="s1">'INTERSECT'</span><span class="p">),</span>
<span class="p">(</span><span class="s1">'INTERVAL'</span><span class="p">),</span> <span class="p">(</span><span class="s1">'INTO'</span><span class="p">),</span> <span class="p">(</span><span class="s1">'IS'</span><span class="p">),</span> <span class="p">(</span><span class="s1">'ISOLATION'</span><span class="p">),</span> <span class="p">(</span><span class="s1">'JOIN'</span><span class="p">),</span> <span class="p">(</span><span class="s1">'KEY'</span><span class="p">),</span> <span class="p">(</span><span class="s1">'LANGUAGE'</span><span class="p">),</span>
<span class="p">(</span><span class="s1">'LAST'</span><span class="p">),</span> <span class="p">(</span><span class="s1">'LEADING'</span><span class="p">),</span> <span class="p">(</span><span class="s1">'LEAVE'</span><span class="p">),</span> <span class="p">(</span><span class="s1">'LEFT'</span><span class="p">),</span> <span class="p">(</span><span class="s1">'LEVEL'</span><span class="p">),</span> <span class="p">(</span><span class="s1">'LIKE'</span><span class="p">),</span> <span class="p">(</span><span class="s1">'LIMIT'</span><span class="p">),</span>
<span class="p">(</span><span class="s1">'LOCAL'</span><span class="p">),</span> <span class="p">(</span><span class="s1">'LOWER'</span><span class="p">),</span> <span class="p">(</span><span class="s1">'MATCH'</span><span class="p">),</span> <span class="p">(</span><span class="s1">'MAX'</span><span class="p">),</span> <span class="p">(</span><span class="s1">'MIN'</span><span class="p">),</span> <span class="p">(</span><span class="s1">'MINUTE'</span><span class="p">),</span> <span class="p">(</span><span class="s1">'MODULE'</span><span class="p">),</span>
<span class="p">(</span><span class="s1">'MONTH'</span><span class="p">),</span> <span class="p">(</span><span class="s1">'NAMES'</span><span class="p">),</span> <span class="p">(</span><span class="s1">'NATIONAL'</span><span class="p">),</span> <span class="p">(</span><span class="s1">'NATURAL'</span><span class="p">),</span> <span class="p">(</span><span class="s1">'NCHAR'</span><span class="p">),</span> <span class="p">(</span><span class="s1">'NCLOB'</span><span class="p">),</span> <span class="p">(</span><span class="s1">'NEW'</span><span class="p">),</span>
<span class="p">(</span><span class="s1">'NEXT'</span><span class="p">),</span> <span class="p">(</span><span class="s1">'NO'</span><span class="p">),</span> <span class="p">(</span><span class="s1">'NONE'</span><span class="p">),</span> <span class="p">(</span><span class="s1">'NOT'</span><span class="p">),</span> <span class="p">(</span><span class="s1">'NULL'</span><span class="p">),</span> <span class="p">(</span><span class="s1">'NUMERIC'</span><span class="p">),</span> <span class="p">(</span><span class="s1">'OBJECT'</span><span class="p">),</span> <span class="p">(</span><span class="s1">'OF'</span><span class="p">),</span>
<span class="p">(</span><span class="s1">'OFF'</span><span class="p">),</span> <span class="p">(</span><span class="s1">'OFFSET'</span><span class="p">),</span> <span class="p">(</span><span class="s1">'OLD'</span><span class="p">),</span> <span class="p">(</span><span class="s1">'ON'</span><span class="p">),</span> <span class="p">(</span><span class="s1">'ONLY'</span><span class="p">),</span> <span class="p">(</span><span class="s1">'OPEN'</span><span class="p">),</span> <span class="p">(</span><span class="s1">'OPTION'</span><span class="p">),</span> <span class="p">(</span><span class="s1">'OR'</span><span class="p">),</span>
<span class="p">(</span><span class="s1">'ORDER'</span><span class="p">),</span> <span class="p">(</span><span class="s1">'OUT'</span><span class="p">),</span> <span class="p">(</span><span class="s1">'OUTER'</span><span class="p">),</span> <span class="p">(</span><span class="s1">'OUTPUT'</span><span class="p">),</span> <span class="p">(</span><span class="s1">'OVER'</span><span class="p">),</span> <span class="p">(</span><span class="s1">'OVERLAPS'</span><span class="p">),</span> <span class="p">(</span><span class="s1">'PAD'</span><span class="p">),</span>
<span class="p">(</span><span class="s1">'PARAMETER'</span><span class="p">),</span> <span class="p">(</span><span class="s1">'PARTIAL'</span><span class="p">),</span> <span class="p">(</span><span class="s1">'PARTITION'</span><span class="p">),</span> <span class="p">(</span><span class="s1">'PERCENT'</span><span class="p">),</span> <span class="p">(</span><span class="s1">'PLACING'</span><span class="p">),</span> <span class="p">(</span><span class="s1">'POSITION'</span><span class="p">),</span>
<span class="p">(</span><span class="s1">'PRECISION'</span><span class="p">),</span> <span class="p">(</span><span class="s1">'PREPARE'</span><span class="p">),</span> <span class="p">(</span><span class="s1">'PRIMARY'</span><span class="p">),</span> <span class="p">(</span><span class="s1">'PRIOR'</span><span class="p">),</span> <span class="p">(</span><span class="s1">'PRIVILEGES'</span><span class="p">),</span> <span class="p">(</span><span class="s1">'PROCEDURE'</span><span class="p">),</span>
<span class="p">(</span><span class="s1">'PUBLIC'</span><span class="p">),</span> <span class="p">(</span><span class="s1">'RANGE'</span><span class="p">),</span> <span class="p">(</span><span class="s1">'READ'</span><span class="p">),</span> <span class="p">(</span><span class="s1">'REAL'</span><span class="p">),</span> <span class="p">(</span><span class="s1">'REFERENCES'</span><span class="p">),</span> <span class="p">(</span><span class="s1">'RELATIVE'</span><span class="p">),</span>
<span class="p">(</span><span class="s1">'REPLACE'</span><span class="p">),</span> <span class="p">(</span><span class="s1">'RESTRICT'</span><span class="p">),</span> <span class="p">(</span><span class="s1">'RETURN'</span><span class="p">),</span> <span class="p">(</span><span class="s1">'RETURNS'</span><span class="p">),</span> <span class="p">(</span><span class="s1">'REVOKE'</span><span class="p">),</span> <span class="p">(</span><span class="s1">'RIGHT'</span><span class="p">),</span>
<span class="p">(</span><span class="s1">'ROLE'</span><span class="p">),</span> <span class="p">(</span><span class="s1">'ROLLBACK'</span><span class="p">),</span> <span class="p">(</span><span class="s1">'ROLLUP'</span><span class="p">),</span> <span class="p">(</span><span class="s1">'ROUTINE'</span><span class="p">),</span> <span class="p">(</span><span class="s1">'ROW'</span><span class="p">),</span> <span class="p">(</span><span class="s1">'ROWS'</span><span class="p">),</span> <span class="p">(</span><span class="s1">'SAVEPOINT'</span><span class="p">),</span>
<span class="p">(</span><span class="s1">'SCHEMA'</span><span class="p">),</span> <span class="p">(</span><span class="s1">'SCROLL'</span><span class="p">),</span> <span class="p">(</span><span class="s1">'SEARCH'</span><span class="p">),</span> <span class="p">(</span><span class="s1">'SECOND'</span><span class="p">),</span> <span class="p">(</span><span class="s1">'SECTION'</span><span class="p">),</span> <span class="p">(</span><span class="s1">'SELECT'</span><span class="p">),</span> <span class="p">(</span><span class="s1">'SESSION'</span><span class="p">),</span>
<span class="p">(</span><span class="s1">'SET'</span><span class="p">),</span> <span class="p">(</span><span class="s1">'SETS'</span><span class="p">),</span> <span class="p">(</span><span class="s1">'SHARE'</span><span class="p">),</span> <span class="p">(</span><span class="s1">'SHOW'</span><span class="p">),</span> <span class="p">(</span><span class="s1">'SIMILAR'</span><span class="p">),</span> <span class="p">(</span><span class="s1">'SIZE'</span><span class="p">),</span> <span class="p">(</span><span class="s1">'SMALLINT'</span><span class="p">),</span>
<span class="p">(</span><span class="s1">'SOME'</span><span class="p">),</span> <span class="p">(</span><span class="s1">'SPACE'</span><span class="p">),</span> <span class="p">(</span><span class="s1">'SPECIFIC'</span><span class="p">),</span> <span class="p">(</span><span class="s1">'SQL'</span><span class="p">),</span> <span class="p">(</span><span class="s1">'SQLCODE'</span><span class="p">),</span> <span class="p">(</span><span class="s1">'SQLERROR'</span><span class="p">),</span> <span class="p">(</span><span class="s1">'SQLSTATE'</span><span class="p">),</span>
<span class="p">(</span><span class="s1">'START'</span><span class="p">),</span> <span class="p">(</span><span class="s1">'STATEMENT'</span><span class="p">),</span> <span class="p">(</span><span class="s1">'STATIC'</span><span class="p">),</span> <span class="p">(</span><span class="s1">'SUBSTRING'</span><span class="p">),</span> <span class="p">(</span><span class="s1">'SUM'</span><span class="p">),</span> <span class="p">(</span><span class="s1">'SYSTEM'</span><span class="p">),</span>
<span class="p">(</span><span class="s1">'TABLE'</span><span class="p">),</span> <span class="p">(</span><span class="s1">'TEMPORARY'</span><span class="p">),</span> <span class="p">(</span><span class="s1">'THEN'</span><span class="p">),</span> <span class="p">(</span><span class="s1">'TIME'</span><span class="p">),</span> <span class="p">(</span><span class="s1">'TIMESTAMP'</span><span class="p">),</span> <span class="p">(</span><span class="s1">'TO'</span><span class="p">),</span> <span class="p">(</span><span class="s1">'TRAILING'</span><span class="p">),</span>
<span class="p">(</span><span class="s1">'TRANSACTION'</span><span class="p">),</span> <span class="p">(</span><span class="s1">'TRANSLATE'</span><span class="p">),</span> <span class="p">(</span><span class="s1">'TRANSLATION'</span><span class="p">),</span> <span class="p">(</span><span class="s1">'TRIGGER'</span><span class="p">),</span> <span class="p">(</span><span class="s1">'TRUE'</span><span class="p">),</span> <span class="p">(</span><span class="s1">'UNION'</span><span class="p">),</span>
<span class="p">(</span><span class="s1">'UNIQUE'</span><span class="p">),</span> <span class="p">(</span><span class="s1">'UNKNOWN'</span><span class="p">),</span> <span class="p">(</span><span class="s1">'UNNEST'</span><span class="p">),</span> <span class="p">(</span><span class="s1">'UPDATE'</span><span class="p">),</span> <span class="p">(</span><span class="s1">'USAGE'</span><span class="p">),</span> <span class="p">(</span><span class="s1">'USER'</span><span class="p">),</span> <span class="p">(</span><span class="s1">'USING'</span><span class="p">),</span>
<span class="p">(</span><span class="s1">'VALUE'</span><span class="p">),</span> <span class="p">(</span><span class="s1">'VALUES'</span><span class="p">),</span> <span class="p">(</span><span class="s1">'VARCHAR'</span><span class="p">),</span> <span class="p">(</span><span class="s1">'VARIABLE'</span><span class="p">),</span> <span class="p">(</span><span class="s1">'VARYING'</span><span class="p">),</span> <span class="p">(</span><span class="s1">'VIEW'</span><span class="p">),</span> <span class="p">(</span><span class="s1">'WHEN'</span><span class="p">),</span>
<span class="p">(</span><span class="s1">'WHENEVER'</span><span class="p">),</span> <span class="p">(</span><span class="s1">'WHERE'</span><span class="p">),</span> <span class="p">(</span><span class="s1">'WITH'</span><span class="p">),</span> <span class="p">(</span><span class="s1">'WORK'</span><span class="p">),</span> <span class="p">(</span><span class="s1">'WRITE'</span><span class="p">),</span> <span class="p">(</span><span class="s1">'YEAR'</span><span class="p">),</span> <span class="p">(</span><span class="s1">'ZONE'</span><span class="p">);</span>

<span class="c1">-- Step 3: Query to find tables with reserved keyword names</span>
<span class="k">SELECT</span> 
    <span class="k">TABLE_NAME</span>
<span class="k">FROM</span> 
    <span class="n">INFORMATION_SCHEMA</span><span class="p">.</span><span class="n">TABLES</span>
<span class="k">WHERE</span> 
    <span class="n">TABLE_TYPE</span> <span class="o">=</span> <span class="s1">'BASE TABLE'</span>
    <span class="k">AND</span> <span class="k">TABLE_NAME</span> <span class="k">COLLATE</span> <span class="n">Latin1_General_CI_AS</span> <span class="k">IN</span> <span class="p">(</span><span class="k">SELECT</span> <span class="n">Keyword</span> <span class="k">FROM</span> <span class="o">#</span><span class="n">ReservedKeywords</span><span class="p">);</span>

<span class="c1">-- Cleanup: Drop the temporary table after use</span>
<span class="k">DROP</span> <span class="k">TABLE</span> <span class="o">#</span><span class="n">ReservedKeywords</span><span class="p">;</span>
</code></pre></div></div>

<p>The list of keyword according to ChatGPT:</p>
<div class="language-plaintext highlighter-rouge"><div class="highlight"><pre class="highlight"><code>ABORT
ABS
ACCESS
ADD
ADMIN
AFTER
AGGREGATE
ALL
ALLOCATE
ALTER
ANALYZE
AND
ANY
ARE
ARRAY
AS
ASC
ASSERTION
AT
AUTHORIZATION
AVG
BACKUP
BEFORE
BEGIN
BETWEEN
BIGINT
BINARY
BIT
BLOB
BOOLEAN
BOTH
BREAK
BY
BYTE
CALL
CASCADE
CASE
CAST
CATALOG
CHAR
CHARACTER
CHECK
CLOSE
CLUSTER
COALESCE
COLLATE
COLUMN
COMMIT
CONNECT
CONSTRAINT
CONTAINS
CONTINUE
CONVERT
COPY
COUNT
CREATE
CROSS
CUBE
CURRENT
CURRENT_DATE
CURRENT_PATH
CURRENT_ROLE
CURRENT_TIME
CURRENT_TIMESTAMP
CURRENT_USER
CURSOR
CYCLE
DATA
DATABASE
DATE
DAY
DBA
DEALLOCATE
DEC
DECIMAL
DECLARE
DEFAULT
DELETE
DESCRIBE
DESCRIPTOR
DETERMINISTIC
DIAGNOSTICS
DISCONNECT
DISTINCT
DO
DOMAIN
DOUBLE
DROP
DYNAMIC
EACH
ELSE
END
END-EXEC
ESCAPE
EXCEPT
EXCEPTION
EXEC
EXECUTE
EXISTS
EXIT
EXTERNAL
EXTRACT
FALSE
FETCH
FIRST
FLOAT
FOR
FOREIGN
FOUND
FREE
FROM
FULL
FUNCTION
GENERAL
GET
GLOBAL
GO
GOTO
GRANT
GROUP
GROUPING
HAVING
HOST
HOUR
IDENTITY
IF
IGNORE
IMMEDIATE
IN
INCREMENT
INDEX
INDICATOR
INITIAL
INITIALLY
INNER
INOUT
INPUT
INSERT
INT
INTEGER
INTERSECT
INTERVAL
INTO
IS
ISOLATION
JOIN
KEY
LANGUAGE
LAST
LEADING
LEAVE
LEFT
LEVEL
LIKE
LIMIT
LOCAL
LOWER
MATCH
MAX
MIN
MINUTE
MODULE
MONTH
NAMES
NATIONAL
NATURAL
NCHAR
NCLOB
NEW
NEXT
NO
NONE
NOT
NULL
NUMERIC
OBJECT
OF
OFF
OFFSET
OLD
ON
ONLY
OPEN
OPTION
OR
ORDER
OUT
OUTER
OUTPUT
OVER
OVERLAPS
PAD
PARAMETER
PARTIAL
PARTITION
PERCENT
PLACING
POSITION
PRECISION
PREPARE
PRIMARY
PRIOR
PRIVILEGES
PROCEDURE
PUBLIC
RANGE
READ
REAL
REFERENCES
RELATIVE
REPLACE
RESTRICT
RETURN
RETURNS
REVOKE
RIGHT
ROLE
ROLLBACK
ROLLUP
ROUTINE
ROW
ROWS
SAVEPOINT
SCHEMA
SCROLL
SEARCH
SECOND
SECTION
SELECT
SESSION
SET
SETS
SHARE
SHOW
SIMILAR
SIZE
SMALLINT
SOME
SPACE
SPECIFIC
SQL
SQLCODE
SQLERROR
SQLSTATE
START
STATEMENT
STATIC
SUBSTRING
SUM
SYSTEM
TABLE
TEMPORARY
THEN
TIME
TIMESTAMP
TO
TRAILING
TRANSACTION
TRANSLATE
TRANSLATION
TRIGGER
TRUE
UNION
UNIQUE
UNKNOWN
UNNEST
UPDATE
USAGE
USER
USING
VALUE
VALUES
VARCHAR
VARIABLE
VARYING
VIEW
WHEN
WHENEVER
WHERE
WITH
WORK
WRITE
YEAR
ZONE
</code></pre></div></div>]]></content><author><name></name></author><category term="SQL" /><summary type="html"><![CDATA[I was working with an SQL Server schema and discovered that one of my tables was named with a keyword; SELECT u.*, a.* FROM [Bpm].User u INNER JOIN [Bpm].Account a ON u.Id = a.UserId WHERE u.Username = 'foo@exammple.com' Msg 156, Level 15, State 1, Line 2 Incorrect syntax near the keyword ‘User’. Turns out ‘User’ is a keyword and I needed to enclose it in square brackets: FROM [Bpm].[User] .... It’s probably best just to avoid naming things with keywords. Here’s a query for SQL Server to detect if you have inadvertently named one of your tables with a keyword from one of the following DBMS’s: MySQL PostgreSQL Oracle SQL Server (Transact-SQL) SQLite DB2 -- Step 1: Create a temporary table for reserved keywords CREATE TABLE #ReservedKeywords ( Keyword NVARCHAR(128) NOT NULL ); -- Step 2: Insert the reserved keywords into the temporary table INSERT INTO #ReservedKeywords (Keyword) VALUES ('ABORT'), ('ABS'), ('ACCESS'), ('ADD'), ('ADMIN'), ('AFTER'), ('AGGREGATE'), ('ALL'), ('ALLOCATE'), ('ALTER'), ('ANALYZE'), ('AND'), ('ANY'), ('ARE'), ('ARRAY'), ('AS'), ('ASC'), ('ASSERTION'), ('AT'), ('AUTHORIZATION'), ('AVG'), ('BACKUP'), ('BEFORE'), ('BEGIN'), ('BETWEEN'), ('BIGINT'), ('BINARY'), ('BIT'), ('BLOB'), ('BOOLEAN'), ('BOTH'), ('BREAK'), ('BY'), ('BYTE'), ('CALL'), ('CASCADE'), ('CASE'), ('CAST'), ('CATALOG'), ('CHAR'), ('CHARACTER'), ('CHECK'), ('CLOSE'), ('CLUSTER'), ('COALESCE'), ('COLLATE'), ('COLUMN'), ('COMMIT'), ('CONNECT'), ('CONSTRAINT'), ('CONTAINS'), ('CONTINUE'), ('CONVERT'), ('COPY'), ('COUNT'), ('CREATE'), ('CROSS'), ('CUBE'), ('CURRENT'), ('CURRENT_DATE'), ('CURRENT_PATH'), ('CURRENT_ROLE'), ('CURRENT_TIME'), ('CURRENT_TIMESTAMP'), ('CURRENT_USER'), ('CURSOR'), ('CYCLE'), ('DATA'), ('DATABASE'), ('DATE'), ('DAY'), ('DBA'), ('DEALLOCATE'), ('DEC'), ('DECIMAL'), ('DECLARE'), ('DEFAULT'), ('DELETE'), ('DESCRIBE'), ('DESCRIPTOR'), ('DETERMINISTIC'), ('DIAGNOSTICS'), ('DISCONNECT'), ('DISTINCT'), ('DO'), ('DOMAIN'), ('DOUBLE'), ('DROP'), ('DYNAMIC'), ('EACH'), ('ELSE'), ('END'), ('END-EXEC'), ('ESCAPE'), ('EXCEPT'), ('EXCEPTION'), ('EXEC'), ('EXECUTE'), ('EXISTS'), ('EXIT'), ('EXTERNAL'), ('EXTRACT'), ('FALSE'), ('FETCH'), ('FIRST'), ('FLOAT'), ('FOR'), ('FOREIGN'), ('FOUND'), ('FREE'), ('FROM'), ('FULL'), ('FUNCTION'), ('GENERAL'), ('GET'), ('GLOBAL'), ('GO'), ('GOTO'), ('GRANT'), ('GROUP'), ('GROUPING'), ('HAVING'), ('HOST'), ('HOUR'), ('IDENTITY'), ('IF'), ('IGNORE'), ('IMMEDIATE'), ('IN'), ('INCREMENT'), ('INDEX'), ('INDICATOR'), ('INITIAL'), ('INITIALLY'), ('INNER'), ('INOUT'), ('INPUT'), ('INSERT'), ('INT'), ('INTEGER'), ('INTERSECT'), ('INTERVAL'), ('INTO'), ('IS'), ('ISOLATION'), ('JOIN'), ('KEY'), ('LANGUAGE'), ('LAST'), ('LEADING'), ('LEAVE'), ('LEFT'), ('LEVEL'), ('LIKE'), ('LIMIT'), ('LOCAL'), ('LOWER'), ('MATCH'), ('MAX'), ('MIN'), ('MINUTE'), ('MODULE'), ('MONTH'), ('NAMES'), ('NATIONAL'), ('NATURAL'), ('NCHAR'), ('NCLOB'), ('NEW'), ('NEXT'), ('NO'), ('NONE'), ('NOT'), ('NULL'), ('NUMERIC'), ('OBJECT'), ('OF'), ('OFF'), ('OFFSET'), ('OLD'), ('ON'), ('ONLY'), ('OPEN'), ('OPTION'), ('OR'), ('ORDER'), ('OUT'), ('OUTER'), ('OUTPUT'), ('OVER'), ('OVERLAPS'), ('PAD'), ('PARAMETER'), ('PARTIAL'), ('PARTITION'), ('PERCENT'), ('PLACING'), ('POSITION'), ('PRECISION'), ('PREPARE'), ('PRIMARY'), ('PRIOR'), ('PRIVILEGES'), ('PROCEDURE'), ('PUBLIC'), ('RANGE'), ('READ'), ('REAL'), ('REFERENCES'), ('RELATIVE'), ('REPLACE'), ('RESTRICT'), ('RETURN'), ('RETURNS'), ('REVOKE'), ('RIGHT'), ('ROLE'), ('ROLLBACK'), ('ROLLUP'), ('ROUTINE'), ('ROW'), ('ROWS'), ('SAVEPOINT'), ('SCHEMA'), ('SCROLL'), ('SEARCH'), ('SECOND'), ('SECTION'), ('SELECT'), ('SESSION'), ('SET'), ('SETS'), ('SHARE'), ('SHOW'), ('SIMILAR'), ('SIZE'), ('SMALLINT'), ('SOME'), ('SPACE'), ('SPECIFIC'), ('SQL'), ('SQLCODE'), ('SQLERROR'), ('SQLSTATE'), ('START'), ('STATEMENT'), ('STATIC'), ('SUBSTRING'), ('SUM'), ('SYSTEM'), ('TABLE'), ('TEMPORARY'), ('THEN'), ('TIME'), ('TIMESTAMP'), ('TO'), ('TRAILING'), ('TRANSACTION'), ('TRANSLATE'), ('TRANSLATION'), ('TRIGGER'), ('TRUE'), ('UNION'), ('UNIQUE'), ('UNKNOWN'), ('UNNEST'), ('UPDATE'), ('USAGE'), ('USER'), ('USING'), ('VALUE'), ('VALUES'), ('VARCHAR'), ('VARIABLE'), ('VARYING'), ('VIEW'), ('WHEN'), ('WHENEVER'), ('WHERE'), ('WITH'), ('WORK'), ('WRITE'), ('YEAR'), ('ZONE'); -- Step 3: Query to find tables with reserved keyword names SELECT TABLE_NAME FROM INFORMATION_SCHEMA.TABLES WHERE TABLE_TYPE = 'BASE TABLE' AND TABLE_NAME COLLATE Latin1_General_CI_AS IN (SELECT Keyword FROM #ReservedKeywords); -- Cleanup: Drop the temporary table after use DROP TABLE #ReservedKeywords; The list of keyword according to ChatGPT: ABORT ABS ACCESS ADD ADMIN AFTER AGGREGATE ALL ALLOCATE ALTER ANALYZE AND ANY ARE ARRAY AS ASC ASSERTION AT AUTHORIZATION AVG BACKUP BEFORE BEGIN BETWEEN BIGINT BINARY BIT BLOB BOOLEAN BOTH BREAK BY BYTE CALL CASCADE CASE CAST CATALOG CHAR CHARACTER CHECK CLOSE CLUSTER COALESCE COLLATE COLUMN COMMIT CONNECT CONSTRAINT CONTAINS CONTINUE CONVERT COPY COUNT CREATE CROSS CUBE CURRENT CURRENT_DATE CURRENT_PATH CURRENT_ROLE CURRENT_TIME CURRENT_TIMESTAMP CURRENT_USER CURSOR CYCLE DATA DATABASE DATE DAY DBA DEALLOCATE DEC DECIMAL DECLARE DEFAULT DELETE DESCRIBE DESCRIPTOR DETERMINISTIC DIAGNOSTICS DISCONNECT DISTINCT DO DOMAIN DOUBLE DROP DYNAMIC EACH ELSE END END-EXEC ESCAPE EXCEPT EXCEPTION EXEC EXECUTE EXISTS EXIT EXTERNAL EXTRACT FALSE FETCH FIRST FLOAT FOR FOREIGN FOUND FREE FROM FULL FUNCTION GENERAL GET GLOBAL GO GOTO GRANT GROUP GROUPING HAVING HOST HOUR IDENTITY IF IGNORE IMMEDIATE IN INCREMENT INDEX INDICATOR INITIAL INITIALLY INNER INOUT INPUT INSERT INT INTEGER INTERSECT INTERVAL INTO IS ISOLATION JOIN KEY LANGUAGE LAST LEADING LEAVE LEFT LEVEL LIKE LIMIT LOCAL LOWER MATCH MAX MIN MINUTE MODULE MONTH NAMES NATIONAL NATURAL NCHAR NCLOB NEW NEXT NO NONE NOT NULL NUMERIC OBJECT OF OFF OFFSET OLD ON ONLY OPEN OPTION OR ORDER OUT OUTER OUTPUT OVER OVERLAPS PAD PARAMETER PARTIAL PARTITION PERCENT PLACING POSITION PRECISION PREPARE PRIMARY PRIOR PRIVILEGES PROCEDURE PUBLIC RANGE READ REAL REFERENCES RELATIVE REPLACE RESTRICT RETURN RETURNS REVOKE RIGHT ROLE ROLLBACK ROLLUP ROUTINE ROW ROWS SAVEPOINT SCHEMA SCROLL SEARCH SECOND SECTION SELECT SESSION SET SETS SHARE SHOW SIMILAR SIZE SMALLINT SOME SPACE SPECIFIC SQL SQLCODE SQLERROR SQLSTATE START STATEMENT STATIC SUBSTRING SUM SYSTEM TABLE TEMPORARY THEN TIME TIMESTAMP TO TRAILING TRANSACTION TRANSLATE TRANSLATION TRIGGER TRUE UNION UNIQUE UNKNOWN UNNEST UPDATE USAGE USER USING VALUE VALUES VARCHAR VARIABLE VARYING VIEW WHEN WHENEVER WHERE WITH WORK WRITE YEAR ZONE]]></summary></entry><entry><title type="html">Quantum Computation Primer Part 1</title><link href="http://danielvaughan.org/posts/quantum/2019/06/24/Quantum-Computation-Primer-Part-1/" rel="alternate" type="text/html" title="Quantum Computation Primer Part 1" /><published>2019-06-24T00:00:00+00:00</published><updated>2019-06-24T00:00:00+00:00</updated><id>http://danielvaughan.org/posts/quantum/2019/06/24/Quantum-Computation-Primer-Part-1</id><content type="html" xml:base="http://danielvaughan.org/posts/quantum/2019/06/24/Quantum-Computation-Primer-Part-1/"><![CDATA[<p><img src="/assets/images/2019-06-24/header.png" alt="header" /></p>

<h2 id="introduction">Introduction</h2>

<p>The major cloud providers: Microsoft, Amazon, Google, IBM, and Oracle are racing to bring quantum computing as a service to their offerings. In addition, companies, universities, and even <a href="https://www.axios.com/us-chinese-race-for-quantum-dominance-63f55bc2-45b5-438f-ae5c-a29b32a42642.html">nation states</a> are investing heavily.</p>

<p>Why all the buzz?</p>

<p>Quantum computers offer the potential to bring parallelism to calculations on a scale that cannot be matched by classical computers. They may enable us to model the quantum world, bringing breakthroughs in material science, medicine, you name it.</p>

<p>There already exists actual multi-qubit quantum computers, such as <a href="https://quantum-computing.ibm.com">IBM</a>, that allow you to create and run quantum algorithms in the cloud.</p>

<p>Despite the general optimism, there are contrarians <!-- Gil Kalai --><a href="https://www.quantamagazine.org/gil-kalais-argument-against-quantum-computers-20180207/">who argue</a> that larger multi-qubit systems are not feasible and will never happen. But, the physics underpinning quantum computing has been widely validated experimentally and researches continue to make advances in <a href="https://newsroom.unsw.edu.au/news/science-tech/quantum-world-first-researchers-can-now-tell-how-accurate-two-qubit-calculations">improving the accuracy of multi-qubit systems</a>.</p>

<p>For software engineers, it’s a field that is ripe for exploration.</p>

<!--
But while the hardware has still not reached quantum supremacy, where quantum computers are able to outperform classical computers.
Researches are continually making advances.
Researches at embedding individual atoms into silicon, and UNSW have [created the world's first accurate 2-qubit gate in Silicon](https://newsroom.unsw.edu.au/news/science-tech/quantum-world-first-researchers-can-now-tell-how-accurate-two-qubit-calculations).
-->

<h3 id="my-journey-into-the-quantum-realm">My Journey into the Quantum Realm</h3>

<p>In all likelihood, like me, you’re a software engineer looking to cut your teeth with the latest quantum tech. Unfortunately, nearly all of the resources online on the topic of quantum computing come from a mathematics or physics bent; much of the time written by physicists for physicists.</p>

<p>When I began learning quantum theory several months ago, my first step was to plunge head first into what, according to some, is the authoritative text on the subject: Quantum Computation and Quantum Information, by Nielsen and Chuang. Apparently this is the book used in many physics schools. I soon found myself struggling with the linear algebra and I knew I was going to need to take a step back and read up on that. Fortunately I had an old (8<sup>th</sup>) edition of Elementary Linear Algebra, by Anton sitting on my bookshelf; left over from my undergraduate days, nearly two decades ago. I worked my way through that, and thoroughly enjoyed it. Towards the end, after a few weeks of study, I had another crack at a quantum text. This time I chose Quantum Computing for Computer Scientists by Yanofsky and Mannucci. More and more came into focus now. The only thing noticeably missing from the linear algebra book was tensors. I turned to the web for that, and tensor products turned out to be dead simple.</p>

<p>So, armed with my newly acquired linear algebra, I pushed through the quantum computing book; turning to the web to increase clarity here and there. Eventually I found myself where I wanted to be from the beginning, understanding and constructing quantum circuits.</p>

<p>While the mathematics and notation underpinning quantum theory seems daunting at first, on my journey, I’ve been taken with the elegance by which it all fits together. I wrote this series of articles to provide you with a grounding in the fundamentals of quantum computation without spending a lot of time on quantum mechanics, which is a branch of physics heavy in theory that, while broadening comprehension, may deter a beginner. This series doesn’t spend much time on covering the relevant mathematics up front either, but rather introduces critical mathematics along the way. While there’s quite a bit of math and formulas littered throughout these articles, we work through them together.</p>

<p>Let’s dive in.</p>

<!--
# Quantum Kickstarter for Software Engineers - Part 1

In this section we explore some of the theory underpinning quantum computing. I begin with a brief word about my experience with getting up to speed.

> **NOTE:** There are quite a few equations presented in this article. But don't worry, we'll walk you through them together and progressively build up your knowledge.

## Prerequisites - What you need to know

There is rather a lot of theory underpinning quantum computing. I don't know if you need it all; probably not. But exposure to it will broaden your comprehension of the topic. You certainly need the basics to make any headway into any discussion around qubits and gates.
I'll cover some of these topics, but not all. We cover things as we need them.

* Maths
    * Matrix multiplication, inner and outer product, tensor product, determinants
    * Matrix types - unitary, hamitian, identity, conjugates. transpose, adjoint, matrix orthogonality
    * Vectors - vector space, norm of vectors, normalizing vectors
    * Eigenvalues and eigenvectors
    * Tensor product
    * Complex numbers
    * Phase and polar
* Classical computing fundamentals 
    * Logic - AND, OR, NOT, XOR
    * Logic gates - constructing gates from universal gates. Creating an adder.
* Dirac Notation
-->

<h2 id="bits-to-qubits">Bits to Qubits</h2>

<p>In quantum computing, a qubit is analogous to a bit in classical computing. I’m guessing you knew that already. As is a qubyte to a byte. As with classical computing, a qubit has two measurable states but there’s a little more to it.</p>

<p>When you measure a qubit, its quantum state is said to collapse; to a value that is either 0 or 1. Before you measure it, however, the two observable states have a certain probability. You can modify the probabilities of a quantum state, and what’s more, you can employ multiple qubits that affect one another.</p>

<p>A qubit is represented as a vector. The zero qubit state is represented by the single column matrix [1, 0]<sup>T</sup>. The one qubit state is represented by [0, 1]<sup>T</sup>. These are known as its basis states. The ‘T’ superscript denotes the transpose of the matrix, and allows the matrix to be presented horizontally. It’s used occasionally to save space.</p>

<p>These two basis states are <a href="https://en.wikipedia.org/wiki/Orthonormality">orthonormal</a>, which means they are orthogonal and normalized. Together they are called the computational basis. Let me explain these terms.</p>

<p>Orthogonal means that the inner product of the matrices is 0. To calculate the inner product (a.k.a. the dot product), we multiply each item in the first matrix with its counterpart in the second matrix and sum them all together, like so:</p>

<!--
![Qubit basis vectors are orthogonal](/assets/images/2019-06-24/Orthogonal.png)
-->

\[\begin{bmatrix}1 \\ 0\end{bmatrix} \cdot \begin{bmatrix}0 \\ 1\end{bmatrix} = 1 \times 0 + 0 \times 1 = 0\]

<p>Normalized means that the probabilities of the observable states add up to 1.</p>

<p>Determining the probability of quantum states is fundamental to quantum information theory, and we delve further into that later in the article. Firstly, however, we need to cover some basic math; complex numbers and matrix multiplication, then familiarize ourselves with Dirac notation.</p>

<h2 id="some-preliminary-mathematics">Some Preliminary Mathematics</h2>

<p>Though it may appear otherwise skimming over this article, I’ve tried to keep the math simple. There are, however, just a couple operations you need under your belt to be able to follow along. In particular, you need to know how to multiply complex numbers and matrices. We look at those operations now.</p>

<h3 id="multiplying-complex-numbers">Multiplying Complex Numbers</h3>

<p>In quantum computation, qubits are represented as vectors in 3 dimensional space. In quantum circuits, we rotate and combine them to perform computations. The vectors representing qubits’ state contain complex numbers, and complex numbers are also used to rotate qubits in this space.</p>

<p>A complex number consists of a real part $x$ and an imaginary part $y$, as shown:</p>

\[x + yi\]

<p>where $i = \sqrt{-1}$ and $i^{2} = -1$.</p>

<p>When multiplying two complex numbers, you add together the products of the real and imaginary parts of both numbers. See Figure 1.</p>

<figure align="center"><img alt="Multiplying imaginary numbers" src="/assets/images/2019-06-24/ImaginaryMultiplication.png" /><figcaption>Figure 1. Multiplying imaginary numbers</figcaption></figure>

<p>Multiplying this out gives us:</p>

\[(x_1 + y_1 i)(x_2 + y_2 i)
= x_1 x_2 + x_1 y_2 i + y_1 x_2 i + y_1 y_2 i^2\]

<p>Since $i^{2} = -1$, this simplifies to:</p>

\[x_1 x_2 - y_1 y_2 + x_1 y_2 i + y_1 x_2 i\]

<p>The following is an example:</p>

\[\begin{align}
(3 + 2i)(4 + 3i) &amp;= 12 + 9i + 8i + 6i^2 \\
                 &amp;= 12 + 17i - 6       \\
                 &amp;= 6 + 17i
\end{align}\]

<h3 id="multiplying-two-matrices">Multiplying Two Matrices</h3>

<p>When working with quantum states, there are three matrix by matrix multiplication operations that are commonly performed: matrix product, inner product, and tensor product (a.k.a. outer product). We look at the matrix product now and cover the inner and tensor products in later sections, as we need them.</p>

<p>The first thing to note is that calculation of the matrix product is only valid if the number of columns in the first matrix is equal to the number of rows in the second matrix. See Figure 2.</p>

<p>Also notice that the row count for the result equals the row count of the first matrix, and the column count of the result, equals the column count of the second matrix.</p>

<figure align="center"><img alt="Colums A must equal Rows" src="/assets/images/2019-06-24/MMustBeEqual.png" /><figcaption>Figure 2. Size outcomes when multiplying two matrices</figcaption></figure>

<p>The matrix product is generally written without an operator as AB, where A and B are two matrices.</p>

<p>Let’s work through an example, where matrix A and B are presented below.</p>

<p><img src="/assets/images/2019-06-24/MMAandB.png" alt="Matrix A and B" /></p>

<p>To calculate AB, we multiply each item in the first row of A by the item in the first column of B with same index, and sum the products. The result is 1×2 + 3×3 + 2×1 = 13. The value 13 is placed into the first cell of the result matrix.</p>

<p><img src="/assets/images/2019-06-24/MMAB1.png" alt="A times B part 1" /></p>

<p>We then stay on the first row of A, but we shift to the next column of B; repeating the process until we get to the end of the columns in B.</p>

<p><img src="/assets/images/2019-06-24/MSecondColumn.png" alt="A times B part 2" /></p>

<p>We then shift down to the second row of A, and back to the first column in B. After we complete the last row in A, we’re done.</p>

<p><img src="/assets/images/2019-06-24/MMAB2.png" alt="A times B part 2" /></p>

<h3 id="identifying-an-element-in-a-matrix">Identifying an Element in a Matrix</h3>

<p>By convention, a matrix is often given a capital letter as an identifier. An element within the matrix is specified using the name of the matrix in lowercase, with its row then column (in that order) shown as subscript. See the following example:</p>

\[A =
\begin{bmatrix}
a_{00} &amp; a_{01} \\
a_{10} &amp; a_{11}
\end{bmatrix}\]

<h3 id="multiplying-a-matrix-by-a-scalar">Multiplying a Matrix by a Scalar</h3>

<p>The process of multiplying a matrix by a scalar is a simple one: multiply every item in the matrix by the scalar.</p>

<p>If A is the matrix:</p>

<!--
![A times B part 2](/assets/images/2019-06-24/MatrixScalarA.png)
-->

\[A =
\begin{bmatrix}
a_{00} &amp; a_{01} &amp; a_{02} \\
a_{10} &amp; a_{11} &amp; a_{12} \\
a_{20} &amp; a_{21} &amp; a_{22}
\end{bmatrix}\]

<p>Then multiplying the matrix by a scalar produces:</p>

<!--
![A times B part 2](/assets/images/2019-06-24/MatrixScalarLambdaA.png)
-->

\[\lambda A =
\begin{bmatrix}
\lambda a_{00} &amp; \lambda a_{01} &amp; \lambda a_{02} \\
\lambda a_{10} &amp; \lambda a_{11} &amp; \lambda a_{12} \\
\lambda a_{20} &amp; \lambda a_{21} &amp; \lambda a_{22}
\end{bmatrix}\]

<p>For example, if the scalar multiplier is 2 and A’s values are:</p>

<!--
![A times B part 2](/assets/images/2019-06-24/MatrixScalarALambda.png)
-->

\[A =
\begin{bmatrix}
1 &amp; 3 \\
5 &amp; 2
\end{bmatrix},
\quad \lambda = 2\]

<p>Then the result is as follows:</p>

<!--
![A times B part 2](/assets/images/2019-06-24/MatrixScalarExample.png)
-->

\[\lambda A = 2\begin{bmatrix}1 &amp; 3 \\ 5 &amp; 2\end{bmatrix} = \begin{bmatrix}2 &amp; 6 \\ 10 &amp; 4\end{bmatrix}\]

<p>If the scalar is a complex number and/or the matrix contains complex numbers, the procedure does not change. You calculate the products using the rules of complex number multiplication, which we looked at earlier.</p>

<p>Okay, so we’ve gone over some basic math operations that you need to know to follow along. Let’s move on to something more fun.</p>

<h2 id="describing-quantum-state-with-dirac-notation">Describing Quantum State with Dirac Notation</h2>

<p>Dirac notation (also known as bra-ket notation) is everywhere in quantum theory. It’s used to describe quantum states. You can think of it as matrix shorthand.</p>

<p>A single qubit with the zero basis state can be written as a <strong>ket</strong>, like so:</p>

\[\vert 0 \rangle\]

<p>This reads as “ket zero.”</p>

<p>Conversely, a qubit with a one basis state, can be written as:</p>

\[\vert 1 \rangle\]

<blockquote>
  <p><strong>NOTE:</strong> In some texts, |0〉 and |1〉 are presented as |↑〉 (spin-up) and |↓〉 (spin-down), respectively. When you visualize a qubit on a three dimensional sphere, |0〉 is up at the north pole and |1〉 is down at the south pole. I use |0〉 and |1〉 exclusively in this series.</p>
</blockquote>

<p>Recall that |0〉 represents the column vector [1, 0]<sup>T</sup>, and 1 represent [0, 1]<sup>T</sup>.</p>

<p>In Dirac notation, the values within the ket—between the vertical line character ‘|’ and the angled bracket ‘〉’—are tensor products.</p>

<p>The symbol ‘⊗’ is used to denote the tensor product of two matrices. It is calculated by multiplying each item in the first matrix by all items in the second matrix, as illustrated:</p>

\[\begin{alignedat}{2}
\begin{bmatrix} a_{1} \\ a_{2} \end{bmatrix}
\otimes
\begin{bmatrix} b_{1} \\ b_{2} \end{bmatrix}
&amp;\!=\!
\begin{bmatrix}
a_{1}\begin{bmatrix} b_{1} \\ b_{2} \end{bmatrix} \\
a_{2}\begin{bmatrix} b_{1} \\ b_{2} \end{bmatrix}
\end{bmatrix}
&amp;\!=\!
\begin{bmatrix}
a_{1} b_{1} \\
a_{1} b_{2} \\
a_{2} b_{1} \\
a_{2} b_{2}
\end{bmatrix}
\end{alignedat}\]

<!--
![Tensor product example](/assets/images/2019-06-24/TensorProduct.png)
-->

<p>Tensor products are condensed within Dirac notation, like so:</p>

\[\vert 0 \rangle \otimes \vert 1 \rangle = \vert 01 \rangle\]

<p>For qubits, the Dirac notation lends itself beautifully to a binary representation. Notice below how entries in the matrix correspond to the binary, and in particular how the first entry in the matrix corresponds to 0 and not 1.</p>

<!-- 
![Ket Binary](/assets/images/2019-06-24/KetBinary.png)
-->

\[\vert 010 \rangle =
\begin{bmatrix}0\\0\\1\\0\\0\\0\\0\\0\end{bmatrix}
\;\;\longleftrightarrow\;\;
\begin{array}{c c c}
\text{Binary} &amp; &amp; \text{Decimal} \\
000 &amp; &amp; 0 \\
001 &amp; &amp; 1 \\
\color{red}{010} &amp; &amp; \color{red}{2} \\
011 &amp; &amp; 3 \\
100 &amp; &amp; 4 \\
101 &amp; &amp; 5 \\
110 &amp; &amp; 6 \\
111 &amp; &amp; 7
\end{array}\]

<blockquote>
  <p><strong>NOTE:</strong> In some texts, the leading 0’s within a ket are omitted and replaced with a subscript indicating the length. So that |0010⟩ becomes |10<sub>4</sub>⟩. I don’t use that notation in this series, but you may see it elsewhere.</p>
</blockquote>

<p>You can now see how |1⟩ ⊗ |0⟩ are combined by calculating the tensor product of the matrices, like so:</p>

<!-- 
![Tensor Product](/assets/images/2019-06-24/ZeroTensorOne.png)
-->

\[\vert 0 \rangle \otimes \vert 1 \rangle = \begin{bmatrix}1 \\ 0\end{bmatrix} \otimes \begin{bmatrix}0 \\ 1\end{bmatrix} = \begin{bmatrix}0 \\ 1 \\ 0 \\ 0\end{bmatrix} = \vert 01 \rangle\]

<p>In a quantum circuit, the inputs of the circuit are combined as tensor products. We explore this later in the series.</p>

<p>If the Dirac notation points to the left rather than the right, as in: 〉0|, this is called a bra. Together they form a bra-ket.</p>

<h3 id="deriving-a-bra-from-a-ket-and-vice-versa">Deriving a Bra from a Ket (and Vice Versa)</h3>

<p>The bra is the <a href="https://en.wikipedia.org/wiki/Conjugate_transpose">conjugate transpose</a> of the ket. The conjugate transpose is also known as the adjoint matrix, and yet another name is the Hermitian transpose.</p>

<p>To obtain the conjugate transpose, the matrix is rotated and each entry is complex conjugated. For a single column matrix, it just means we turn it horizontally and then take the complex conjugate of each entry. See Figure 3.</p>

<p>The complex conjugate simply means changing the sign of the imaginary part.<br />
For example, if $z = 2 + 3i$, then the complex conjugate is $\overline{z} = 2 - 3i$.</p>

<figure align="center"><img alt="Performing a conjugate transpose" src="/assets/images/2019-06-24/Adjoint.png" /><figcaption>Figure 3. Performing a conjugate transpose</figcaption></figure>

<blockquote>
  <p><strong>Why Complex Numbers?</strong><br />
You may wonder why quantum theory relies so heavily on complex numbers. As Yanofsky and Mannucci point out <a href="#references">[1]</a>, if you add two positive real numbers, the result will always increase. That is not the case with complex numbers. You can add two complex numbers and produce a smaller result. In fact, they may even cancel each other out. This is referred to as <em>interference</em>, and it is sometimes employed deliberately to eliminate unwanted states in quantum algorithms.</p>
</blockquote>

<p>In the following examples we use the variables a and b, such that a,b ∈ C<sup>d</sup>. In other words, a and b denote single column matrices of complex numbers with the number of rows equal to d. Most of the time when we are working with qubits, so the dimension count is 2.</p>

<p>In the following examples, we use the variables $a$ and $b$, such that $a, b \in \mathbb{C}^{d}$. In other words, $a$ and $b$ denote single-column matrices of complex numbers with the number of rows equal to $d$. Most of the time when we are working with qubits, the dimension count is 2.</p>

<p>The following illustrates obtaining a bra from a ket:</p>

<!-- ![Bra equals ket adjoint](/assets/images/2019-06-24/BraKetAdjoint.png) -->

\[\langle a \rvert = \lvert a \rangle^{\dagger} = \begin{bmatrix}\overline{a}_{1} \\ \overline{a}_{2} \\ \vdots \\ \overline{a}_{d}\end{bmatrix}^{\mathsf{T}} = \begin{bmatrix}\overline{a}_{1} &amp; \overline{a}_{2} &amp; \cdots &amp; \overline{a}_{d}\end{bmatrix}\]

<p>This process is reversible. To obtain a ket from a bra, do the same thing again: calculate the conjugate transpose.</p>

<p>When combined, a bra-ket ⟨b|a⟩ represents the inner product of b and a. It’s sometimes written as ⟨b,a⟩. The inner product is the sum of the products of corresponding items. This results in a complex scalar value (with or without an imaginary part). Scalar means that it’s not a vector; it’s a magnitude without direction.</p>

<!--
![Bra equals ket adjoint](/assets/images/2019-06-24/InnerProduct.png)
-->

\[\langle b \vert a \rangle = b \cdot a = a_{1} b_{1} + a_{2} b_{2} + \cdots + a_{d} b_{d}\]

<p>All quantum states are normalized. That is ⟨a|a⟩ = 1. This has important implications for the probability of states. We return to it in a later section.</p>

<p>We’ve seen that quantum theory relies on complex numbers and vectors to describe quantum states. This algebraic structure is termed a complex vector space and is also known as <a href="https://en.wikipedia.org/wiki/Hilbert_space">Hilbert Space</a>.</p>

<p>Another combination of the Dirac notation, which I include for completeness, is the ket-bra. It’s written like this |a⟩⟨b| or sometimes |aXb|. A ket-bra is the tensor (or outer) product and is represented by a d × d matrix:</p>

<!-- 
![Ket-Bra](/assets/images/2019-06-24/KetBra.png)
-->

\[\lvert a \rangle \langle b \rvert =
\begin{bmatrix}
a_{1} b_{1} &amp; a_{1} b_{2} &amp; \cdots &amp; a_{1} b_{d} \\
a_{2} b_{1} &amp; a_{2} b_{2} &amp; \cdots &amp; a_{2} b_{d} \\
\vdots &amp; \vdots &amp; \ddots &amp; \vdots \\
a_{d} b_{1} &amp; a_{d} b_{2} &amp; \cdots &amp; a_{d} b_{d}
\end{bmatrix}\]

<blockquote>
  <p><strong>TIP:</strong> In quantum theory, it’s common to see the Greek characters φ (phi) and ψ (psi) used as variable names in bras and kets. For example, you often see a quantum state expressed as $\vert \psi \rangle = \dots$. Don’t be put off by the Greek characters, foreign notation, and seemingly complex algebra. It all appears far more complex than it actually is.</p>
</blockquote>

<h2 id="exploring-quantum-superposition">Exploring Quantum Superposition</h2>

<p>We learned in an earlier section that when you measure a qubit, its quantum state collapses to either 0 or 1. To which value it collapses depends on the way the qubit has been configured. You can change the probability of a qubit collapsing to a particular value. By doing so, you place the qubit into a superposition.</p>

<p>Now, for a qubit that is in a pure basis state, either |0⟩ or |1⟩, the result is predetermined. It has a 100% chance of collapsing to its respective value. In other words, if you measure a qubit that was placed in the |0⟩ state, for example, you always get 0 because the probability of collapsing to 0, is 1; and the probability of collapsing to 1, is 0.</p>

<p>But, if you employ a certain quantum gate in your quantum circuit, you can split the probability of the qubit collapsing to 0 or 1, to a 50/50 chance either way. In which case, it is said to be in a superposition of both states.</p>

<p>When a qubit is in a superposition, its value is undetermined until it’s measured. In this state, it is neither 0 nor 1 in the classical sense, but a superposition of both possibilities.</p>

<p>This is such an unusual phenomenon, physicists have been unable to explain it using classical physics. Yet, it has been widely observed experimentally. Remember the <a href="https://en.wikipedia.org/wiki/Double-slit_experiment">double slit experiment</a>? A photon seemingly goes everywhere, interfering with itself, before landing on a spot. So to does our qubit exist in all observable states until it is measured.</p>

<blockquote>
  <p><strong>Disambiguating the Term “State”</strong> When one or more qubits make up a quantum system, this system has an overall quantum state at any one time. However, the system also has a set of distinct states that it may collapse to when measured. We’ll call these states: observable states.</p>
</blockquote>

<p>The quantum state of one or more qubits can be described using Dirac notation and simple algebra. Observable states and associated probabilities comprise the qubit’s superposition.</p>

<p>A single qubit can be described by a linear combination of |0〉 and |1〉, such that:</p>

\[\vert \Psi \rangle = \alpha \vert 0 \rangle + \beta \vert 1 \rangle\]

<p>The coefficients $\alpha$ (alpha) and $\beta$ (beta) are known as <em>complex amplitudes</em> or <em>probability amplitudes</em>. As Yanofsky and Mannucci point out <a href="#references">[1]</a>, the name <em>amplitude</em> comes from the fact that a quantum state is a wave, and a wave is characterised by its amplitudes.</p>

<blockquote>
  <p><strong>NOTE:</strong> Probability amplitudes are not measurable. When a qubit is measured it collapses to one of its observable states. We can manipulate the probability amplitudes, but not observe their values directly.</p>
</blockquote>

<h2 id="calculating-the-probability-of-observable-states">Calculating the Probability of Observable States</h2>

<p>To calculate the probability of qubit collapsing to a particular state, we take the square of the modulus of its coefficient. This is known as the <a href="https://en.wikipedia.org/wiki/Born_rule">Born rule</a>.</p>

<p>So, for the $\vert \psi \rangle$ example shown above, the probability of $\vert 0 \rangle$ is $\lvert \alpha \rvert^{2}$.</p>

<p>The modulus of a complex number is calculated like so:</p>

<!-- 
![Calculating the modulus of a complex number](/assets/images/2019-06-24/ComplexModulus.png)
-->

\[\lvert x + i y \rvert = \sqrt{x^{2} + y^{2}}\]

<p>To calculate the probability we square that number. All together this can be written succinctly as shown:</p>

<!-- P(x<sub>i</sub>) = \|&lang;x<sub>i</sub>\|&psi;〉\|<sup>2</sup> -->
<!--
![Probability of Xi equals square of the braket](/assets/images/2019-06-24/PXi.png)
-->

\[P(x_i) = \lvert \langle x_i \vert \psi \rangle \rvert^{2}\]

<p>This is saying that to calculate the probability of the observable state $x_i$ (which is either 0 or 1 for a qubit), you square the modulus of the dot product. In other words, you project the state you are interested in onto the superposition.</p>

<p>Don’t worry if the algebra doesn’t make sense yet. Next we look at an example, and then we further illustrate it using matrices.</p>

<p>Say our qubit superposition is given by the following:</p>

<!--
![Example superposition](/assets/images/2019-06-24/P0_0.png)
-->

\[\vert \psi \rangle = \frac{1}{\sqrt{3}} \vert 0 \rangle + \sqrt{\frac{2}{3}} \vert 1 \rangle\]

<p>Then the probability of collapsing to 0 is given by:</p>

<!--
![Probability of collapsing to 0](/assets/images/2019-06-24/P0_1.png)
-->

\[P(0) = \lvert \langle 0 \vert \left( \frac{1}{\sqrt{3}} \vert 0 \rangle + \sqrt{\frac{2}{3}} \vert 1 \rangle \right) \rvert^{2}
= \left\lvert \frac{1}{\sqrt{3}} \langle 0 \vert 0 \rangle + \sqrt{\frac{2}{3}} \langle 0 \vert 1 \rangle \right\rvert^{2}\]

<p>Now, we can reduce ⟨0|0⟩ to 1 by calculating the dot product, as shown:</p>

<!--
![bra 0 ket 0 = 1](/assets/images/2019-06-24/P0_2.png)
-->

\[\langle 0 \vert 0 \rangle = \begin{bmatrix}1 \\ 0\end{bmatrix} \cdot \begin{bmatrix}1 \\ 0\end{bmatrix} = 1 \times 1 + 0 \times 0 = 1\]

<p>and because ⟨0| and |1〉 are orthogonal, there inner product is 0, as shown:</p>

<!--
![bra 0 ket 1 = 0](/assets/images/2019-06-24/P0_3.png)
-->

\[\langle 0 \vert 1 \rangle = \begin{bmatrix}1 \\ 0\end{bmatrix} \cdot \begin{bmatrix}0 \\ 1\end{bmatrix} = 1 \times 0 + 0 \times 1 = 0\]

<p>So, if we replace those brakets in our probability formula, we see that:</p>

<!--
![P(0) = 1/3](/assets/images/2019-06-24/P0_4.png)
-->

\[P(0) = \left\lvert \frac{1}{\sqrt{3}} \times 1 + \sqrt{\frac{2}{3}} \times 0 \right\rvert^{2} = \frac{1}{3}\]

<p>Alternatively, we can look at the same problem, but substitute matrices for our states and calculate the probability that way.</p>

<!--
![P(1) = 1 - P(0)](/assets/images/2019-06-24/P0_6.png)
-->

\[P(0) = \left\lvert \begin{bmatrix}1 \\ 0\end{bmatrix} \cdot \left( \frac{1}{\sqrt{3}} \begin{bmatrix}1 \\ 0\end{bmatrix} + \sqrt{\frac{2}{3}} \begin{bmatrix}0 \\ 1\end{bmatrix} \right) \right\rvert^{2} = \left\lvert \begin{bmatrix}1 \\ 0\end{bmatrix} \cdot \begin{bmatrix} \frac{1}{\sqrt{3}} \\ \sqrt{\frac{2}{3}} \end{bmatrix} \right\rvert^{2} = \left\lvert \frac{1}{\sqrt{3}} \right\rvert^{2} = \frac{1}{3}\]

<p>Hopefully the Dirac notation version makes a bit more sense now.</p>

<h3 id="leveraging-the-probability-distribution-of-quantum-states">Leveraging the Probability Distribution of Quantum States</h3>

<p>We know that the sum of the probabilities in a probability distribution is always $1$. We also learned earlier that all quantum states are normalised, i.e., $\langle a \vert a \rangle = 1$. For orthonormal bases, such as $[0, 1]^{\mathsf{T}}$ and $[1, 0]^{\mathsf{T}}$, the observable states form a probability distribution. If you sum the probabilities of all observable states, they come to $1$, as described by the formula:</p>

<!--
![The coefficient squares sum to 1](/assets/images/2019-06-24/SumOfP.png)
-->

\[\sum_{i} P(x_i) = 1\]

<p>Therefore, we can calculate the probability of the qubit collapsing to 1, by calculating the complement of P(0), like so:</p>

<!--
![P(1) = 1 - P(0)](/assets/images/2019-06-24/P0_5.png)
-->

\[P(1) = 1 - P(0) = \frac{2}{3}\]

<h2 id="creating-multi-qubit-states">Creating Multi-Qubit States</h2>

<p>So far we’ve looked at the quantum states of single qubits. We can, of course, create quantum states with multiple qubits. These are known as multi-partite quantum states.</p>

<p>To do so, we combine states using tensor products. For example, if qubit A is in the state $\vert \psi \rangle_{A} = \vert 0 \rangle$ and qubit B is in the state $\vert \psi \rangle_{B} = \vert 1 \rangle$, then the total state is given by:</p>

\[\vert \psi \rangle_{AB} = \vert 0 \rangle_{A} \otimes \vert 1 \rangle_{B} = \vert 01 \rangle_{AB}\]

<p>In this case, we can measure the state of qubit A without collapsing the state of qubit B. The individual states are said to be uncorrelated.</p>

<p>We can, however, place qubits into a state, where measuring one affects another. This is known as entanglement.</p>

<h3 id="entangling-qubits">Entangling Qubits</h3>

<p>For instance, take a well known state (one of the Bell states, which we discuss later), this state describes two qubits in superposition:</p>

<!--
![Phi Plus Bell state](/assets/images/2019-06-24/BellEntangled.png)
-->

\[\vert \phi \rangle = \frac{\vert 00 \rangle + \vert 11 \rangle}{\sqrt{2}}\]

<p>The state of the qubits when measured will have a 50% chance of being either 00 or 11.</p>

<p>If we were to measure just one of the qubits, it would cause the other’s state to immediately collapse to the same value. The qubits are said to be entangled. Even if the entangled qubits are far away from each other, possibly light years. This is what Einstein described as “spooky action at a distance.”</p>

<h3 id="determining-if-qubits-are-entangled">Determining if Qubits are Entangled</h3>

<p>When we look at the mathematics governing entanglement, we can use the matrix representation to tell us if the qubits are entangled.</p>

<p>As Yanofsky and Mannucci point out <a href="#references">[1]</a>, a vector that can be written as the tensor product of two vectors is called <strong>separable</strong>.</p>

<p>In contrast, if the tensor product state of two qubits cannot be factored, they are said to be entangled. This is pointed out in Andrew Helwer’s <a href="https://www.microsoft.com/en-us/research/video/quantum-computing-computer-scientists/">introductory video on quantum computing</a>.</p>

<p>For example, if we take the state |01〉, and forget for a moment that we know what the tensor product representation is already.</p>

\[\vert 01 \rangle = \begin{bmatrix}0 \\ 1 \\ 0 \\ 0\end{bmatrix} = \begin{bmatrix}a \\ b\end{bmatrix} \otimes \begin{bmatrix}c \\ d\end{bmatrix}\]

<p>We can see that ac = 0, ad = 1, bc = 0, and bd = 0.</p>

<p><img src="/assets/images/2019-06-24/ket01matrixabcd_colour.png" alt="|&phi;+〉 resultant matrix" /></p>

<p>If we solve for a, b, c, and d; we get a = 1, b = 0, c = 0, and d = 1. We can factor it, therefore we know |01〉 is separable and not entangled.</p>

<!--
![\|&phi;+〉 resultant matrix](/assets/images/2019-06-24/Ket01Matrix.png)
-->

\[\vert 01 \rangle = \begin{bmatrix}0 \\ 1 \\ 0 \\ 0\end{bmatrix} = \begin{bmatrix}1 \\ 0\end{bmatrix} \otimes \begin{bmatrix}0 \\ 1\end{bmatrix}\]

<p>In contrast, if we look at the |φ+〉 state, it is a two qubits state in equal superposition. The matrix representation is calculated below:</p>

<!--
![\|&phi;+〉 resultant matrix](/assets/images/2019-06-24/PhiPlusMatrix.png)
-->

\[\frac{\vert 00 \rangle + \vert 11 \rangle}{\sqrt{2}} = \frac{1}{\sqrt{2}}\left(\begin{bmatrix}1 \\ 0\end{bmatrix} \otimes \begin{bmatrix}1 \\ 0\end{bmatrix}\right) + \frac{1}{\sqrt{2}}\left(\begin{bmatrix}0 \\ 1\end{bmatrix} \otimes \begin{bmatrix}0 \\ 1\end{bmatrix}\right) = \frac{1}{\sqrt{2}}\begin{bmatrix}1 \\ 0 \\ 0 \\ 0\end{bmatrix} + \frac{1}{\sqrt{2}}\begin{bmatrix}0 \\ 0 \\ 0 \\ 1\end{bmatrix} = \begin{bmatrix}\frac{1}{\sqrt{2}} \\ 0 \\ 0 \\ \frac{1}{\sqrt{2}}\end{bmatrix}\]

<p>In this case, the matrix is not factorable. We have $ac = \tfrac{1}{\sqrt{2}}$, $ad = 0$, $bc = 0$, and $bd = \tfrac{1}{\sqrt{2}}$. There is no solution for $a$, $b$, $c$, and $d$. Therefore, the matrix is not separable and the qubits are entangled. In fact, because of the equal probability of the two states $\vert 00 \rangle$ and $\vert 11 \rangle$, the Bell state is said to be <em>maximally entangled</em>. They are as entangled as you can get.</p>

<!--

There are some topics I've deliberately neglected to present or cut-out. The content presented in the article is rather difficult, and I didn't want to overdo it with more advanced topics.

When you can write the state as \|&psi;〉<sub>A</sub> &otimes; \|&psi;〉<sub>B</sub>, the state is said to be uncorrelated. If you cannot write the state as a tensor product of two states, then the overall state is said to be correlated. Correlated states come in two varieties: separable and entangled. We look at examples of correlated states next.

The resulting state is called an uncorrelated state; the qubits are independent of one another. We can, however, create a superposition that affects both qubits, in which case they are said to be correlated.

There are three ways qubits

* uncorrelated
* correlated - separable
* correlated - entangled

### Understanding Pure and Mixed State

So far we've seen that a qubit can be expressed as a single ket, like so:

\|&psi;> = &alpha;\|0〉 + &beta;\|1〉 

When a qubit can be expressed like this, it is said to have a pure state, and is in a **coherent** superposition.

-->

<p>But, how do we create a Bell state? We explore that in Part 2 of the series. Next, we look at visualizing single qubit states.</p>

<p>To recap, as quantum engineers, we have the opportunity to manipulate the probabilities using quantum gates in our quantum circuits. We can also combine qubits in such a way that they correlate with one another. We can even leverage quantum entanglement to instantly affect the shared state of multiple qubits, even if the qubits are far away from one another.</p>

<h2 id="visualizing-a-qubit-on-the-bloch-sphere">Visualizing a Qubit on the Bloch Sphere</h2>

<p>Many operations on single qubits can be neatly visualized on a 3 dimensional unit sphere, known as the Bloch sphere. See figure 4.</p>

<p>A qubit can be represented as a line of length 1 from the center of the sphere to the sphere’s surface.</p>

<p>At the north pole sits basis state |0⟩; at the south, |1⟩.</p>

<p>Before collapsing into a basis state, a qubit’s superposition may be located anywhere on the Bloch sphere. You can think of θ (theta) as latitude and φ (phi) as longitude. As we move vertically, north or south, the latitude changes (θ), and as we move horizontally the longitude (φ) changes.</p>

<p>While the latitude affects the probability of the qubit collapsing to a particular basis state, the longitude does not. The longitude is referred to as the qubit’s phase.</p>

<figure align="center"><a title="Glosser.ca [CC BY-SA 3.0 (https://creativecommons.org/licenses/by-sa/3.0)], via Wikimedia Commons" href="https://commons.wikimedia.org/wiki/File:Bloch_Sphere.svg"><img alt="Bloch Sphere" src="/assets/images/2019-06-24/BlochSphere.png" /></a><figcaption>Figure 4. Bloch Sphere</figcaption></figure>

<p>We saw earlier that a qubit’s superposition can be written:</p>

\[\vert \psi \rangle = \alpha \vert 0 \rangle + \beta \vert 1 \rangle\]

<p>where α and β are its probability amplitudes, which are complex numbers.</p>

<h3 id="converting-between-cartesian-and-polar-representations">Converting between Cartesian and Polar Representations</h3>

<p>Recall that a complex number consists of a real part $x$ and an imaginary multiplier $y$.</p>

\[z = x + i y\]

<p>A complex number can be represented by just $x$ and $y$. The pair $(x, y)$ is called its <em>Cartesian representation</em>. It can be graphed on a two dimensional Cartesian plane. Such a graph is called an <a href="https://en.wikipedia.org/wiki/Complex_plane#Argand_diagram">Argand diagram</a>. See figure 5.</p>

<p>The <a href="https://en.wikipedia.org/wiki/Argument_(complex_analysis)">arg</a> function can be used to calculate $\theta$. In this case, $\operatorname{arg}$ is equivalent to $\operatorname{atan2}$, as shown:</p>

\[\operatorname{arg}(x + i y) = \operatorname{atan2}(y, x) = \tan^{-1}\!\left(\frac{y}{x}\right)\]

<p>Later in this section you will see how to use the $\operatorname{arg}$ function to calculate the angles $(\theta, \phi)$ on the Bloch sphere.</p>

<figure align="center"><a title="Glosser.ca [CC BY-SA 3.0 (https://creativecommons.org/licenses/by-sa/3.0)], via Wikimedia Commons" href="https://en.wikipedia.org/wiki/File:Argandgaussplane.png"><img alt="Argand diagram" src="/assets/images/2019-06-24/Argandgaussplane.png" /></a><figcaption>Figure x. Argand diagram</figcaption></figure>

<p>We can convert the Cartesian coordinates to polar representation. The polar coordinates consist of the modulus $\rho$ and the angle $\theta$. Recall that to calculate the modulus we use:</p>

<!--
![Calculating the modulus of a complex number](/assets/images/2019-06-24/RhoModulus.png)
-->

\[\rho = \lvert x + i y \rvert = \sqrt{x^{2} + y^{2}}\]

<p>To calculate the angle, we use:</p>

<!--
![Calculating the angle](/assets/images/2019-06-24/ThetaTan.png)
-->

\[\theta = \tan^{-1}\!\left(\frac{y}{x}\right)\]

<p>To convert back from polar to Cartesian representation, use:</p>

<!-- x = ρ cos(θ), y = ρ sin(θ) -->

<!--
![Calculating the angle](/assets/images/2019-06-24/XPCos.png)
-->

\[x = \rho \cos(\theta), \quad y = \rho \sin(\theta)\]

<h3 id="locating-the-qubit-on-the-bloch-sphere">Locating the Qubit on the Bloch Sphere</h3>

<p>Feel free to merely skim through this section. While its useful to understand how states are translated to the Bloch sphere, you can always return to this at a later stage.</p>

<p>The coefficients $\alpha$ and $\beta$ can be visualised on the Bloch sphere as a point corresponding to the two angles $(\theta, \phi)$.</p>

<p>It turns out that because $\lvert \alpha \rvert^{2} + \lvert \beta \rvert^{2} = 1$, we can calculate a qubit’s position on the Bloch sphere using the following:</p>

<!--
![A point on the Bloch sphere](/assets/images/2019-06-24/KetPsiCos.png)
-->

\[\vert \psi \rangle = \cos\!\left(\frac{\theta}{2}\right) \vert 0 \rangle + e^{i\phi} \sin\!\left(\frac{\theta}{2}\right) \vert 1 \rangle\]

<p>where $0 \leq \theta \leq \pi$ and $0 \leq \phi \leq 2\pi$</p>

<p>That gives us</p>

\[\alpha = \cos\!\left(\frac{\theta}{2}\right)
\quad \text{and} \quad
\beta = e^{i\phi} \sin\!\left(\frac{\theta}{2}\right).\]

<p>To find the angles, use</p>

\[\theta = 2 \cos^{-1}(\lvert \alpha \rvert)
\quad \text{and} \quad
\phi = \operatorname{arg}(\beta) - \operatorname{arg}(\alpha).\]

<blockquote>
  <p><strong>NOTE:</strong> You can also find these values via the state’s <a href="https://en.wikipedia.org/wiki/Density_matrix">density matrix</a>, which is calculated by its ket–bra: $\rho = \vert \psi \rangle \langle \psi \vert$.
This is outside the scope of this article.</p>
</blockquote>

<h2 id="conclusion">Conclusion</h2>

<p>In this article, we explored the differences between qubits and classical bits. We looked at the computation basis for qubits. We saw how to describe quantum state using Dirac notation. We observed that qubits can be placed into superposition, and saw how to calculate the probability of observable states. We also saw how an entangled qubit can affect the quantum state of the pair. Finally we took a ride around the Block sphere, and saw how a qubit’s state can be visualized in 3 dimensions.</p>

<p>In the next part, we explore how quantum gates are used to build quantum circuits, which ultimately puts us on the road to materializing quantum algorithms. I hope you’ll join me.</p>

<p>Thanks for reading and I hope you found this article useful. If so, then I’d appreciate it if you would please rate it and/or leave feedback below.</p>

<h2 id="references">References</h2>

<p>The following sources were used in the preparation of this article:</p>

<ol>
  <li>
    <p>Yanofsky, N., &amp; Mannucci, M. (2008). <em>Quantum Computing for Computer Scientists</em>. Cambridge University Press.</p>
  </li>
  <li>
    <p>Anton, H. (2000). <em>Elementary Linear Algebra</em> (8th ed.). Wiley.</p>
  </li>
  <li>
    <p>Nielsen, M., &amp; Chuang, I. (2010). <em>Quantum Computation and Quantum Information</em> (10th ed.). Cambridge University Press.</p>
  </li>
  <li>
    <p>Glendinning, I. (2005). <em>The Bloch Sphere</em>.<br />
https://www.vcpc.univie.ac.at/~ian/hotlist/qc/talks/bloch-sphere.pdf</p>
  </li>
  <li>
    <p>Dutta, S. (2019). <em>If quantum gates are reversible how can they possibly perform irreversible classical AND and OR operations?</em><br />
https://quantumcomputing.stackexchange.com/questions/131/if-quantum-gates-are-reversible-how-can-they-possibly-perform-irreversible-class</p>
  </li>
  <li>
    <p>Wolf, R. (n.d.). <em>Quantum Computing: Lecture Notes</em>.<br />
https://homepages.cwi.nl/~rdewolf/qcnotes.pdf</p>
  </li>
  <li>
    <p>Wikipedia contributors. (2019). <em>Quantum logic gate</em>.<br />
https://en.wikipedia.org/wiki/Quantum_logic_gate</p>
  </li>
  <li>
    <p>Glendinning, I. (2010). <em>Rotations on the Bloch Sphere</em>.<br />
https://www.vcpc.univie.ac.at/~ian/hotlist/qc/talks/bloch-sphere-rotations.pdf</p>
  </li>
  <li>
    <p>Hui, J. (2018). <em>What are Qubits in Quantum Computing?</em><br />
https://medium.com/@jonathan_hui/qc-what-are-qubits-in-quantum-computing-cdb3cb566595</p>
  </li>
</ol>

<h2 id="previous-discusssion">Previous Discusssion</h2>

<p>This article was originally published on CodeProject, where reader comments available:</p>

<p>👉 <a href="https://www.codeproject.com/articles/Quantum-Computation-Primer-Part-1#comments-section">View comments and discussion on CodeProject</a></p>]]></content><author><name></name></author><category term="Quantum" /><summary type="html"><![CDATA[Introduction The major cloud providers: Microsoft, Amazon, Google, IBM, and Oracle are racing to bring quantum computing as a service to their offerings. In addition, companies, universities, and even nation states are investing heavily. Why all the buzz? Quantum computers offer the potential to bring parallelism to calculations on a scale that cannot be matched by classical computers. They may enable us to model the quantum world, bringing breakthroughs in material science, medicine, you name it. There already exists actual multi-qubit quantum computers, such as IBM, that allow you to create and run quantum algorithms in the cloud. Despite the general optimism, there are contrarians who argue that larger multi-qubit systems are not feasible and will never happen. But, the physics underpinning quantum computing has been widely validated experimentally and researches continue to make advances in improving the accuracy of multi-qubit systems. For software engineers, it’s a field that is ripe for exploration. My Journey into the Quantum Realm In all likelihood, like me, you’re a software engineer looking to cut your teeth with the latest quantum tech. Unfortunately, nearly all of the resources online on the topic of quantum computing come from a mathematics or physics bent; much of the time written by physicists for physicists. When I began learning quantum theory several months ago, my first step was to plunge head first into what, according to some, is the authoritative text on the subject: Quantum Computation and Quantum Information, by Nielsen and Chuang. Apparently this is the book used in many physics schools. I soon found myself struggling with the linear algebra and I knew I was going to need to take a step back and read up on that. Fortunately I had an old (8th) edition of Elementary Linear Algebra, by Anton sitting on my bookshelf; left over from my undergraduate days, nearly two decades ago. I worked my way through that, and thoroughly enjoyed it. Towards the end, after a few weeks of study, I had another crack at a quantum text. This time I chose Quantum Computing for Computer Scientists by Yanofsky and Mannucci. More and more came into focus now. The only thing noticeably missing from the linear algebra book was tensors. I turned to the web for that, and tensor products turned out to be dead simple. So, armed with my newly acquired linear algebra, I pushed through the quantum computing book; turning to the web to increase clarity here and there. Eventually I found myself where I wanted to be from the beginning, understanding and constructing quantum circuits. While the mathematics and notation underpinning quantum theory seems daunting at first, on my journey, I’ve been taken with the elegance by which it all fits together. I wrote this series of articles to provide you with a grounding in the fundamentals of quantum computation without spending a lot of time on quantum mechanics, which is a branch of physics heavy in theory that, while broadening comprehension, may deter a beginner. This series doesn’t spend much time on covering the relevant mathematics up front either, but rather introduces critical mathematics along the way. While there’s quite a bit of math and formulas littered throughout these articles, we work through them together. Let’s dive in. Bits to Qubits In quantum computing, a qubit is analogous to a bit in classical computing. I’m guessing you knew that already. As is a qubyte to a byte. As with classical computing, a qubit has two measurable states but there’s a little more to it. When you measure a qubit, its quantum state is said to collapse; to a value that is either 0 or 1. Before you measure it, however, the two observable states have a certain probability. You can modify the probabilities of a quantum state, and what’s more, you can employ multiple qubits that affect one another. A qubit is represented as a vector. The zero qubit state is represented by the single column matrix [1, 0]T. The one qubit state is represented by [0, 1]T. These are known as its basis states. The ‘T’ superscript denotes the transpose of the matrix, and allows the matrix to be presented horizontally. It’s used occasionally to save space. These two basis states are orthonormal, which means they are orthogonal and normalized. Together they are called the computational basis. Let me explain these terms. Orthogonal means that the inner product of the matrices is 0. To calculate the inner product (a.k.a. the dot product), we multiply each item in the first matrix with its counterpart in the second matrix and sum them all together, like so: \[\begin{bmatrix}1 \\ 0\end{bmatrix} \cdot \begin{bmatrix}0 \\ 1\end{bmatrix} = 1 \times 0 + 0 \times 1 = 0\] Normalized means that the probabilities of the observable states add up to 1. Determining the probability of quantum states is fundamental to quantum information theory, and we delve further into that later in the article. Firstly, however, we need to cover some basic math; complex numbers and matrix multiplication, then familiarize ourselves with Dirac notation. Some Preliminary Mathematics Though it may appear otherwise skimming over this article, I’ve tried to keep the math simple. There are, however, just a couple operations you need under your belt to be able to follow along. In particular, you need to know how to multiply complex numbers and matrices. We look at those operations now. Multiplying Complex Numbers In quantum computation, qubits are represented as vectors in 3 dimensional space. In quantum circuits, we rotate and combine them to perform computations. The vectors representing qubits’ state contain complex numbers, and complex numbers are also used to rotate qubits in this space. A complex number consists of a real part $x$ and an imaginary part $y$, as shown: \[x + yi\] where $i = \sqrt{-1}$ and $i^{2} = -1$. When multiplying two complex numbers, you add together the products of the real and imaginary parts of both numbers. See Figure 1. Figure 1. Multiplying imaginary numbers Multiplying this out gives us: \[(x_1 + y_1 i)(x_2 + y_2 i) = x_1 x_2 + x_1 y_2 i + y_1 x_2 i + y_1 y_2 i^2\] Since $i^{2} = -1$, this simplifies to: \[x_1 x_2 - y_1 y_2 + x_1 y_2 i + y_1 x_2 i\] The following is an example: \[\begin{align} (3 + 2i)(4 + 3i) &amp;= 12 + 9i + 8i + 6i^2 \\ &amp;= 12 + 17i - 6 \\ &amp;= 6 + 17i \end{align}\] Multiplying Two Matrices When working with quantum states, there are three matrix by matrix multiplication operations that are commonly performed: matrix product, inner product, and tensor product (a.k.a. outer product). We look at the matrix product now and cover the inner and tensor products in later sections, as we need them. The first thing to note is that calculation of the matrix product is only valid if the number of columns in the first matrix is equal to the number of rows in the second matrix. See Figure 2. Also notice that the row count for the result equals the row count of the first matrix, and the column count of the result, equals the column count of the second matrix. Figure 2. Size outcomes when multiplying two matrices The matrix product is generally written without an operator as AB, where A and B are two matrices. Let’s work through an example, where matrix A and B are presented below. To calculate AB, we multiply each item in the first row of A by the item in the first column of B with same index, and sum the products. The result is 1×2 + 3×3 + 2×1 = 13. The value 13 is placed into the first cell of the result matrix. We then stay on the first row of A, but we shift to the next column of B; repeating the process until we get to the end of the columns in B. We then shift down to the second row of A, and back to the first column in B. After we complete the last row in A, we’re done. Identifying an Element in a Matrix By convention, a matrix is often given a capital letter as an identifier. An element within the matrix is specified using the name of the matrix in lowercase, with its row then column (in that order) shown as subscript. See the following example: \[A = \begin{bmatrix} a_{00} &amp; a_{01} \\ a_{10} &amp; a_{11} \end{bmatrix}\] Multiplying a Matrix by a Scalar The process of multiplying a matrix by a scalar is a simple one: multiply every item in the matrix by the scalar. If A is the matrix: \[A = \begin{bmatrix} a_{00} &amp; a_{01} &amp; a_{02} \\ a_{10} &amp; a_{11} &amp; a_{12} \\ a_{20} &amp; a_{21} &amp; a_{22} \end{bmatrix}\] Then multiplying the matrix by a scalar produces: \[\lambda A = \begin{bmatrix} \lambda a_{00} &amp; \lambda a_{01} &amp; \lambda a_{02} \\ \lambda a_{10} &amp; \lambda a_{11} &amp; \lambda a_{12} \\ \lambda a_{20} &amp; \lambda a_{21} &amp; \lambda a_{22} \end{bmatrix}\] For example, if the scalar multiplier is 2 and A’s values are: \[A = \begin{bmatrix} 1 &amp; 3 \\ 5 &amp; 2 \end{bmatrix}, \quad \lambda = 2\] Then the result is as follows: \[\lambda A = 2\begin{bmatrix}1 &amp; 3 \\ 5 &amp; 2\end{bmatrix} = \begin{bmatrix}2 &amp; 6 \\ 10 &amp; 4\end{bmatrix}\] If the scalar is a complex number and/or the matrix contains complex numbers, the procedure does not change. You calculate the products using the rules of complex number multiplication, which we looked at earlier. Okay, so we’ve gone over some basic math operations that you need to know to follow along. Let’s move on to something more fun. Describing Quantum State with Dirac Notation Dirac notation (also known as bra-ket notation) is everywhere in quantum theory. It’s used to describe quantum states. You can think of it as matrix shorthand. A single qubit with the zero basis state can be written as a ket, like so: \[\vert 0 \rangle\] This reads as “ket zero.” Conversely, a qubit with a one basis state, can be written as: \[\vert 1 \rangle\] NOTE: In some texts, |0〉 and |1〉 are presented as |↑〉 (spin-up) and |↓〉 (spin-down), respectively. When you visualize a qubit on a three dimensional sphere, |0〉 is up at the north pole and |1〉 is down at the south pole. I use |0〉 and |1〉 exclusively in this series. Recall that |0〉 represents the column vector [1, 0]T, and 1 represent [0, 1]T. In Dirac notation, the values within the ket—between the vertical line character ‘|’ and the angled bracket ‘〉’—are tensor products. The symbol ‘⊗’ is used to denote the tensor product of two matrices. It is calculated by multiplying each item in the first matrix by all items in the second matrix, as illustrated: \[\begin{alignedat}{2} \begin{bmatrix} a_{1} \\ a_{2} \end{bmatrix} \otimes \begin{bmatrix} b_{1} \\ b_{2} \end{bmatrix} &amp;\!=\! \begin{bmatrix} a_{1}\begin{bmatrix} b_{1} \\ b_{2} \end{bmatrix} \\ a_{2}\begin{bmatrix} b_{1} \\ b_{2} \end{bmatrix} \end{bmatrix} &amp;\!=\! \begin{bmatrix} a_{1} b_{1} \\ a_{1} b_{2} \\ a_{2} b_{1} \\ a_{2} b_{2} \end{bmatrix} \end{alignedat}\] Tensor products are condensed within Dirac notation, like so: \[\vert 0 \rangle \otimes \vert 1 \rangle = \vert 01 \rangle\] For qubits, the Dirac notation lends itself beautifully to a binary representation. Notice below how entries in the matrix correspond to the binary, and in particular how the first entry in the matrix corresponds to 0 and not 1. \[\vert 010 \rangle = \begin{bmatrix}0\\0\\1\\0\\0\\0\\0\\0\end{bmatrix} \;\;\longleftrightarrow\;\; \begin{array}{c c c} \text{Binary} &amp; &amp; \text{Decimal} \\ 000 &amp; &amp; 0 \\ 001 &amp; &amp; 1 \\ \color{red}{010} &amp; &amp; \color{red}{2} \\ 011 &amp; &amp; 3 \\ 100 &amp; &amp; 4 \\ 101 &amp; &amp; 5 \\ 110 &amp; &amp; 6 \\ 111 &amp; &amp; 7 \end{array}\] NOTE: In some texts, the leading 0’s within a ket are omitted and replaced with a subscript indicating the length. So that |0010⟩ becomes |104⟩. I don’t use that notation in this series, but you may see it elsewhere. You can now see how |1⟩ ⊗ |0⟩ are combined by calculating the tensor product of the matrices, like so: \[\vert 0 \rangle \otimes \vert 1 \rangle = \begin{bmatrix}1 \\ 0\end{bmatrix} \otimes \begin{bmatrix}0 \\ 1\end{bmatrix} = \begin{bmatrix}0 \\ 1 \\ 0 \\ 0\end{bmatrix} = \vert 01 \rangle\] In a quantum circuit, the inputs of the circuit are combined as tensor products. We explore this later in the series. If the Dirac notation points to the left rather than the right, as in: 〉0|, this is called a bra. Together they form a bra-ket. Deriving a Bra from a Ket (and Vice Versa) The bra is the conjugate transpose of the ket. The conjugate transpose is also known as the adjoint matrix, and yet another name is the Hermitian transpose. To obtain the conjugate transpose, the matrix is rotated and each entry is complex conjugated. For a single column matrix, it just means we turn it horizontally and then take the complex conjugate of each entry. See Figure 3. The complex conjugate simply means changing the sign of the imaginary part. For example, if $z = 2 + 3i$, then the complex conjugate is $\overline{z} = 2 - 3i$. Figure 3. Performing a conjugate transpose Why Complex Numbers? You may wonder why quantum theory relies so heavily on complex numbers. As Yanofsky and Mannucci point out [1], if you add two positive real numbers, the result will always increase. That is not the case with complex numbers. You can add two complex numbers and produce a smaller result. In fact, they may even cancel each other out. This is referred to as interference, and it is sometimes employed deliberately to eliminate unwanted states in quantum algorithms. In the following examples we use the variables a and b, such that a,b ∈ Cd. In other words, a and b denote single column matrices of complex numbers with the number of rows equal to d. Most of the time when we are working with qubits, so the dimension count is 2. In the following examples, we use the variables $a$ and $b$, such that $a, b \in \mathbb{C}^{d}$. In other words, $a$ and $b$ denote single-column matrices of complex numbers with the number of rows equal to $d$. Most of the time when we are working with qubits, the dimension count is 2. The following illustrates obtaining a bra from a ket: \[\langle a \rvert = \lvert a \rangle^{\dagger} = \begin{bmatrix}\overline{a}_{1} \\ \overline{a}_{2} \\ \vdots \\ \overline{a}_{d}\end{bmatrix}^{\mathsf{T}} = \begin{bmatrix}\overline{a}_{1} &amp; \overline{a}_{2} &amp; \cdots &amp; \overline{a}_{d}\end{bmatrix}\] This process is reversible. To obtain a ket from a bra, do the same thing again: calculate the conjugate transpose. When combined, a bra-ket ⟨b|a⟩ represents the inner product of b and a. It’s sometimes written as ⟨b,a⟩. The inner product is the sum of the products of corresponding items. This results in a complex scalar value (with or without an imaginary part). Scalar means that it’s not a vector; it’s a magnitude without direction. \[\langle b \vert a \rangle = b \cdot a = a_{1} b_{1} + a_{2} b_{2} + \cdots + a_{d} b_{d}\] All quantum states are normalized. That is ⟨a|a⟩ = 1. This has important implications for the probability of states. We return to it in a later section. We’ve seen that quantum theory relies on complex numbers and vectors to describe quantum states. This algebraic structure is termed a complex vector space and is also known as Hilbert Space. Another combination of the Dirac notation, which I include for completeness, is the ket-bra. It’s written like this |a⟩⟨b| or sometimes |aXb|. A ket-bra is the tensor (or outer) product and is represented by a d × d matrix: \[\lvert a \rangle \langle b \rvert = \begin{bmatrix} a_{1} b_{1} &amp; a_{1} b_{2} &amp; \cdots &amp; a_{1} b_{d} \\ a_{2} b_{1} &amp; a_{2} b_{2} &amp; \cdots &amp; a_{2} b_{d} \\ \vdots &amp; \vdots &amp; \ddots &amp; \vdots \\ a_{d} b_{1} &amp; a_{d} b_{2} &amp; \cdots &amp; a_{d} b_{d} \end{bmatrix}\] TIP: In quantum theory, it’s common to see the Greek characters φ (phi) and ψ (psi) used as variable names in bras and kets. For example, you often see a quantum state expressed as $\vert \psi \rangle = \dots$. Don’t be put off by the Greek characters, foreign notation, and seemingly complex algebra. It all appears far more complex than it actually is. Exploring Quantum Superposition We learned in an earlier section that when you measure a qubit, its quantum state collapses to either 0 or 1. To which value it collapses depends on the way the qubit has been configured. You can change the probability of a qubit collapsing to a particular value. By doing so, you place the qubit into a superposition. Now, for a qubit that is in a pure basis state, either |0⟩ or |1⟩, the result is predetermined. It has a 100% chance of collapsing to its respective value. In other words, if you measure a qubit that was placed in the |0⟩ state, for example, you always get 0 because the probability of collapsing to 0, is 1; and the probability of collapsing to 1, is 0. But, if you employ a certain quantum gate in your quantum circuit, you can split the probability of the qubit collapsing to 0 or 1, to a 50/50 chance either way. In which case, it is said to be in a superposition of both states. When a qubit is in a superposition, its value is undetermined until it’s measured. In this state, it is neither 0 nor 1 in the classical sense, but a superposition of both possibilities. This is such an unusual phenomenon, physicists have been unable to explain it using classical physics. Yet, it has been widely observed experimentally. Remember the double slit experiment? A photon seemingly goes everywhere, interfering with itself, before landing on a spot. So to does our qubit exist in all observable states until it is measured. Disambiguating the Term “State” When one or more qubits make up a quantum system, this system has an overall quantum state at any one time. However, the system also has a set of distinct states that it may collapse to when measured. We’ll call these states: observable states. The quantum state of one or more qubits can be described using Dirac notation and simple algebra. Observable states and associated probabilities comprise the qubit’s superposition. A single qubit can be described by a linear combination of |0〉 and |1〉, such that: \[\vert \Psi \rangle = \alpha \vert 0 \rangle + \beta \vert 1 \rangle\] The coefficients $\alpha$ (alpha) and $\beta$ (beta) are known as complex amplitudes or probability amplitudes. As Yanofsky and Mannucci point out [1], the name amplitude comes from the fact that a quantum state is a wave, and a wave is characterised by its amplitudes. NOTE: Probability amplitudes are not measurable. When a qubit is measured it collapses to one of its observable states. We can manipulate the probability amplitudes, but not observe their values directly. Calculating the Probability of Observable States To calculate the probability of qubit collapsing to a particular state, we take the square of the modulus of its coefficient. This is known as the Born rule. So, for the $\vert \psi \rangle$ example shown above, the probability of $\vert 0 \rangle$ is $\lvert \alpha \rvert^{2}$. The modulus of a complex number is calculated like so: \[\lvert x + i y \rvert = \sqrt{x^{2} + y^{2}}\] To calculate the probability we square that number. All together this can be written succinctly as shown: \[P(x_i) = \lvert \langle x_i \vert \psi \rangle \rvert^{2}\] This is saying that to calculate the probability of the observable state $x_i$ (which is either 0 or 1 for a qubit), you square the modulus of the dot product. In other words, you project the state you are interested in onto the superposition. Don’t worry if the algebra doesn’t make sense yet. Next we look at an example, and then we further illustrate it using matrices. Say our qubit superposition is given by the following: \[\vert \psi \rangle = \frac{1}{\sqrt{3}} \vert 0 \rangle + \sqrt{\frac{2}{3}} \vert 1 \rangle\] Then the probability of collapsing to 0 is given by: \[P(0) = \lvert \langle 0 \vert \left( \frac{1}{\sqrt{3}} \vert 0 \rangle + \sqrt{\frac{2}{3}} \vert 1 \rangle \right) \rvert^{2} = \left\lvert \frac{1}{\sqrt{3}} \langle 0 \vert 0 \rangle + \sqrt{\frac{2}{3}} \langle 0 \vert 1 \rangle \right\rvert^{2}\] Now, we can reduce ⟨0|0⟩ to 1 by calculating the dot product, as shown: \[\langle 0 \vert 0 \rangle = \begin{bmatrix}1 \\ 0\end{bmatrix} \cdot \begin{bmatrix}1 \\ 0\end{bmatrix} = 1 \times 1 + 0 \times 0 = 1\] and because ⟨0| and |1〉 are orthogonal, there inner product is 0, as shown: \[\langle 0 \vert 1 \rangle = \begin{bmatrix}1 \\ 0\end{bmatrix} \cdot \begin{bmatrix}0 \\ 1\end{bmatrix} = 1 \times 0 + 0 \times 1 = 0\] So, if we replace those brakets in our probability formula, we see that: \[P(0) = \left\lvert \frac{1}{\sqrt{3}} \times 1 + \sqrt{\frac{2}{3}} \times 0 \right\rvert^{2} = \frac{1}{3}\] Alternatively, we can look at the same problem, but substitute matrices for our states and calculate the probability that way. \[P(0) = \left\lvert \begin{bmatrix}1 \\ 0\end{bmatrix} \cdot \left( \frac{1}{\sqrt{3}} \begin{bmatrix}1 \\ 0\end{bmatrix} + \sqrt{\frac{2}{3}} \begin{bmatrix}0 \\ 1\end{bmatrix} \right) \right\rvert^{2} = \left\lvert \begin{bmatrix}1 \\ 0\end{bmatrix} \cdot \begin{bmatrix} \frac{1}{\sqrt{3}} \\ \sqrt{\frac{2}{3}} \end{bmatrix} \right\rvert^{2} = \left\lvert \frac{1}{\sqrt{3}} \right\rvert^{2} = \frac{1}{3}\] Hopefully the Dirac notation version makes a bit more sense now. Leveraging the Probability Distribution of Quantum States We know that the sum of the probabilities in a probability distribution is always $1$. We also learned earlier that all quantum states are normalised, i.e., $\langle a \vert a \rangle = 1$. For orthonormal bases, such as $[0, 1]^{\mathsf{T}}$ and $[1, 0]^{\mathsf{T}}$, the observable states form a probability distribution. If you sum the probabilities of all observable states, they come to $1$, as described by the formula: \[\sum_{i} P(x_i) = 1\] Therefore, we can calculate the probability of the qubit collapsing to 1, by calculating the complement of P(0), like so: \[P(1) = 1 - P(0) = \frac{2}{3}\] Creating Multi-Qubit States So far we’ve looked at the quantum states of single qubits. We can, of course, create quantum states with multiple qubits. These are known as multi-partite quantum states. To do so, we combine states using tensor products. For example, if qubit A is in the state $\vert \psi \rangle_{A} = \vert 0 \rangle$ and qubit B is in the state $\vert \psi \rangle_{B} = \vert 1 \rangle$, then the total state is given by: \[\vert \psi \rangle_{AB} = \vert 0 \rangle_{A} \otimes \vert 1 \rangle_{B} = \vert 01 \rangle_{AB}\] In this case, we can measure the state of qubit A without collapsing the state of qubit B. The individual states are said to be uncorrelated. We can, however, place qubits into a state, where measuring one affects another. This is known as entanglement. Entangling Qubits For instance, take a well known state (one of the Bell states, which we discuss later), this state describes two qubits in superposition: \[\vert \phi \rangle = \frac{\vert 00 \rangle + \vert 11 \rangle}{\sqrt{2}}\] The state of the qubits when measured will have a 50% chance of being either 00 or 11. If we were to measure just one of the qubits, it would cause the other’s state to immediately collapse to the same value. The qubits are said to be entangled. Even if the entangled qubits are far away from each other, possibly light years. This is what Einstein described as “spooky action at a distance.” Determining if Qubits are Entangled When we look at the mathematics governing entanglement, we can use the matrix representation to tell us if the qubits are entangled. As Yanofsky and Mannucci point out [1], a vector that can be written as the tensor product of two vectors is called separable. In contrast, if the tensor product state of two qubits cannot be factored, they are said to be entangled. This is pointed out in Andrew Helwer’s introductory video on quantum computing. For example, if we take the state |01〉, and forget for a moment that we know what the tensor product representation is already. \[\vert 01 \rangle = \begin{bmatrix}0 \\ 1 \\ 0 \\ 0\end{bmatrix} = \begin{bmatrix}a \\ b\end{bmatrix} \otimes \begin{bmatrix}c \\ d\end{bmatrix}\] We can see that ac = 0, ad = 1, bc = 0, and bd = 0. If we solve for a, b, c, and d; we get a = 1, b = 0, c = 0, and d = 1. We can factor it, therefore we know |01〉 is separable and not entangled. \[\vert 01 \rangle = \begin{bmatrix}0 \\ 1 \\ 0 \\ 0\end{bmatrix} = \begin{bmatrix}1 \\ 0\end{bmatrix} \otimes \begin{bmatrix}0 \\ 1\end{bmatrix}\] In contrast, if we look at the |φ+〉 state, it is a two qubits state in equal superposition. The matrix representation is calculated below: \[\frac{\vert 00 \rangle + \vert 11 \rangle}{\sqrt{2}} = \frac{1}{\sqrt{2}}\left(\begin{bmatrix}1 \\ 0\end{bmatrix} \otimes \begin{bmatrix}1 \\ 0\end{bmatrix}\right) + \frac{1}{\sqrt{2}}\left(\begin{bmatrix}0 \\ 1\end{bmatrix} \otimes \begin{bmatrix}0 \\ 1\end{bmatrix}\right) = \frac{1}{\sqrt{2}}\begin{bmatrix}1 \\ 0 \\ 0 \\ 0\end{bmatrix} + \frac{1}{\sqrt{2}}\begin{bmatrix}0 \\ 0 \\ 0 \\ 1\end{bmatrix} = \begin{bmatrix}\frac{1}{\sqrt{2}} \\ 0 \\ 0 \\ \frac{1}{\sqrt{2}}\end{bmatrix}\] In this case, the matrix is not factorable. We have $ac = \tfrac{1}{\sqrt{2}}$, $ad = 0$, $bc = 0$, and $bd = \tfrac{1}{\sqrt{2}}$. There is no solution for $a$, $b$, $c$, and $d$. Therefore, the matrix is not separable and the qubits are entangled. In fact, because of the equal probability of the two states $\vert 00 \rangle$ and $\vert 11 \rangle$, the Bell state is said to be maximally entangled. They are as entangled as you can get. But, how do we create a Bell state? We explore that in Part 2 of the series. Next, we look at visualizing single qubit states. To recap, as quantum engineers, we have the opportunity to manipulate the probabilities using quantum gates in our quantum circuits. We can also combine qubits in such a way that they correlate with one another. We can even leverage quantum entanglement to instantly affect the shared state of multiple qubits, even if the qubits are far away from one another. Visualizing a Qubit on the Bloch Sphere Many operations on single qubits can be neatly visualized on a 3 dimensional unit sphere, known as the Bloch sphere. See figure 4. A qubit can be represented as a line of length 1 from the center of the sphere to the sphere’s surface. At the north pole sits basis state |0⟩; at the south, |1⟩. Before collapsing into a basis state, a qubit’s superposition may be located anywhere on the Bloch sphere. You can think of θ (theta) as latitude and φ (phi) as longitude. As we move vertically, north or south, the latitude changes (θ), and as we move horizontally the longitude (φ) changes. While the latitude affects the probability of the qubit collapsing to a particular basis state, the longitude does not. The longitude is referred to as the qubit’s phase. Figure 4. Bloch Sphere We saw earlier that a qubit’s superposition can be written: \[\vert \psi \rangle = \alpha \vert 0 \rangle + \beta \vert 1 \rangle\] where α and β are its probability amplitudes, which are complex numbers. Converting between Cartesian and Polar Representations Recall that a complex number consists of a real part $x$ and an imaginary multiplier $y$. \[z = x + i y\] A complex number can be represented by just $x$ and $y$. The pair $(x, y)$ is called its Cartesian representation. It can be graphed on a two dimensional Cartesian plane. Such a graph is called an Argand diagram. See figure 5. The arg function can be used to calculate $\theta$. In this case, $\operatorname{arg}$ is equivalent to $\operatorname{atan2}$, as shown: \[\operatorname{arg}(x + i y) = \operatorname{atan2}(y, x) = \tan^{-1}\!\left(\frac{y}{x}\right)\] Later in this section you will see how to use the $\operatorname{arg}$ function to calculate the angles $(\theta, \phi)$ on the Bloch sphere. Figure x. Argand diagram We can convert the Cartesian coordinates to polar representation. The polar coordinates consist of the modulus $\rho$ and the angle $\theta$. Recall that to calculate the modulus we use: \[\rho = \lvert x + i y \rvert = \sqrt{x^{2} + y^{2}}\] To calculate the angle, we use: \[\theta = \tan^{-1}\!\left(\frac{y}{x}\right)\] To convert back from polar to Cartesian representation, use: \[x = \rho \cos(\theta), \quad y = \rho \sin(\theta)\] Locating the Qubit on the Bloch Sphere Feel free to merely skim through this section. While its useful to understand how states are translated to the Bloch sphere, you can always return to this at a later stage. The coefficients $\alpha$ and $\beta$ can be visualised on the Bloch sphere as a point corresponding to the two angles $(\theta, \phi)$. It turns out that because $\lvert \alpha \rvert^{2} + \lvert \beta \rvert^{2} = 1$, we can calculate a qubit’s position on the Bloch sphere using the following: \[\vert \psi \rangle = \cos\!\left(\frac{\theta}{2}\right) \vert 0 \rangle + e^{i\phi} \sin\!\left(\frac{\theta}{2}\right) \vert 1 \rangle\] where $0 \leq \theta \leq \pi$ and $0 \leq \phi \leq 2\pi$ That gives us \[\alpha = \cos\!\left(\frac{\theta}{2}\right) \quad \text{and} \quad \beta = e^{i\phi} \sin\!\left(\frac{\theta}{2}\right).\] To find the angles, use \[\theta = 2 \cos^{-1}(\lvert \alpha \rvert) \quad \text{and} \quad \phi = \operatorname{arg}(\beta) - \operatorname{arg}(\alpha).\] NOTE: You can also find these values via the state’s density matrix, which is calculated by its ket–bra: $\rho = \vert \psi \rangle \langle \psi \vert$. This is outside the scope of this article. Conclusion In this article, we explored the differences between qubits and classical bits. We looked at the computation basis for qubits. We saw how to describe quantum state using Dirac notation. We observed that qubits can be placed into superposition, and saw how to calculate the probability of observable states. We also saw how an entangled qubit can affect the quantum state of the pair. Finally we took a ride around the Block sphere, and saw how a qubit’s state can be visualized in 3 dimensions. In the next part, we explore how quantum gates are used to build quantum circuits, which ultimately puts us on the road to materializing quantum algorithms. I hope you’ll join me. Thanks for reading and I hope you found this article useful. If so, then I’d appreciate it if you would please rate it and/or leave feedback below. References The following sources were used in the preparation of this article: Yanofsky, N., &amp; Mannucci, M. (2008). Quantum Computing for Computer Scientists. Cambridge University Press. Anton, H. (2000). Elementary Linear Algebra (8th ed.). Wiley. Nielsen, M., &amp; Chuang, I. (2010). Quantum Computation and Quantum Information (10th ed.). Cambridge University Press. Glendinning, I. (2005). The Bloch Sphere. https://www.vcpc.univie.ac.at/~ian/hotlist/qc/talks/bloch-sphere.pdf Dutta, S. (2019). If quantum gates are reversible how can they possibly perform irreversible classical AND and OR operations? https://quantumcomputing.stackexchange.com/questions/131/if-quantum-gates-are-reversible-how-can-they-possibly-perform-irreversible-class Wolf, R. (n.d.). Quantum Computing: Lecture Notes. https://homepages.cwi.nl/~rdewolf/qcnotes.pdf Wikipedia contributors. (2019). Quantum logic gate. https://en.wikipedia.org/wiki/Quantum_logic_gate Glendinning, I. (2010). Rotations on the Bloch Sphere. https://www.vcpc.univie.ac.at/~ian/hotlist/qc/talks/bloch-sphere-rotations.pdf Hui, J. (2018). What are Qubits in Quantum Computing? https://medium.com/@jonathan_hui/qc-what-are-qubits-in-quantum-computing-cdb3cb566595 Previous Discusssion This article was originally published on CodeProject, where reader comments available: 👉 View comments and discussion on CodeProject]]></summary></entry><entry><title type="html">Option Templates in UWP</title><link href="http://danielvaughan.org/posts/codon/2019/03/23/Option-Templates-In-Uwp/" rel="alternate" type="text/html" title="Option Templates in UWP" /><published>2019-03-23T00:00:00+00:00</published><updated>2019-03-23T00:00:00+00:00</updated><id>http://danielvaughan.org/posts/codon/2019/03/23/Option-Templates-In-Uwp</id><content type="html" xml:base="http://danielvaughan.org/posts/codon/2019/03/23/Option-Templates-In-Uwp/"><![CDATA[<ul>
  <li><a href="#introduction">Introduction</a></li>
  <li><a href="#adding-options">Adding Options</a></li>
  <li><a href="#sample-overview">Sample Overview</a></li>
  <li><a href="#exploring-the.net-standard-library">Exploring the .NET Standard Library</a></li>
  <li><a href="#rendering-options-in-uwp">Rendering Options in UWP</a></li>
  <li><a href="#conclusion">Conclusion</a></li>
</ul>

<h2 id="introduction">Introduction</h2>

<p>Just about every app needs a settings screen. A lot of developers choose to simply build-out static UI; hard-wiring buttons and text fields to a setting backing store. If one does this, however, eventually, as the number of settings grows, technical debt increases; making refactoring your settings screen into categories, or changing how the settings are stored or displayed, evermore difficult.</p>

<p>That’s why I built an options system into <a href="http://codonfx.com/">CodonFX</a>, which integrates with an settings system and an isolated storage backing store, which can be swapped out for a SQLite backing store.
The options system in Codon has probably saved me months of development time, and allowed me to do some pretty neat things with little effort, such as exporting and importing options.</p>

<h2 id="adding-options">Adding Options</h2>

<p>With the Codon options system, a single line of code can be used to materialize an option on an option screen that writes itself to a backing store. See the following:</p>

<div class="language-cs highlighter-rouge"><div class="highlight"><pre class="highlight"><code><span class="n">generalOptions</span><span class="p">.</span><span class="nf">Add</span><span class="p">(</span><span class="k">new</span> <span class="nf">BooleanUserOption</span><span class="p">(()</span> <span class="p">=&gt;</span> <span class="s">"Boolean 1 title"</span><span class="p">,</span> <span class="s">"Boolean1Key"</span><span class="p">,</span> <span class="p">()</span> <span class="p">=&gt;</span> <span class="k">false</span><span class="p">));</span>
</code></pre></div></div>

<p>Here we create a <code class="language-plaintext highlighter-rouge">BooleanUserOption</code>, which is rendered as a switch on the options screen, and automatically writes its value to Codon’s <code class="language-plaintext highlighter-rouge">ISettingsService</code> using the specified string key. The title for the option is a lambda expression, which allows you to easily localize it, so that if the UI language changes the title will be displayed in the correct language.</p>

<p>There are a bunch of built-in option types, representing common setting types, including:</p>
<ul>
  <li><code class="language-plaintext highlighter-rouge">BooleanUserOption</code></li>
  <li><code class="language-plaintext highlighter-rouge">DoubleUserOption</code></li>
  <li><code class="language-plaintext highlighter-rouge">IntUserOption</code></li>
  <li><code class="language-plaintext highlighter-rouge">ObjectUserOption</code></li>
  <li><code class="language-plaintext highlighter-rouge">StringUserOption</code></li>
</ul>

<p>There are others that are used to present settings in different ways, including:</p>
<ul>
  <li><code class="language-plaintext highlighter-rouge">CommandOption</code></li>
  <li><code class="language-plaintext highlighter-rouge">CompositeOption</code></li>
  <li><code class="language-plaintext highlighter-rouge">ListOption</code></li>
  <li><code class="language-plaintext highlighter-rouge">RangeUserOption</code></li>
</ul>

<p><code class="language-plaintext highlighter-rouge">CommandOption</code> is used to present a button, that when clicked/tapped executes and <code class="language-plaintext highlighter-rouge">ICommand</code>.</p>

<p><code class="language-plaintext highlighter-rouge">CompositeOption</code> allows you to create your own custom behavior with potentially multiple options being rendered in custom UI.</p>

<p><code class="language-plaintext highlighter-rouge">ListOption</code> allows you, for example, to present an enumeration of values that render as a drop down list.</p>

<p><code class="language-plaintext highlighter-rouge">RangeUserOption</code> can be used to present a slider to the user, for writing a double or int value to the backing store.</p>

<p>You can, of course, create custom <code class="language-plaintext highlighter-rouge">IUserOption</code> classes, to suite the needs of your application.</p>

<h2 id="sample-overview">Sample Overview</h2>

<p>I’ve put together a <a href="https://github.com/CodonFramework/Samples/tree/master/Source/OptionsSample">small sample for UWP</a> to demonstrate it in a UWP app. Codon is cross-platform, and you can see the option’s system in action in apps such as <a href="https://play.google.com/store/apps/details?id=com.outcoder.browser">Surfy Browser for Android</a>.</p>

<p>In the sample you see the projects: a UWP app project and a .NET Standard class library. The user options system is located in the Codon.Extras.Core NuGet package, which is referenced by the class library. The UWP app project references the package NuGet Codon.Extras.Uwp.</p>

<h2 id="exploring-the-net-standard-library">Exploring the .NET Standard Library</h2>

<p>The class library contains various classes including a <code class="language-plaintext highlighter-rouge">Bootstrapper</code> class, whose <code class="language-plaintext highlighter-rouge">Run</code> method is called when the app starts.</p>

<p>While not absolutely necessary, the <code class="language-plaintext highlighter-rouge">AppSettings</code> class has strongly typed properties representing settings, which gives you compile-time confidence that your settings are being referred to correctly.</p>

<p>The partial class located in <em>AppSettings.UserOptions.cs</em> is responsible for registering user options that are presented on the <code class="language-plaintext highlighter-rouge">OptionsPage</code>. Generally speaking, the user options represent a subset of the settings.</p>

<p>The <code class="language-plaintext highlighter-rouge">ConfigureUserOptions</code> method of the <code class="language-plaintext highlighter-rouge">AppSettings</code> class, requires the <code class="language-plaintext highlighter-rouge">IUserOptionsService</code>. See Listing 1.</p>

<p>The <code class="language-plaintext highlighter-rouge">userRoles</code> parameter is provided just to demonstrate how you might display a different set of options depending on the privileges of the user. This would be more applicable for an enterprise scenario. I do this in one of my apps, and you may not need it.</p>

<p>The <code class="language-plaintext highlighter-rouge">IUserOptionsService</code> implementation allows to register multiple option categories, via its <code class="language-plaintext highlighter-rouge">Register</code> method. It accepts an <code class="language-plaintext highlighter-rouge">OptionCategory</code> method and a list of options that should appear in the category. In some of my apps I display option categories in tabs or sometimes, expandable groups.</p>

<p>When you add an options to a category’s option collection, it is automatically displayed on the options page. Each <code class="language-plaintext highlighter-rouge">UserOption</code> object must have a unique key. Lambda expression are used for most of the properties to allow your app to switch languages without requiring a restart.</p>

<p>You can specify a template for the option by setting its <code class="language-plaintext highlighter-rouge">TemplateFunc</code> property.</p>

<p>For more information see the <code class="language-plaintext highlighter-rouge">UserOptionBase</code> implementations.</p>

<p><strong>Listing 1.</strong> <code class="language-plaintext highlighter-rouge">AppSettings.ConfigureUserOptions</code> method.</p>
<div class="language-cs highlighter-rouge"><div class="highlight"><pre class="highlight"><code><span class="k">partial</span> <span class="k">class</span> <span class="nc">AppSettings</span>
<span class="p">{</span>
	<span class="k">public</span> <span class="k">void</span> <span class="nf">ConfigureUserOptions</span><span class="p">(</span><span class="n">IUserOptionsService</span> <span class="n">userOptionsService</span><span class="p">,</span> <span class="n">UserRoles</span> <span class="n">userRoles</span><span class="p">)</span>
	<span class="p">{</span>
		<span class="n">OptionCategory</span> <span class="n">defaultCategory</span> <span class="p">=</span> <span class="k">new</span> <span class="nf">OptionCategory</span><span class="p">(</span><span class="n">OptionCategoryIds</span><span class="p">.</span><span class="n">General</span><span class="p">,</span> <span class="p">()</span> <span class="p">=&gt;</span> <span class="s">"General"</span><span class="p">);</span>

		<span class="kt">var</span> <span class="n">generalOptions</span> <span class="p">=</span> <span class="k">new</span> <span class="n">List</span><span class="p">&lt;</span><span class="n">IUserOption</span><span class="p">&gt;</span>
		<span class="p">{</span>
			<span class="k">new</span> <span class="nf">StringUserOption</span><span class="p">(()</span> <span class="p">=&gt;</span> <span class="s">"String 1"</span><span class="p">,</span> <span class="n">String1Key</span><span class="p">,</span> <span class="p">()</span> <span class="p">=&gt;</span> <span class="n">string1DefaultValue</span><span class="p">),</span>
			<span class="k">new</span> <span class="nf">BooleanUserOption</span><span class="p">(()</span> <span class="p">=&gt;</span> <span class="s">"Boolean 1"</span><span class="p">,</span> <span class="n">Boolean1Key</span><span class="p">,</span> <span class="p">()</span> <span class="p">=&gt;</span> <span class="n">boolean1DefaultValue</span><span class="p">)</span>
		<span class="p">};</span>
		
		<span class="n">userOptionsService</span><span class="p">.</span><span class="nf">Register</span><span class="p">(</span><span class="n">generalOptions</span><span class="p">,</span> <span class="n">defaultCategory</span><span class="p">);</span>
	<span class="p">}</span>
<span class="p">}</span>
</code></pre></div></div>

<p>I mentioned that the <code class="language-plaintext highlighter-rouge">AppSettings</code> class is not really necessary. But I like to use it so I can easily refactor the setting names without fear of breaking something.</p>

<p>For completeness I’d like to mention that I use a Resharper live template for defining a setting. See Listing 2. <em>$SettingName$</em> and <em>$Type$</em> are the only two editable values. <em>$SettingName$</em> is defined as ‘Suggest name for a variable’ in the property grid for the template. <em>$Type$</em> is set to ‘Guess type expected at this point.’</p>

<p>Depending on where you define your <code class="language-plaintext highlighter-rouge">AppSettings</code> class, you may want to alter the visibility of the setting name and setter from <code class="language-plaintext highlighter-rouge">private</code> to <code class="language-plaintext highlighter-rouge">internal</code> or <code class="language-plaintext highlighter-rouge">public</code>.</p>

<p><strong>Listing 2.</strong> Resharper Live Template for a Setting</p>
<div class="language-cs highlighter-rouge"><div class="highlight"><pre class="highlight"><code><span class="k">public</span> <span class="k">const</span> <span class="kt">string</span> <span class="err">$</span><span class="n">SettingName</span><span class="err">$</span><span class="n">Key</span> <span class="p">=</span> <span class="s">"$SettingName$"</span><span class="p">;</span>
<span class="k">static</span> <span class="err">$</span><span class="n">Type</span><span class="err">$</span> <span class="err">$</span><span class="n">SettingNameLower</span><span class="err">$</span><span class="n">DefaultValue</span> <span class="p">=</span> <span class="err">$</span><span class="n">DefaultValue</span><span class="err">$</span><span class="p">;</span>

<span class="k">public</span> <span class="err">$</span><span class="n">Type</span><span class="err">$</span> <span class="err">$</span><span class="n">SettingName</span><span class="err">$</span>
<span class="p">{</span>
	<span class="k">get</span> <span class="p">=&gt;</span> <span class="n">settingsService</span><span class="p">.</span><span class="nf">GetSetting</span><span class="p">(</span><span class="err">$</span><span class="n">SettingName</span><span class="err">$</span><span class="n">Key</span><span class="p">,</span> <span class="err">$</span><span class="n">SettingNameLower</span><span class="err">$</span><span class="n">DefaultValue</span><span class="p">);</span>
	<span class="k">private</span> <span class="k">set</span> <span class="p">=&gt;</span> <span class="n">settingsService</span><span class="p">.</span><span class="nf">SetSetting</span><span class="p">(</span><span class="err">$</span><span class="n">SettingName</span><span class="err">$</span><span class="n">Key</span><span class="p">,</span> <span class="k">value</span><span class="p">);</span>
<span class="p">}</span>
</code></pre></div></div>

<p>When the app starts up, the <code class="language-plaintext highlighter-rouge">Bootstrapper</code> class’s <code class="language-plaintext highlighter-rouge">Run</code> method is called via the <code class="language-plaintext highlighter-rouge">App</code> class in the UWP app project, as shown in the following excerpt:</p>

<div class="language-cs highlighter-rouge"><div class="highlight"><pre class="highlight"><code><span class="k">protected</span> <span class="k">override</span> <span class="k">void</span> <span class="nf">OnLaunched</span><span class="p">(</span><span class="n">LaunchActivatedEventArgs</span> <span class="n">e</span><span class="p">)</span>
<span class="p">{</span>
	<span class="p">...</span>
	<span class="k">if</span> <span class="p">(!</span><span class="n">bootstrapperRan</span><span class="p">)</span>
	<span class="p">{</span>
		<span class="n">bootstrapperRan</span> <span class="p">=</span> <span class="k">true</span><span class="p">;</span>
		<span class="kt">var</span> <span class="n">bootstrapper</span> <span class="p">=</span> <span class="k">new</span> <span class="nf">Bootstrapper</span><span class="p">();</span>
		<span class="n">bootstrapper</span><span class="p">.</span><span class="nf">Run</span><span class="p">();</span>
	<span class="p">}</span>
	<span class="p">...</span>
<span class="p">}</span>
</code></pre></div></div>
<p>Sometimes your bootstrapper may need to go off and perform some asynchronous activity, in which case you’ll want to make the <code class="language-plaintext highlighter-rouge">Run</code> method <code class="language-plaintext highlighter-rouge">async</code>, and handle errors appropriately.</p>

<p>The <code class="language-plaintext highlighter-rouge">Bootstrapper</code> class, registers the <code class="language-plaintext highlighter-rouge">AppSettings</code> class as a singleton. See Listing 3.</p>

<blockquote>
  <p><strong>TIP:</strong>Depending on the needs of your app, you may need to implement a platform specific bootstrapper, for each of your platforms. I usually do that, and have the platform-specific bootstrappers call Run on the non-platform-specific bootstrapper.</p>
</blockquote>

<p>You may notice in the code that the <code class="language-plaintext highlighter-rouge">AppSettings</code> class requires an <code class="language-plaintext highlighter-rouge">ISettingsService</code> instance as a constructor parameter. Dependency injection is used to resolve the default instance, using the Codon frameworks default IoC container, the <code class="language-plaintext highlighter-rouge">FrameworkContainer</code> class.</p>

<p>In case you’re interested in the Codon framework’s internals, <code class="language-plaintext highlighter-rouge">FrameworkContainer</code> locates default type mappings using interface attributes, using Codon’s <code class="language-plaintext highlighter-rouge">DefaultType</code> and <code class="language-plaintext highlighter-rouge">DefaultTypeName</code> attributes; or the .NET Standard <code class="language-plaintext highlighter-rouge">DefaultValueAttribute</code>. If you take a look at the <a href="https://github.com/CodonFramework/Codon/blob/master/Source/Framework/Codon/SettingsModel/SettingsService/ISettingsService.cs">ISettingsService source</a>, you see how it’s decorated with both a <code class="language-plaintext highlighter-rouge">DefaultType</code> and a <code class="language-plaintext highlighter-rouge">DefaultTypeName</code> attribute. <code class="language-plaintext highlighter-rouge">DefaultTypeName</code> takes precedence, and is used to locate a platform specific implementation of the interface, if it exists. If a type identified by <code class="language-plaintext highlighter-rouge">DefaultTypeName</code> can’t be located, the container falls back to <code class="language-plaintext highlighter-rouge">DefaultType</code>.</p>

<p>We could configure the user options when the <code class="language-plaintext highlighter-rouge">AppSettings</code> class is instantiated, which would allow us to pass the <code class="language-plaintext highlighter-rouge">IUserOptionsService</code> using DI, but I chose to use an explicit method call since we might wish to postpone configuring the user options to optimize app start time.</p>

<p><strong>Listing 3.</strong> Bootstrapper class.</p>
<div class="language-cs highlighter-rouge"><div class="highlight"><pre class="highlight"><code><span class="k">public</span> <span class="k">class</span> <span class="nc">Bootstrapper</span>
<span class="p">{</span>
	<span class="k">public</span> <span class="k">void</span> <span class="nf">Run</span><span class="p">()</span>
	<span class="p">{</span>
		<span class="n">Dependency</span><span class="p">.</span><span class="n">Register</span><span class="p">&lt;</span><span class="n">AppSettings</span><span class="p">,</span> <span class="n">AppSettings</span><span class="p">&gt;(</span><span class="k">true</span><span class="p">);</span>

		<span class="kt">var</span> <span class="n">appSettings</span> <span class="p">=</span> <span class="n">Dependency</span><span class="p">.</span><span class="n">Resolve</span><span class="p">&lt;</span><span class="n">AppSettings</span><span class="p">&gt;();</span>
		<span class="n">appSettings</span><span class="p">.</span><span class="nf">ConfigureUserOptions</span><span class="p">(</span><span class="n">Dependency</span><span class="p">.</span><span class="n">Resolve</span><span class="p">&lt;</span><span class="n">IUserOptionsService</span><span class="p">&gt;(),</span> <span class="n">UserRoles</span><span class="p">.</span><span class="n">User</span><span class="p">);</span>
	<span class="p">}</span>
<span class="p">}</span>
</code></pre></div></div>

<h2 id="rendering-options-in-uwp">Rendering Options in UWP</h2>

<p>The <code class="language-plaintext highlighter-rouge">OptionsViewModel</code> class, in the class library project, contains a <code class="language-plaintext highlighter-rouge">Groupings</code> property, which retrieves the <code class="language-plaintext highlighter-rouge">UserOptionGroupings</code> from the <code class="language-plaintext highlighter-rouge">IUserOptionsService</code>, like so:</p>

<div class="language-cs highlighter-rouge"><div class="highlight"><pre class="highlight"><code><span class="k">public</span> <span class="n">IUserOptionGroupings</span> <span class="n">Groupings</span> <span class="p">=&gt;</span> 
			<span class="n">Dependency</span><span class="p">.</span><span class="n">Resolve</span><span class="p">&lt;</span><span class="n">IUserOptionsService</span><span class="p">&gt;().</span><span class="n">UserOptionGroupings</span><span class="p">;</span>
</code></pre></div></div>

<p>The <code class="language-plaintext highlighter-rouge">OptionsPage</code> class exposes an instance of the <code class="language-plaintext highlighter-rouge">OptionsViewModel</code> via the IoC container, as shown in Listing 4.</p>

<p>We use both <code class="language-plaintext highlighter-rouge">x:Bind</code> and <code class="language-plaintext highlighter-rouge">x:Binding</code> expression on the XAML page, and thus the <code class="language-plaintext highlighter-rouge">OptionsViewModel</code> instance is exposed both as a property and set as the <code class="language-plaintext highlighter-rouge">DataContext</code> of the page. In case you’re not aware, the context of <code class="language-plaintext highlighter-rouge">x:Bind</code> is a property of the Page, whereas the good old <code class="language-plaintext highlighter-rouge">x:Binding</code> expression uses the Page’s <code class="language-plaintext highlighter-rouge">DataContext</code> when resolving properties.</p>

<p><strong>Listing 4.</strong> OptionsPage class</p>
<div class="language-cs highlighter-rouge"><div class="highlight"><pre class="highlight"><code><span class="k">public</span> <span class="k">sealed</span> <span class="k">partial</span> <span class="k">class</span> <span class="nc">OptionsPage</span> <span class="p">:</span> <span class="n">Page</span>
<span class="p">{</span>
	<span class="k">public</span> <span class="nf">OptionsPage</span><span class="p">()</span>
	<span class="p">{</span>
		<span class="k">this</span><span class="p">.</span><span class="nf">InitializeComponent</span><span class="p">();</span>
		<span class="n">DataContext</span> <span class="p">=</span> <span class="n">Dependency</span><span class="p">.</span><span class="n">Resolve</span><span class="p">&lt;</span><span class="n">OptionsViewModel</span><span class="p">,</span> <span class="n">OptionsViewModel</span><span class="p">&gt;(</span><span class="k">true</span><span class="p">);</span>
	<span class="p">}</span>

	<span class="k">public</span> <span class="n">OptionsViewModel</span> <span class="n">ViewModel</span>
	<span class="p">{</span>
		<span class="k">get</span> <span class="p">=&gt;</span> <span class="n">DataContext</span> <span class="k">as</span> <span class="n">OptionsViewModel</span><span class="p">;</span>
		<span class="k">set</span> <span class="p">=&gt;</span> <span class="n">DataContext</span> <span class="p">=</span> <span class="k">value</span><span class="p">;</span>
	<span class="p">}</span>
<span class="p">}</span>
</code></pre></div></div>

<p>Within the OptionsPage.xaml file, you see that the page resources include a <code class="language-plaintext highlighter-rouge">CollectionViewSource</code> declaration, whose <code class="language-plaintext highlighter-rouge">Source</code> property is bound to the view-model’s <code class="language-plaintext highlighter-rouge">Groupings</code> property. See Listing 5.</p>

<p>We use a custom template selector to determine the <code class="language-plaintext highlighter-rouge">DataTemplate</code> to use for each option in the <code class="language-plaintext highlighter-rouge">CollectionViewSource</code>.</p>

<p><strong>Listing 5.</strong> OptionsPage Resources element</p>
<div class="language-xml highlighter-rouge"><div class="highlight"><pre class="highlight"><code><span class="nt">&lt;Page.Resources&gt;</span>
	<span class="nt">&lt;CollectionViewSource</span> <span class="na">x:Key=</span><span class="s">"optionsViewSource"</span>  
		<span class="na">IsSourceGrouped=</span><span class="s">"True"</span> <span class="na">Source=</span><span class="s">"{x:Bind ViewModel.Groupings}"</span> <span class="nt">/&gt;</span>

	<span class="nt">&lt;local:OptionTemplateSelector</span> 
		<span class="na">x:Key=</span><span class="s">"optionTemplateSelector"</span> 
		<span class="na">Templates=</span><span class="s">"{StaticResource OptionTemplateCollection}"</span><span class="nt">&gt;</span>
	<span class="nt">&lt;/local:OptionTemplateSelector&gt;</span>
<span class="nt">&lt;/Page.Resources&gt;</span>
</code></pre></div></div>

<p>The <code class="language-plaintext highlighter-rouge">OptionTemplateSelector</code> has a <code class="language-plaintext highlighter-rouge">Templates</code> property that is bound to a resource located in App.xaml. See Listing 6.</p>

<p>The <code class="language-plaintext highlighter-rouge">NamedTemplateCollection</code> includes all the templates, used to display each user option. There is a <em>String</em> template and a <em>Boolean</em> template. The names <em>String</em> and <em>Boolean</em> map to the <code class="language-plaintext highlighter-rouge">TemplateName</code> properties of the <code class="language-plaintext highlighter-rouge">StringUserOption</code> and the <code class="language-plaintext highlighter-rouge">BooleanUserOption</code> class respectively.</p>

<blockquote>
  <p><strong>NOTE:</strong> You can override the template used by a user option by setting its <code class="language-plaintext highlighter-rouge">TemplateName</code> property.</p>
</blockquote>

<p><strong>Listing 6.</strong> NamedTemplateCollection element</p>
<div class="language-xml highlighter-rouge"><div class="highlight"><pre class="highlight"><code><span class="nt">&lt;local:NamedTemplateCollection</span> <span class="na">x:Key=</span><span class="s">"OptionTemplateCollection"</span><span class="nt">&gt;</span>
	<span class="nt">&lt;local:NamedTemplate</span> <span class="na">Name=</span><span class="s">"String"</span><span class="nt">&gt;</span>
		<span class="nt">&lt;local:NamedTemplate.DataTemplate&gt;</span>
			<span class="nt">&lt;DataTemplate&gt;</span>
				<span class="nt">&lt;TextBox</span> 
					<span class="na">Header=</span><span class="s">"{Binding UserOption.Title, Mode=OneWay}"</span> 
					<span class="na">Text=</span><span class="s">"{Binding Setting, Mode=TwoWay}"</span> 
					<span class="na">Style=</span><span class="s">"{StaticResource OptionBox}"</span> <span class="nt">/&gt;</span>
			<span class="nt">&lt;/DataTemplate&gt;</span>
		<span class="nt">&lt;/local:NamedTemplate.DataTemplate&gt;</span>
	<span class="nt">&lt;/local:NamedTemplate&gt;</span>
	<span class="nt">&lt;local:NamedTemplate</span> <span class="na">Name=</span><span class="s">"Boolean"</span><span class="nt">&gt;</span>
		<span class="nt">&lt;local:NamedTemplate.DataTemplate&gt;</span>
			<span class="nt">&lt;DataTemplate&gt;</span>
				<span class="nt">&lt;ToggleSwitch</span> 
					<span class="na">Header=</span><span class="s">"{Binding UserOption.Title, Mode=OneWay}"</span> 
					<span class="na">IsOn=</span><span class="s">"{Binding Setting, Mode=TwoWay}"</span> 
					<span class="na">Margin=</span><span class="s">"{StaticResource OptionItemMargin}"</span> <span class="nt">/&gt;</span>
			<span class="nt">&lt;/DataTemplate&gt;</span>
		<span class="nt">&lt;/local:NamedTemplate.DataTemplate&gt;</span>
	<span class="nt">&lt;/local:NamedTemplate&gt;</span>
<span class="nt">&lt;/local:NamedTemplateCollection&gt;</span>
</code></pre></div></div>

<p>The custom template selector is named <code class="language-plaintext highlighter-rouge">OptionTemplateSelector</code> and it sub-classes <code class="language-plaintext highlighter-rouge">Windows.UI.Xaml.Controls.DataTemplateSelector</code>. See Listing 7.</p>

<p>The <code class="language-plaintext highlighter-rouge">SelectTemplateCore</code> method attempts to retrieve a template whose name matches that of the <code class="language-plaintext highlighter-rouge">TemplateName</code> property of the <code class="language-plaintext highlighter-rouge">IUserOption</code>. A cache, which is a <code class="language-plaintext highlighter-rouge">Dictionary&lt;string, NamedTemplate&gt;</code> is used for efficient O(1) retrieval of templates.</p>

<p><strong>Listing 7.</strong> OptionTemplateSelector class</p>
<div class="language-cs highlighter-rouge"><div class="highlight"><pre class="highlight"><code><span class="k">public</span> <span class="k">class</span> <span class="nc">OptionTemplateSelector</span> <span class="p">:</span> <span class="n">DataTemplateSelector</span>
<span class="p">{</span>
	<span class="k">public</span> <span class="n">NamedTemplateCollection</span> <span class="n">Templates</span> <span class="p">{</span> <span class="k">get</span><span class="p">;</span> <span class="k">set</span><span class="p">;</span> <span class="p">}</span>

	<span class="n">IDictionary</span><span class="p">&lt;</span><span class="kt">string</span><span class="p">,</span> <span class="n">NamedTemplate</span><span class="p">&gt;</span> <span class="n">cache</span> <span class="p">{</span> <span class="k">get</span><span class="p">;</span> <span class="k">set</span><span class="p">;</span> <span class="p">}</span>

	<span class="k">void</span> <span class="nf">InitTemplateCollection</span><span class="p">()</span>
	<span class="p">{</span>
		<span class="n">cache</span> <span class="p">=</span> <span class="n">Templates</span><span class="p">?.</span><span class="nf">ToDictionary</span><span class="p">(</span><span class="n">x</span> <span class="p">=&gt;</span> <span class="n">x</span><span class="p">.</span><span class="n">Name</span><span class="p">)</span> 
							<span class="p">??</span> <span class="k">new</span> <span class="n">Dictionary</span><span class="p">&lt;</span><span class="kt">string</span><span class="p">,</span> <span class="n">NamedTemplate</span><span class="p">&gt;();</span>
	<span class="p">}</span>

	<span class="k">protected</span> <span class="k">override</span> <span class="n">DataTemplate</span> <span class="nf">SelectTemplateCore</span><span class="p">(</span>
					<span class="kt">object</span> <span class="n">item</span><span class="p">,</span> <span class="n">DependencyObject</span> <span class="n">container</span><span class="p">)</span>
	<span class="p">{</span>
		<span class="k">if</span> <span class="p">(</span><span class="n">cache</span> <span class="p">==</span> <span class="k">null</span><span class="p">)</span>
		<span class="p">{</span>
			<span class="nf">InitTemplateCollection</span><span class="p">();</span>
		<span class="p">}</span>

		<span class="k">if</span> <span class="p">(</span><span class="n">item</span> <span class="p">!=</span> <span class="k">null</span><span class="p">)</span>
		<span class="p">{</span>
			<span class="kt">var</span> <span class="n">readerWriter</span> <span class="p">=</span> <span class="p">(</span><span class="n">IUserOptionReaderWriter</span><span class="p">)</span><span class="n">item</span><span class="p">;</span>
			<span class="kt">var</span> <span class="n">templateName</span> <span class="p">=</span> <span class="n">readerWriter</span><span class="p">.</span><span class="n">UserOption</span><span class="p">.</span><span class="n">TemplateName</span><span class="p">;</span>

			<span class="n">cache</span><span class="p">.</span><span class="nf">TryGetValue</span><span class="p">(</span><span class="n">templateName</span><span class="p">,</span> <span class="k">out</span> <span class="n">NamedTemplate</span> <span class="n">keyedTemplate</span><span class="p">);</span>
			
			<span class="k">if</span> <span class="p">(</span><span class="n">keyedTemplate</span> <span class="p">!=</span> <span class="k">null</span><span class="p">)</span>
			<span class="p">{</span>
				<span class="k">return</span> <span class="n">keyedTemplate</span><span class="p">.</span><span class="n">DataTemplate</span><span class="p">;</span>
			<span class="p">}</span>
		<span class="p">}</span>

		<span class="n">DataTemplate</span> <span class="n">result</span> <span class="p">=</span> <span class="k">base</span><span class="p">.</span><span class="nf">SelectTemplateCore</span><span class="p">(</span><span class="n">item</span><span class="p">,</span> <span class="n">container</span><span class="p">);</span>
		<span class="k">return</span> <span class="n">result</span><span class="p">;</span>
	<span class="p">}</span>
<span class="p">}</span>
</code></pre></div></div>

<p>Back in the <em>OptionsPage.xml</em> file we see that options are rendered within a <code class="language-plaintext highlighter-rouge">ListView</code>. See Listing 8. The <code class="language-plaintext highlighter-rouge">ListView</code> is bound to the <code class="language-plaintext highlighter-rouge">CollectionViewSource</code> to retrieve its option groupings, and  <code class="language-plaintext highlighter-rouge">OptionTemplateSelector</code> retrieves the <code class="language-plaintext highlighter-rouge">DataTemplate</code> objects for each option.</p>

<p><strong>Listing 8.</strong> Options are rendered in a ListView</p>
<div class="language-xml highlighter-rouge"><div class="highlight"><pre class="highlight"><code><span class="nt">&lt;ListView</span> <span class="na">ItemsSource=</span><span class="s">"{Binding Source={StaticResource optionsViewSource}}"</span>
		<span class="na">ItemTemplateSelector=</span><span class="s">"{StaticResource optionTemplateSelector}"</span>
		<span class="na">SelectionMode=</span><span class="s">"None"</span><span class="nt">&gt;</span>
	<span class="nt">&lt;ListView.ItemContainerStyle&gt;</span>
		<span class="nt">&lt;Style</span> <span class="na">TargetType=</span><span class="s">"ListViewItem"</span><span class="nt">&gt;</span>
			<span class="nt">&lt;Setter</span> <span class="na">Property=</span><span class="s">"HorizontalContentAlignment"</span> <span class="na">Value=</span><span class="s">"Stretch"</span> <span class="nt">/&gt;</span>
		<span class="nt">&lt;/Style&gt;</span>
	<span class="nt">&lt;/ListView.ItemContainerStyle&gt;</span>
<span class="nt">&lt;/ListView&gt;</span>
</code></pre></div></div>

<p>The sample app displays its options as shown in the following figure:</p>

<p><img src="/assets/images/2019-03-29_AppScreenShot.png" alt="Options Sample App" /></p>

<h2 id="conclusion">Conclusion</h2>

<p>An app’s functionality grows and changes over time. When building a settings screen for your app, it’s prudent to engineer it so that you can easily add settings from the screen without having to spend time re-working the user interface. One way to achieve that is by using a third-party framework like Codon FX, which allows you to add a new user option to your app with a single line of code.</p>

<p>In this article you’ve seen how to configure a .NET Standard project and a UWP app to use Codon FX. You looked at defining an <code class="language-plaintext highlighter-rouge">AppSettings</code> class containing settings used throughout your app, and at exposing a subset of those settings as user options.
You saw how to create <code class="language-plaintext highlighter-rouge">DataTemplate</code> elements for user options, and at consuming a collection of data templates to render each user option on a settings screen.</p>

<p>I hope you find this article useful. If so, then I’d appreciate it if you would leave feedback below.</p>

<ul>
  <li><a href="https://github.com/CodonFramework/Samples/tree/master/Source/OptionsSample">UWP Options Sample on GitHub</a></li>
</ul>]]></content><author><name></name></author><category term="Codon" /><summary type="html"><![CDATA[Introduction Adding Options Sample Overview Exploring the .NET Standard Library Rendering Options in UWP Conclusion Introduction Just about every app needs a settings screen. A lot of developers choose to simply build-out static UI; hard-wiring buttons and text fields to a setting backing store. If one does this, however, eventually, as the number of settings grows, technical debt increases; making refactoring your settings screen into categories, or changing how the settings are stored or displayed, evermore difficult. That’s why I built an options system into CodonFX, which integrates with an settings system and an isolated storage backing store, which can be swapped out for a SQLite backing store. The options system in Codon has probably saved me months of development time, and allowed me to do some pretty neat things with little effort, such as exporting and importing options. Adding Options With the Codon options system, a single line of code can be used to materialize an option on an option screen that writes itself to a backing store. See the following: generalOptions.Add(new BooleanUserOption(() =&gt; "Boolean 1 title", "Boolean1Key", () =&gt; false)); Here we create a BooleanUserOption, which is rendered as a switch on the options screen, and automatically writes its value to Codon’s ISettingsService using the specified string key. The title for the option is a lambda expression, which allows you to easily localize it, so that if the UI language changes the title will be displayed in the correct language. There are a bunch of built-in option types, representing common setting types, including: BooleanUserOption DoubleUserOption IntUserOption ObjectUserOption StringUserOption There are others that are used to present settings in different ways, including: CommandOption CompositeOption ListOption RangeUserOption CommandOption is used to present a button, that when clicked/tapped executes and ICommand. CompositeOption allows you to create your own custom behavior with potentially multiple options being rendered in custom UI. ListOption allows you, for example, to present an enumeration of values that render as a drop down list. RangeUserOption can be used to present a slider to the user, for writing a double or int value to the backing store. You can, of course, create custom IUserOption classes, to suite the needs of your application. Sample Overview I’ve put together a small sample for UWP to demonstrate it in a UWP app. Codon is cross-platform, and you can see the option’s system in action in apps such as Surfy Browser for Android. In the sample you see the projects: a UWP app project and a .NET Standard class library. The user options system is located in the Codon.Extras.Core NuGet package, which is referenced by the class library. The UWP app project references the package NuGet Codon.Extras.Uwp. Exploring the .NET Standard Library The class library contains various classes including a Bootstrapper class, whose Run method is called when the app starts. While not absolutely necessary, the AppSettings class has strongly typed properties representing settings, which gives you compile-time confidence that your settings are being referred to correctly. The partial class located in AppSettings.UserOptions.cs is responsible for registering user options that are presented on the OptionsPage. Generally speaking, the user options represent a subset of the settings. The ConfigureUserOptions method of the AppSettings class, requires the IUserOptionsService. See Listing 1. The userRoles parameter is provided just to demonstrate how you might display a different set of options depending on the privileges of the user. This would be more applicable for an enterprise scenario. I do this in one of my apps, and you may not need it. The IUserOptionsService implementation allows to register multiple option categories, via its Register method. It accepts an OptionCategory method and a list of options that should appear in the category. In some of my apps I display option categories in tabs or sometimes, expandable groups. When you add an options to a category’s option collection, it is automatically displayed on the options page. Each UserOption object must have a unique key. Lambda expression are used for most of the properties to allow your app to switch languages without requiring a restart. You can specify a template for the option by setting its TemplateFunc property. For more information see the UserOptionBase implementations. Listing 1. AppSettings.ConfigureUserOptions method. partial class AppSettings { public void ConfigureUserOptions(IUserOptionsService userOptionsService, UserRoles userRoles) { OptionCategory defaultCategory = new OptionCategory(OptionCategoryIds.General, () =&gt; "General"); var generalOptions = new List&lt;IUserOption&gt; { new StringUserOption(() =&gt; "String 1", String1Key, () =&gt; string1DefaultValue), new BooleanUserOption(() =&gt; "Boolean 1", Boolean1Key, () =&gt; boolean1DefaultValue) }; userOptionsService.Register(generalOptions, defaultCategory); } } I mentioned that the AppSettings class is not really necessary. But I like to use it so I can easily refactor the setting names without fear of breaking something. For completeness I’d like to mention that I use a Resharper live template for defining a setting. See Listing 2. $SettingName$ and $Type$ are the only two editable values. $SettingName$ is defined as ‘Suggest name for a variable’ in the property grid for the template. $Type$ is set to ‘Guess type expected at this point.’ Depending on where you define your AppSettings class, you may want to alter the visibility of the setting name and setter from private to internal or public. Listing 2. Resharper Live Template for a Setting public const string $SettingName$Key = "$SettingName$"; static $Type$ $SettingNameLower$DefaultValue = $DefaultValue$; public $Type$ $SettingName$ { get =&gt; settingsService.GetSetting($SettingName$Key, $SettingNameLower$DefaultValue); private set =&gt; settingsService.SetSetting($SettingName$Key, value); } When the app starts up, the Bootstrapper class’s Run method is called via the App class in the UWP app project, as shown in the following excerpt: protected override void OnLaunched(LaunchActivatedEventArgs e) { ... if (!bootstrapperRan) { bootstrapperRan = true; var bootstrapper = new Bootstrapper(); bootstrapper.Run(); } ... } Sometimes your bootstrapper may need to go off and perform some asynchronous activity, in which case you’ll want to make the Run method async, and handle errors appropriately. The Bootstrapper class, registers the AppSettings class as a singleton. See Listing 3. TIP:Depending on the needs of your app, you may need to implement a platform specific bootstrapper, for each of your platforms. I usually do that, and have the platform-specific bootstrappers call Run on the non-platform-specific bootstrapper. You may notice in the code that the AppSettings class requires an ISettingsService instance as a constructor parameter. Dependency injection is used to resolve the default instance, using the Codon frameworks default IoC container, the FrameworkContainer class. In case you’re interested in the Codon framework’s internals, FrameworkContainer locates default type mappings using interface attributes, using Codon’s DefaultType and DefaultTypeName attributes; or the .NET Standard DefaultValueAttribute. If you take a look at the ISettingsService source, you see how it’s decorated with both a DefaultType and a DefaultTypeName attribute. DefaultTypeName takes precedence, and is used to locate a platform specific implementation of the interface, if it exists. If a type identified by DefaultTypeName can’t be located, the container falls back to DefaultType. We could configure the user options when the AppSettings class is instantiated, which would allow us to pass the IUserOptionsService using DI, but I chose to use an explicit method call since we might wish to postpone configuring the user options to optimize app start time. Listing 3. Bootstrapper class. public class Bootstrapper { public void Run() { Dependency.Register&lt;AppSettings, AppSettings&gt;(true); var appSettings = Dependency.Resolve&lt;AppSettings&gt;(); appSettings.ConfigureUserOptions(Dependency.Resolve&lt;IUserOptionsService&gt;(), UserRoles.User); } } Rendering Options in UWP The OptionsViewModel class, in the class library project, contains a Groupings property, which retrieves the UserOptionGroupings from the IUserOptionsService, like so: public IUserOptionGroupings Groupings =&gt; Dependency.Resolve&lt;IUserOptionsService&gt;().UserOptionGroupings; The OptionsPage class exposes an instance of the OptionsViewModel via the IoC container, as shown in Listing 4. We use both x:Bind and x:Binding expression on the XAML page, and thus the OptionsViewModel instance is exposed both as a property and set as the DataContext of the page. In case you’re not aware, the context of x:Bind is a property of the Page, whereas the good old x:Binding expression uses the Page’s DataContext when resolving properties. Listing 4. OptionsPage class public sealed partial class OptionsPage : Page { public OptionsPage() { this.InitializeComponent(); DataContext = Dependency.Resolve&lt;OptionsViewModel, OptionsViewModel&gt;(true); } public OptionsViewModel ViewModel { get =&gt; DataContext as OptionsViewModel; set =&gt; DataContext = value; } } Within the OptionsPage.xaml file, you see that the page resources include a CollectionViewSource declaration, whose Source property is bound to the view-model’s Groupings property. See Listing 5. We use a custom template selector to determine the DataTemplate to use for each option in the CollectionViewSource. Listing 5. OptionsPage Resources element &lt;Page.Resources&gt; &lt;CollectionViewSource x:Key="optionsViewSource" IsSourceGrouped="True" Source="{x:Bind ViewModel.Groupings}" /&gt; &lt;local:OptionTemplateSelector x:Key="optionTemplateSelector" Templates="{StaticResource OptionTemplateCollection}"&gt; &lt;/local:OptionTemplateSelector&gt; &lt;/Page.Resources&gt; The OptionTemplateSelector has a Templates property that is bound to a resource located in App.xaml. See Listing 6. The NamedTemplateCollection includes all the templates, used to display each user option. There is a String template and a Boolean template. The names String and Boolean map to the TemplateName properties of the StringUserOption and the BooleanUserOption class respectively. NOTE: You can override the template used by a user option by setting its TemplateName property. Listing 6. NamedTemplateCollection element &lt;local:NamedTemplateCollection x:Key="OptionTemplateCollection"&gt; &lt;local:NamedTemplate Name="String"&gt; &lt;local:NamedTemplate.DataTemplate&gt; &lt;DataTemplate&gt; &lt;TextBox Header="{Binding UserOption.Title, Mode=OneWay}" Text="{Binding Setting, Mode=TwoWay}" Style="{StaticResource OptionBox}" /&gt; &lt;/DataTemplate&gt; &lt;/local:NamedTemplate.DataTemplate&gt; &lt;/local:NamedTemplate&gt; &lt;local:NamedTemplate Name="Boolean"&gt; &lt;local:NamedTemplate.DataTemplate&gt; &lt;DataTemplate&gt; &lt;ToggleSwitch Header="{Binding UserOption.Title, Mode=OneWay}" IsOn="{Binding Setting, Mode=TwoWay}" Margin="{StaticResource OptionItemMargin}" /&gt; &lt;/DataTemplate&gt; &lt;/local:NamedTemplate.DataTemplate&gt; &lt;/local:NamedTemplate&gt; &lt;/local:NamedTemplateCollection&gt; The custom template selector is named OptionTemplateSelector and it sub-classes Windows.UI.Xaml.Controls.DataTemplateSelector. See Listing 7. The SelectTemplateCore method attempts to retrieve a template whose name matches that of the TemplateName property of the IUserOption. A cache, which is a Dictionary&lt;string, NamedTemplate&gt; is used for efficient O(1) retrieval of templates. Listing 7. OptionTemplateSelector class public class OptionTemplateSelector : DataTemplateSelector { public NamedTemplateCollection Templates { get; set; } IDictionary&lt;string, NamedTemplate&gt; cache { get; set; } void InitTemplateCollection() { cache = Templates?.ToDictionary(x =&gt; x.Name) ?? new Dictionary&lt;string, NamedTemplate&gt;(); } protected override DataTemplate SelectTemplateCore( object item, DependencyObject container) { if (cache == null) { InitTemplateCollection(); } if (item != null) { var readerWriter = (IUserOptionReaderWriter)item; var templateName = readerWriter.UserOption.TemplateName; cache.TryGetValue(templateName, out NamedTemplate keyedTemplate); if (keyedTemplate != null) { return keyedTemplate.DataTemplate; } } DataTemplate result = base.SelectTemplateCore(item, container); return result; } } Back in the OptionsPage.xml file we see that options are rendered within a ListView. See Listing 8. The ListView is bound to the CollectionViewSource to retrieve its option groupings, and OptionTemplateSelector retrieves the DataTemplate objects for each option. Listing 8. Options are rendered in a ListView &lt;ListView ItemsSource="{Binding Source={StaticResource optionsViewSource}}" ItemTemplateSelector="{StaticResource optionTemplateSelector}" SelectionMode="None"&gt; &lt;ListView.ItemContainerStyle&gt; &lt;Style TargetType="ListViewItem"&gt; &lt;Setter Property="HorizontalContentAlignment" Value="Stretch" /&gt; &lt;/Style&gt; &lt;/ListView.ItemContainerStyle&gt; &lt;/ListView&gt; The sample app displays its options as shown in the following figure: Conclusion An app’s functionality grows and changes over time. When building a settings screen for your app, it’s prudent to engineer it so that you can easily add settings from the screen without having to spend time re-working the user interface. One way to achieve that is by using a third-party framework like Codon FX, which allows you to add a new user option to your app with a single line of code. In this article you’ve seen how to configure a .NET Standard project and a UWP app to use Codon FX. You looked at defining an AppSettings class containing settings used throughout your app, and at exposing a subset of those settings as user options. You saw how to create DataTemplate elements for user options, and at consuming a collection of data templates to render each user option on a settings screen. I hope you find this article useful. If so, then I’d appreciate it if you would leave feedback below. UWP Options Sample on GitHub]]></summary></entry><entry><title type="html">Asynchronous Commanding with Codon FX</title><link href="http://danielvaughan.org/posts/codon/2018/04/01/Async-Commands-with-Codon-FX/" rel="alternate" type="text/html" title="Asynchronous Commanding with Codon FX" /><published>2018-04-01T00:00:00+00:00</published><updated>2018-04-01T00:00:00+00:00</updated><id>http://danielvaughan.org/posts/codon/2018/04/01/Async-Commands-with-Codon-FX</id><content type="html" xml:base="http://danielvaughan.org/posts/codon/2018/04/01/Async-Commands-with-Codon-FX/"><![CDATA[<h2 id="introduction">Introduction</h2>

<p>Have you ever created a view-model for your app that contains an <code class="language-plaintext highlighter-rouge">ICommand</code> that needs to perform some asynchronous activity? Such as calling a web API or saving data to a file? If you have, you’ll know that the synchronous <code class="language-plaintext highlighter-rouge">ICommand</code> interface doesn’t lend itself easily to asynchronous operations. You end up having to build a mini-state-machine to disable and re-enable the command target when the command completes. Wouldn’t it be nice if commands could function asynchronously? Well, in Codon, they can.</p>

<p><a href="http://www.codonfx.com">Codon FX</a> is a cross-platform framework for building maintainable applications. Codon comes with rich commanding infrastructure. As you’d expect there is a basic <code class="language-plaintext highlighter-rouge">ICommand</code> implementation: <code class="language-plaintext highlighter-rouge">ActionCommand</code>, that allows you to supply delegates that are called during command execution or when evaluating the command’s <code class="language-plaintext highlighter-rouge">Enabled</code> property. There is also a <code class="language-plaintext highlighter-rouge">UICommand</code> class that, in addition to the features of the <code class="language-plaintext highlighter-rouge">ActionCommand</code> class, provides text, icon, and visibility support.</p>

<p>Now, you’d be forgiven for thinking that these <code class="language-plaintext highlighter-rouge">ICommand</code> implementations, residing in Codon’s core .NET Standard library, are all that Codon has to offer as far as commanding goes. But they’re not. In Codon’s <em>Extras</em> package there exists a number of other commands, which are analogous to those in the core library, but offer <em>async</em> support.  <code class="language-plaintext highlighter-rouge">AsyncActionCommand</code> brings in asynchronous method support, yet also implements <code class="language-plaintext highlighter-rouge">ICommand</code> seamlessly, making it compatible with the built-in commanding infrastructure of UWP, WPF, Xamarin Forms, and Codon’s Xamarin Android binding system.</p>

<p>In this post you look at using the <code class="language-plaintext highlighter-rouge">AsyncActionCommand</code>. You see how to create a view-model with an asynchronous command that kicks of a potentially long running operation. You also explore how to globally handle exceptions that occur during the execution of an asynchronous operation.</p>

<h2 id="getting-started-with-codon-fx">Getting Started with Codon FX</h2>

<p>Codon is built on .NET Standard. It has platform specific packages to support its dialog service and a number of other services. But, if you don’t need the <code class="language-plaintext highlighter-rouge">IDialogService</code> implementation, page navigation, or any of the other platform specific features, then a NuGet reference to <em>Codon</em> or <em>Codon.Extras.Core</em> will suffice.</p>

<p>The sample UWP app makes use of Codon’s <code class="language-plaintext highlighter-rouge">IDialogService</code>. For that reason, I’ve added a reference to the <em>Codon.Extras.Uwp</em> package.</p>

<p>The <code class="language-plaintext highlighter-rouge">MainViewModel</code> class in the sample contains a single <code class="language-plaintext highlighter-rouge">ICommand</code> named <code class="language-plaintext highlighter-rouge">DoWorkCommand</code>. See Listing 1.</p>

<p><code class="language-plaintext highlighter-rouge">DoWorkCommand</code> is created with the following two parameters:</p>
<ul>
  <li>An async execute method named <code class="language-plaintext highlighter-rouge">DoWorkAsync</code>,</li>
  <li>and an async can-execute method names <code class="language-plaintext highlighter-rouge">CanDoWorkAsync</code>.</li>
</ul>

<p>There isn’t a traditional getter or setter for the <code class="language-plaintext highlighter-rouge">DoWorkCommand</code> property. Instead I’ve used a C# 7.0 expression bodied getter to lazy-load the command. You don’t need to do it this way, I just happen to like the conciseness of this syntax.</p>

<p><strong>Listing 1.</strong> The Asynchronous DoWorkCommand</p>
<div class="language-csharp highlighter-rouge"><div class="highlight"><pre class="highlight"><code><span class="k">public</span> <span class="k">class</span> <span class="nc">MainViewModel</span> <span class="p">:</span> <span class="n">ViewModelBase</span><span class="p">,</span> <span class="n">IExceptionHandler</span>
<span class="p">{</span>
    <span class="p">...</span>
    
	<span class="n">AsyncActionCommand</span> <span class="n">doWorkCommand</span><span class="p">;</span>

	<span class="k">public</span> <span class="n">ICommand</span> <span class="n">DoWorkCommand</span> <span class="p">=&gt;</span> <span class="n">doWorkCommand</span>
		<span class="p">??</span> <span class="p">(</span><span class="n">doWorkCommand</span> <span class="p">=</span> <span class="k">new</span> <span class="nf">AsyncActionCommand</span><span class="p">(</span>
				<span class="n">DoWorkAsync</span><span class="p">,</span> <span class="n">CanDoWorkAsync</span><span class="p">));</span>
		
    <span class="p">...</span>
<span class="p">}</span>
</code></pre></div></div>

<p><code class="language-plaintext highlighter-rouge">MainViewModel</code> extends Codon’s <code class="language-plaintext highlighter-rouge">ViewModelBase</code> class. The <code class="language-plaintext highlighter-rouge">Codon.UIModel.ViewModelBase</code> class extends <code class="language-plaintext highlighter-rouge">ObservableBase</code>, which implements <code class="language-plaintext highlighter-rouge">INotifyPropertyChanged</code> (and <code class="language-plaintext highlighter-rouge">INotifyPropertyChanging</code>) via a <code class="language-plaintext highlighter-rouge">PropertyChangeNotifier</code> object.</p>

<p>The <code class="language-plaintext highlighter-rouge">MainViewModel</code> contains a boolean <code class="language-plaintext highlighter-rouge">Busy</code> property, which, as we shall see, is used to display a busy progress ring on a page. The property is defined in the view-model as shown:</p>

<div class="language-csharp highlighter-rouge"><div class="highlight"><pre class="highlight"><code><span class="kt">bool</span> <span class="n">busy</span><span class="p">;</span>

<span class="k">public</span> <span class="kt">bool</span> <span class="n">Busy</span>
<span class="p">{</span>
	<span class="k">get</span> <span class="p">=&gt;</span> <span class="n">busy</span><span class="p">;</span>
	<span class="k">private</span> <span class="k">set</span> <span class="p">=&gt;</span> <span class="nf">Set</span><span class="p">(</span><span class="k">ref</span> <span class="n">busy</span><span class="p">,</span> <span class="k">value</span><span class="p">);</span>
<span class="p">}</span>
</code></pre></div></div>

<p>Before we look at the <code class="language-plaintext highlighter-rouge">DoWorkCommand</code>s delegates, lets briefly examine Codon’s property setter infrastructure and at the way property change notification happens behind the scenes.</p>

<h2 id="understanding-codons-property-setter-api">Understanding Codon’s Property Setter API</h2>

<p>The <code class="language-plaintext highlighter-rouge">ViewModelBase</code> class’s <code class="language-plaintext highlighter-rouge">Set</code> method updates the field only if it has changed, and ensures that the update occurs on the UI thread so no cross-thread exceptions are thrown.</p>

<p>The <code class="language-plaintext highlighter-rouge">Set</code> method returns one of the following <code class="language-plaintext highlighter-rouge">AssignmentResult</code> enum values:</p>
<ul>
  <li>Success</li>
  <li>Cancelled</li>
  <li>AlreadyAssigned</li>
  <li>OwnerDisposed</li>
</ul>

<p><code class="language-plaintext highlighter-rouge">Success</code> indicates that the field was not equal to the value being applied and that the field is now set to the specified value.</p>

<p><code class="language-plaintext highlighter-rouge">Cancelled</code> may be returned if a subscriber to the view-model’s <code class="language-plaintext highlighter-rouge">INotifyPropertyChanging</code> method, marks the <code class="language-plaintext highlighter-rouge">PropertyChangingEventArgs</code> as <em>Cancelled</em>, which prevents the field value from being updated.</p>

<p>If <code class="language-plaintext highlighter-rouge">AlreadyAssigned</code> is returned, then the field is equal to the value being applied. Neither the <code class="language-plaintext highlighter-rouge">PropertyChanging</code> event nor the <code class="language-plaintext highlighter-rouge">PropertyChanged</code> event is raised in this case.</p>

<p><code class="language-plaintext highlighter-rouge">ViewModelBase</code> extends <code class="language-plaintext highlighter-rouge">ObservableBase</code>, which makes use of a <code class="language-plaintext highlighter-rouge">PropertyChangeNotifier</code> object. The <code class="language-plaintext highlighter-rouge">PropertyChangeNotifier</code> class allows you to aggregate the INPC (INotifyPropertyChanged) behavior, and alleviates the need to inherit from a base class implementing <code class="language-plaintext highlighter-rouge">INotifyPropertyChanged</code>.</p>

<blockquote>
  <p><strong>FUN FACT:</strong> You can use <code class="language-plaintext highlighter-rouge">PropertyChangeNotifier</code> to enable INPC on any class.</p>
</blockquote>

<p>If you’re interested in the inner workings of Codon’s INPC infrastructure please see the  <a href="https://github.com/CodonFramework/Codon/blob/master/Source/Framework/Codon/ComponentModel/ObservableBase.cs"><code class="language-plaintext highlighter-rouge">Codon.ComponentModel.ObservableBase</code> class</a>.</p>

<h2 id="understanding-async-command-actions">Understanding Async Command Actions</h2>

<p>In this part of the post we look at the two method delegates passed to the <code class="language-plaintext highlighter-rouge">AsyncActionCommand</code>’s constructor. The first is a the command’s execution func <code class="language-plaintext highlighter-rouge">DoWorkAsync</code>, the second, <code class="language-plaintext highlighter-rouge">CanDoWorkAsync</code>, is a func that determines the <code class="language-plaintext highlighter-rouge">Enabled</code> state of the command and whether it can be executed.</p>

<p>The <code class="language-plaintext highlighter-rouge">CanDoWorkAsync</code> method relies on the <code class="language-plaintext highlighter-rouge">busy</code> flag, as shown in the following excerpt:</p>

<div class="language-csharp highlighter-rouge"><div class="highlight"><pre class="highlight"><code><span class="n">Task</span><span class="p">&lt;</span><span class="kt">bool</span><span class="p">&gt;</span> <span class="nf">CanDoWorkAsync</span><span class="p">(</span><span class="kt">object</span> <span class="n">arg</span><span class="p">)</span>
<span class="p">{</span>
	<span class="k">return</span> <span class="n">Task</span><span class="p">.</span><span class="nf">FromResult</span><span class="p">(!</span><span class="n">busy</span><span class="p">);</span>
<span class="p">}</span>
</code></pre></div></div>

<p>When the view-model’s <code class="language-plaintext highlighter-rouge">Busy</code> property is set to <code class="language-plaintext highlighter-rouge">true</code>, the <code class="language-plaintext highlighter-rouge">CanDoWorkAsync</code> method returns a <code class="language-plaintext highlighter-rouge">Task&lt;bool&gt;</code> equal to <code class="language-plaintext highlighter-rouge">false</code>, which sets the <code class="language-plaintext highlighter-rouge">Enabled</code> state of the command to <code class="language-plaintext highlighter-rouge">false</code>. There’s some magic that happens behind the scenes to make all this happen asynchronously. Please see the source of <a href="https://github.com/CodonFramework/Codon/blob/master/Source/Framework/Codon.Extras/UIModel/Input/Commands/AsyncActionCommand.cs">AsyncActionCommand</a> if you’re interested.</p>

<blockquote>
  <p><strong>Did you know?</strong> Codon commands also support parameter type coercion. Codon’s generic support means that if, for example, a command expects a <code class="language-plaintext highlighter-rouge">bool</code> parameter, then a parameter specified in XAML as <code class="language-plaintext highlighter-rouge">true</code> is automatically converted to a <code class="language-plaintext highlighter-rouge">bool</code>. This mechanism is also extensible; you can add your own type coercion capabilities by creating a custom <code class="language-plaintext highlighter-rouge">IImplicitTypeConverter</code> class which you then add to the IoC container, like so:</p>
</blockquote>

<div class="language-csharp highlighter-rouge"><div class="highlight"><pre class="highlight"><code><span class="n">Dependency</span><span class="p">.</span><span class="n">Register</span><span class="p">&lt;</span><span class="n">IImplicitTypeConverter</span><span class="p">,</span> <span class="n">MyImplicitTypeConverter</span><span class="p">&gt;();</span>
</code></pre></div></div>

<p>Let’s return to the command’s <code class="language-plaintext highlighter-rouge">DoWorkAsync</code> method.</p>

<p>The <code class="language-plaintext highlighter-rouge">DoWorkAsync</code> method is called when the <code class="language-plaintext highlighter-rouge">DoWorkCommand</code> is executed. See Lising 2. This method is marked async, which means we can <em>await</em> other async methods within its body.</p>

<p>It begins by setting a <em>Busy</em> flag to true. It then signals to the <code class="language-plaintext highlighter-rouge">doWorkCommand</code> that it should re-evaluate its <code class="language-plaintext highlighter-rouge">Enabled</code> property. Because <code class="language-plaintext highlighter-rouge">busy</code> is true at that point, the command’s <code class="language-plaintext highlighter-rouge">Enabled</code> property is set to false.</p>

<blockquote>
  <p><strong>NOTE:</strong> In contrast to traditional synchronous <code class="language-plaintext highlighter-rouge">ICommand</code> implementations, <code class="language-plaintext highlighter-rouge">RaiseCanExecuteChanged</code> may occur asynchronously, and so the <code class="language-plaintext highlighter-rouge">Enabled</code> state may not have necessarily changed after the call to its <code class="language-plaintext highlighter-rouge">RaiseCanExecuteChanged</code> method. To wait for the command to update its <code class="language-plaintext highlighter-rouge">Enabled</code> property, <em>await</em> its <code class="language-plaintext highlighter-rouge">RefreshAsync</code> method.</p>
</blockquote>

<p>You’ll notice that there is a <code class="language-plaintext highlighter-rouge">if (raiseException)</code> block within the method. We explore its purpose in a moment.</p>

<p>We use a <code class="language-plaintext highlighter-rouge">Task.Delay</code> call to prevent the method from completing for a few seconds, after which we use Codon’s <code class="language-plaintext highlighter-rouge">IDialogService</code> to display an <em>Activity Complete</em> message to the user.</p>

<p>The <em>finally</em> block sets the <code class="language-plaintext highlighter-rouge">Busy</code> flag to <code class="language-plaintext highlighter-rouge">false</code> and once again calls the command’s <code class="language-plaintext highlighter-rouge">RaiseCanExecuteChanged</code> method, which updates the command’s <code class="language-plaintext highlighter-rouge">Enabled</code> property to <code class="language-plaintext highlighter-rouge">true</code>.</p>

<p><strong>Listing 2.</strong> DoWorkAsync Method</p>
<div class="language-csharp highlighter-rouge"><div class="highlight"><pre class="highlight"><code><span class="k">async</span> <span class="n">Task</span> <span class="nf">DoWorkAsync</span><span class="p">(</span><span class="kt">object</span> <span class="n">arg</span><span class="p">)</span>
<span class="p">{</span>
	<span class="k">try</span>
	<span class="p">{</span>
		<span class="n">Busy</span> <span class="p">=</span> <span class="k">true</span><span class="p">;</span>
		<span class="n">doWorkCommand</span><span class="p">.</span><span class="nf">RaiseCanExecuteChanged</span><span class="p">();</span>

		<span class="k">if</span> <span class="p">(</span><span class="n">raiseException</span><span class="p">)</span>
		<span class="p">{</span>
			<span class="k">throw</span> <span class="k">new</span> <span class="nf">Exception</span><span class="p">(</span>
				<span class="s">"This exception is handled by the ShouldRethrowException method."</span><span class="p">);</span>
		<span class="p">}</span>

		<span class="cm">/* Wait for a few seconds before completion. */</span>
		<span class="k">await</span> <span class="n">Task</span><span class="p">.</span><span class="nf">Delay</span><span class="p">(</span><span class="m">5000</span><span class="p">);</span>

		<span class="k">await</span> <span class="n">Dependency</span><span class="p">.</span><span class="n">Resolve</span><span class="p">&lt;</span><span class="n">IDialogService</span><span class="p">&gt;().</span><span class="nf">ShowMessageAsync</span><span class="p">(</span>
			<span class="s">"The command has finished processing asynchronously."</span><span class="p">,</span> <span class="s">"Activity Complete"</span><span class="p">);</span>
	<span class="p">}</span>
	<span class="k">finally</span>
	<span class="p">{</span>
		<span class="n">Busy</span> <span class="p">=</span> <span class="k">false</span><span class="p">;</span>
		<span class="n">doWorkCommand</span><span class="p">.</span><span class="nf">RaiseCanExecuteChanged</span><span class="p">();</span>
	<span class="p">}</span>
<span class="p">}</span>
</code></pre></div></div>

<p>So, what’s with the <code class="language-plaintext highlighter-rouge">if (raiseException)</code> block? The view-model contains a <code class="language-plaintext highlighter-rouge">RaiseException</code> property that when set to <code class="language-plaintext highlighter-rouge">true</code> causes an exception to be thrown when the command executes. The purpose of this is to demonstrate the commanding infrastructure’s global exception handling.</p>

<p>Exceptions thrown from a non-UI thread are notoriously difficult to handle properly. Especially if your code is running on different platforms. Codon attempts to alleviate that fact by providing a exception handling extensibility point. This is true for the commanding infrastructure, the decoupled messaging system, and the application settings system.</p>

<p>For example, to be notified of, and have the opportunity to handle, exception that are thrown during command execution, we can register a custom <code class="language-plaintext highlighter-rouge">IExceptionHandler</code> with the IoC container. We can do this globally, using a service that is separate from any particular view-model (an approach I favor), or we can take the easy road and implement <code class="language-plaintext highlighter-rouge">IExceptionHandler</code> in a view-model and register that view-model with the IoC container, as I did in this example. See Listing 3.</p>

<p><strong>Listing 3.</strong> Registering an IExceptionHandler</p>
<div class="language-csharp highlighter-rouge"><div class="highlight"><pre class="highlight"><code><span class="k">public</span> <span class="k">class</span> <span class="nc">MainViewModel</span> <span class="p">:</span> <span class="n">ViewModelBase</span><span class="p">,</span> <span class="n">IExceptionHandler</span>
<span class="p">{</span>
	<span class="k">public</span> <span class="nf">MainViewModel</span><span class="p">()</span>
	<span class="p">{</span>
		<span class="cm">/* If an exception occurs during the execution of a command,
			* the ShouldRethrowException method is called. */</span>
		<span class="n">Dependency</span><span class="p">.</span><span class="n">Register</span><span class="p">&lt;</span><span class="n">IExceptionHandler</span><span class="p">&gt;(</span><span class="k">this</span><span class="p">);</span>
	<span class="p">}</span>
<span class="p">}</span>
</code></pre></div></div>

<p>When an exception is thrown during the <em>executeAsync</em> or the <em>canExecuteAsync</em> funcs, then the <code class="language-plaintext highlighter-rouge">IExceptionHandler</code> implementation has the opportunity to handle (disregard/log etc.) the exception. See Listing 4.</p>

<p>The <code class="language-plaintext highlighter-rouge">MainViewModel</code>’s <code class="language-plaintext highlighter-rouge">ShouldRethrowException</code> method displays the exception in a dialog using the <code class="language-plaintext highlighter-rouge">IDialogService</code>. It could just as easily log the exception using Codon’s <code class="language-plaintext highlighter-rouge">ILog</code> and evaluate some rules to determine if the exception should be rethrown or not; as indicated by the return value. If the method returns <code class="language-plaintext highlighter-rouge">true</code>, the commanding infrastructure re-throws the exception.</p>

<p>Now, if you’re as old as I am, you may be thinking: Oh, this reminds me of that awfully complicated Exception Handling Application Block of the Enterprise Library from Patterns and Practices. And yes, it is a little bit like that. But, its real purpose, rather than being a way of applying policies to application errors, is to give your app the opportunity to handle exceptions raised by first or third-party components that might occur on a different thread and crash your app. When using Xamarin Android, for example, there isn’t a way to globally handle exceptions.</p>

<p><strong>Listing 4.</strong> MainViewModel ShouldRethrowException Method</p>
<div class="language-csharp highlighter-rouge"><div class="highlight"><pre class="highlight"><code><span class="kt">bool</span> <span class="n">IExceptionHandler</span><span class="p">.</span><span class="nf">ShouldRethrowException</span><span class="p">(</span><span class="n">Exception</span> <span class="n">exception</span><span class="p">,</span> <span class="kt">object</span> <span class="n">owner</span><span class="p">,</span> 
	<span class="p">[</span><span class="n">CallerMemberName</span><span class="p">]</span><span class="kt">string</span> <span class="n">memberName</span> <span class="p">=</span> <span class="k">null</span><span class="p">,</span> 
	<span class="p">[</span><span class="n">CallerFilePath</span><span class="p">]</span><span class="kt">string</span> <span class="n">filePath</span> <span class="p">=</span> <span class="k">null</span><span class="p">,</span>
	<span class="p">[</span><span class="n">CallerLineNumber</span><span class="p">]</span><span class="kt">int</span> <span class="n">lineNumber</span> <span class="p">=</span> <span class="m">0</span><span class="p">)</span>
<span class="p">{</span>
	<span class="n">Dependency</span><span class="p">.</span><span class="n">Resolve</span><span class="p">&lt;</span><span class="n">IDialogService</span><span class="p">&gt;().</span><span class="nf">ShowMessageAsync</span><span class="p">(</span>
		<span class="s">"Exception thrown: "</span> <span class="p">+</span> <span class="n">exception</span><span class="p">.</span><span class="n">Message</span><span class="p">);</span>
			
	<span class="k">return</span> <span class="k">false</span><span class="p">;</span>
<span class="p">}</span>
</code></pre></div></div>

<p>Let’s now explore how the view-model is wired-up to the view. The <code class="language-plaintext highlighter-rouge">MainPage</code> class of the app sports a <code class="language-plaintext highlighter-rouge">ViewModel</code> property of type <code class="language-plaintext highlighter-rouge">MainViewModel</code>. See Listing 5.</p>

<p>We expose the <code class="language-plaintext highlighter-rouge">MainViewModel</code> as a property to allow the use of <code class="language-plaintext highlighter-rouge">x:Bind</code> binding expressions in XAML. The page’s <code class="language-plaintext highlighter-rouge">DataContext</code> property is also set to the <code class="language-plaintext highlighter-rouge">MainViewModel</code> for good measure. I find it useful to do this for cases where I need the flexibility of old style Binding expressions.</p>

<p><strong>Listing 5.</strong> MainPage.xaml.cs</p>
<div class="language-csharp highlighter-rouge"><div class="highlight"><pre class="highlight"><code><span class="k">public</span> <span class="k">sealed</span> <span class="k">partial</span> <span class="k">class</span> <span class="nc">MainPage</span> <span class="p">:</span> <span class="n">Page</span>
<span class="p">{</span>
	<span class="k">public</span> <span class="nf">MainPage</span><span class="p">()</span>
	<span class="p">{</span>
		<span class="k">this</span><span class="p">.</span><span class="nf">InitializeComponent</span><span class="p">();</span>

		<span class="n">DataContext</span> <span class="p">=</span> <span class="n">Dependency</span><span class="p">.</span><span class="n">Resolve</span><span class="p">&lt;</span><span class="n">MainViewModel</span><span class="p">&gt;();</span>
	<span class="p">}</span>

	<span class="k">public</span> <span class="n">MainViewModel</span> <span class="n">ViewModel</span> <span class="p">=&gt;</span> <span class="p">(</span><span class="n">MainViewModel</span><span class="p">)</span><span class="n">DataContext</span><span class="p">;</span>
<span class="p">}</span>
</code></pre></div></div>

<p>The <em>MainPage.xaml</em> file is bound to the view-model’s <code class="language-plaintext highlighter-rouge">DoWorkCommand</code>. See Listing 6.</p>

<p>The <code class="language-plaintext highlighter-rouge">ProgressRing</code> and the <code class="language-plaintext highlighter-rouge">StackPanel</code> both share row 0 of the parent <code class="language-plaintext highlighter-rouge">Grid</code>. The <code class="language-plaintext highlighter-rouge">ProgressRing</code> sits on top of the other elements.</p>

<p><strong>Listing 6.</strong> MainPage.xaml Excerpt</p>
<div class="language-xml highlighter-rouge"><div class="highlight"><pre class="highlight"><code><span class="nt">&lt;Page</span> <span class="na">x:Class=</span><span class="s">"AsyncCommandsExample.MainPage"</span>
	<span class="err">...</span><span class="nt">&gt;</span>

	<span class="nt">&lt;Grid</span> <span class="na">Background=</span><span class="s">"{ThemeResource ApplicationPageBackgroundThemeBrush}"</span><span class="nt">&gt;</span>

		<span class="nt">&lt;StackPanel&gt;</span>
		
			<span class="nt">&lt;Button</span> <span class="na">Command=</span><span class="s">"{x:Bind ViewModel.DoWorkCommand}"</span> 
					<span class="na">Content=</span><span class="s">"Show Dialog with Timer"</span> <span class="nt">/&gt;</span>
					
			<span class="nt">&lt;ToggleSwitch</span> <span class="na">IsOn=</span><span class="s">"{x:Bind ViewModel.RaiseException, Mode=TwoWay}"</span>
				    <span class="na">Header=</span><span class="s">"Raise Exception during Command Execution"</span> <span class="nt">/&gt;</span>
				
		<span class="nt">&lt;/StackPanel&gt;</span>

		<span class="nt">&lt;ProgressRing</span> <span class="na">IsActive=</span><span class="s">"{x:Bind ViewModel.Busy, Mode=OneWay}"</span> <span class="nt">/&gt;</span>

	<span class="nt">&lt;/Grid&gt;</span>

<span class="nt">&lt;/Page&gt;</span>
</code></pre></div></div>

<p>A <code class="language-plaintext highlighter-rouge">ProgressRing</code> control is shown when the view-model’s <code class="language-plaintext highlighter-rouge">Busy</code> property is set to <code class="language-plaintext highlighter-rouge">true</code>, which occurs for 5 seconds when the button is clicked. See Figure 1.</p>

<figure><img src="/assets/images/2018-04-01_Progress.png" /><figcaption>Figure 1. View-model in busy state as command executing.</figcaption></figure>

<p>When the <code class="language-plaintext highlighter-rouge">DoWorkCommand</code> completes a dialog is presented and the busy state is restored to <code class="language-plaintext highlighter-rouge">false</code>. See Figure 2.</p>

<figure><img src="/assets/images/2018-04-01_Complete.png" /><figcaption>Figure 2. Command execution complete and busy state restored to false.</figcaption></figure>

<p>A <code class="language-plaintext highlighter-rouge">ToggleSwitch</code> is bound to the view-model’s <code class="language-plaintext highlighter-rouge">RaiseException</code> property. When <code class="language-plaintext highlighter-rouge">IsOn</code> is set to <code class="language-plaintext highlighter-rouge">true</code>,
and the button is clicked, an exception is raised in the <code class="language-plaintext highlighter-rouge">DoWorkAsync</code> method of the view-model. See Figure 3.</p>

<figure><img src="/assets/images/2018-04-01_Exception.png" /><figcaption>Figure 3. Exception raised during command execution.</figcaption></figure>

<h2 id="conclusion">Conclusion</h2>

<p>In this post you’ve seen how Codon comes with rich commanding infrastructure. As you’d expect there is a basic <code class="language-plaintext highlighter-rouge">ICommand</code> implementation: <code class="language-plaintext highlighter-rouge">ActionCommand</code>, that allows you to supply delegates that are called during command execution or when evaluating the command’s <code class="language-plaintext highlighter-rouge">Enabled</code> property. There is also a <code class="language-plaintext highlighter-rouge">UICommand</code> class that, in addition to the features of the <code class="language-plaintext highlighter-rouge">ActionCommand</code> class, provides text, icon, and visibility support. However, in Codon’s <em>Extras</em> package there exists a number asynchronous commands, which are analogous to those in the core library, and offer <em>async</em> support.  <code class="language-plaintext highlighter-rouge">AsyncActionCommand</code> brings in asynchronous method support, yet also implements the <code class="language-plaintext highlighter-rouge">ICommand</code> interface seamlessly, making it compatible with the built-in commanding infrastructure of UWP, WPF, Xamarin Forms, and Codon’s Xamarin Android binding system.</p>

<p>You saw how to create a view-model with an asynchronous command that kicks of a potentially long running operation. You also explored how to globally handle exceptions that occur during the execution of an asynchronous operation.</p>

<p><a href="https://github.com/CodonFramework/Samples">Download or View the Sample Code on GitHub</a></p>

<p>I hope you find this post useful. Have a great day!</p>]]></content><author><name></name></author><category term="Codon" /><summary type="html"><![CDATA[Introduction Have you ever created a view-model for your app that contains an ICommand that needs to perform some asynchronous activity? Such as calling a web API or saving data to a file? If you have, you’ll know that the synchronous ICommand interface doesn’t lend itself easily to asynchronous operations. You end up having to build a mini-state-machine to disable and re-enable the command target when the command completes. Wouldn’t it be nice if commands could function asynchronously? Well, in Codon, they can. Codon FX is a cross-platform framework for building maintainable applications. Codon comes with rich commanding infrastructure. As you’d expect there is a basic ICommand implementation: ActionCommand, that allows you to supply delegates that are called during command execution or when evaluating the command’s Enabled property. There is also a UICommand class that, in addition to the features of the ActionCommand class, provides text, icon, and visibility support. Now, you’d be forgiven for thinking that these ICommand implementations, residing in Codon’s core .NET Standard library, are all that Codon has to offer as far as commanding goes. But they’re not. In Codon’s Extras package there exists a number of other commands, which are analogous to those in the core library, but offer async support. AsyncActionCommand brings in asynchronous method support, yet also implements ICommand seamlessly, making it compatible with the built-in commanding infrastructure of UWP, WPF, Xamarin Forms, and Codon’s Xamarin Android binding system. In this post you look at using the AsyncActionCommand. You see how to create a view-model with an asynchronous command that kicks of a potentially long running operation. You also explore how to globally handle exceptions that occur during the execution of an asynchronous operation. Getting Started with Codon FX Codon is built on .NET Standard. It has platform specific packages to support its dialog service and a number of other services. But, if you don’t need the IDialogService implementation, page navigation, or any of the other platform specific features, then a NuGet reference to Codon or Codon.Extras.Core will suffice. The sample UWP app makes use of Codon’s IDialogService. For that reason, I’ve added a reference to the Codon.Extras.Uwp package. The MainViewModel class in the sample contains a single ICommand named DoWorkCommand. See Listing 1. DoWorkCommand is created with the following two parameters: An async execute method named DoWorkAsync, and an async can-execute method names CanDoWorkAsync. There isn’t a traditional getter or setter for the DoWorkCommand property. Instead I’ve used a C# 7.0 expression bodied getter to lazy-load the command. You don’t need to do it this way, I just happen to like the conciseness of this syntax. Listing 1. The Asynchronous DoWorkCommand public class MainViewModel : ViewModelBase, IExceptionHandler { ... AsyncActionCommand doWorkCommand; public ICommand DoWorkCommand =&gt; doWorkCommand ?? (doWorkCommand = new AsyncActionCommand( DoWorkAsync, CanDoWorkAsync)); ... } MainViewModel extends Codon’s ViewModelBase class. The Codon.UIModel.ViewModelBase class extends ObservableBase, which implements INotifyPropertyChanged (and INotifyPropertyChanging) via a PropertyChangeNotifier object. The MainViewModel contains a boolean Busy property, which, as we shall see, is used to display a busy progress ring on a page. The property is defined in the view-model as shown: bool busy; public bool Busy { get =&gt; busy; private set =&gt; Set(ref busy, value); } Before we look at the DoWorkCommands delegates, lets briefly examine Codon’s property setter infrastructure and at the way property change notification happens behind the scenes. Understanding Codon’s Property Setter API The ViewModelBase class’s Set method updates the field only if it has changed, and ensures that the update occurs on the UI thread so no cross-thread exceptions are thrown. The Set method returns one of the following AssignmentResult enum values: Success Cancelled AlreadyAssigned OwnerDisposed Success indicates that the field was not equal to the value being applied and that the field is now set to the specified value. Cancelled may be returned if a subscriber to the view-model’s INotifyPropertyChanging method, marks the PropertyChangingEventArgs as Cancelled, which prevents the field value from being updated. If AlreadyAssigned is returned, then the field is equal to the value being applied. Neither the PropertyChanging event nor the PropertyChanged event is raised in this case. ViewModelBase extends ObservableBase, which makes use of a PropertyChangeNotifier object. The PropertyChangeNotifier class allows you to aggregate the INPC (INotifyPropertyChanged) behavior, and alleviates the need to inherit from a base class implementing INotifyPropertyChanged. FUN FACT: You can use PropertyChangeNotifier to enable INPC on any class. If you’re interested in the inner workings of Codon’s INPC infrastructure please see the Codon.ComponentModel.ObservableBase class. Understanding Async Command Actions In this part of the post we look at the two method delegates passed to the AsyncActionCommand’s constructor. The first is a the command’s execution func DoWorkAsync, the second, CanDoWorkAsync, is a func that determines the Enabled state of the command and whether it can be executed. The CanDoWorkAsync method relies on the busy flag, as shown in the following excerpt: Task&lt;bool&gt; CanDoWorkAsync(object arg) { return Task.FromResult(!busy); } When the view-model’s Busy property is set to true, the CanDoWorkAsync method returns a Task&lt;bool&gt; equal to false, which sets the Enabled state of the command to false. There’s some magic that happens behind the scenes to make all this happen asynchronously. Please see the source of AsyncActionCommand if you’re interested. Did you know? Codon commands also support parameter type coercion. Codon’s generic support means that if, for example, a command expects a bool parameter, then a parameter specified in XAML as true is automatically converted to a bool. This mechanism is also extensible; you can add your own type coercion capabilities by creating a custom IImplicitTypeConverter class which you then add to the IoC container, like so: Dependency.Register&lt;IImplicitTypeConverter, MyImplicitTypeConverter&gt;(); Let’s return to the command’s DoWorkAsync method. The DoWorkAsync method is called when the DoWorkCommand is executed. See Lising 2. This method is marked async, which means we can await other async methods within its body. It begins by setting a Busy flag to true. It then signals to the doWorkCommand that it should re-evaluate its Enabled property. Because busy is true at that point, the command’s Enabled property is set to false. NOTE: In contrast to traditional synchronous ICommand implementations, RaiseCanExecuteChanged may occur asynchronously, and so the Enabled state may not have necessarily changed after the call to its RaiseCanExecuteChanged method. To wait for the command to update its Enabled property, await its RefreshAsync method. You’ll notice that there is a if (raiseException) block within the method. We explore its purpose in a moment. We use a Task.Delay call to prevent the method from completing for a few seconds, after which we use Codon’s IDialogService to display an Activity Complete message to the user. The finally block sets the Busy flag to false and once again calls the command’s RaiseCanExecuteChanged method, which updates the command’s Enabled property to true. Listing 2. DoWorkAsync Method async Task DoWorkAsync(object arg) { try { Busy = true; doWorkCommand.RaiseCanExecuteChanged(); if (raiseException) { throw new Exception( "This exception is handled by the ShouldRethrowException method."); } /* Wait for a few seconds before completion. */ await Task.Delay(5000); await Dependency.Resolve&lt;IDialogService&gt;().ShowMessageAsync( "The command has finished processing asynchronously.", "Activity Complete"); } finally { Busy = false; doWorkCommand.RaiseCanExecuteChanged(); } } So, what’s with the if (raiseException) block? The view-model contains a RaiseException property that when set to true causes an exception to be thrown when the command executes. The purpose of this is to demonstrate the commanding infrastructure’s global exception handling. Exceptions thrown from a non-UI thread are notoriously difficult to handle properly. Especially if your code is running on different platforms. Codon attempts to alleviate that fact by providing a exception handling extensibility point. This is true for the commanding infrastructure, the decoupled messaging system, and the application settings system. For example, to be notified of, and have the opportunity to handle, exception that are thrown during command execution, we can register a custom IExceptionHandler with the IoC container. We can do this globally, using a service that is separate from any particular view-model (an approach I favor), or we can take the easy road and implement IExceptionHandler in a view-model and register that view-model with the IoC container, as I did in this example. See Listing 3. Listing 3. Registering an IExceptionHandler public class MainViewModel : ViewModelBase, IExceptionHandler { public MainViewModel() { /* If an exception occurs during the execution of a command, * the ShouldRethrowException method is called. */ Dependency.Register&lt;IExceptionHandler&gt;(this); } } When an exception is thrown during the executeAsync or the canExecuteAsync funcs, then the IExceptionHandler implementation has the opportunity to handle (disregard/log etc.) the exception. See Listing 4. The MainViewModel’s ShouldRethrowException method displays the exception in a dialog using the IDialogService. It could just as easily log the exception using Codon’s ILog and evaluate some rules to determine if the exception should be rethrown or not; as indicated by the return value. If the method returns true, the commanding infrastructure re-throws the exception. Now, if you’re as old as I am, you may be thinking: Oh, this reminds me of that awfully complicated Exception Handling Application Block of the Enterprise Library from Patterns and Practices. And yes, it is a little bit like that. But, its real purpose, rather than being a way of applying policies to application errors, is to give your app the opportunity to handle exceptions raised by first or third-party components that might occur on a different thread and crash your app. When using Xamarin Android, for example, there isn’t a way to globally handle exceptions. Listing 4. MainViewModel ShouldRethrowException Method bool IExceptionHandler.ShouldRethrowException(Exception exception, object owner, [CallerMemberName]string memberName = null, [CallerFilePath]string filePath = null, [CallerLineNumber]int lineNumber = 0) { Dependency.Resolve&lt;IDialogService&gt;().ShowMessageAsync( "Exception thrown: " + exception.Message); return false; } Let’s now explore how the view-model is wired-up to the view. The MainPage class of the app sports a ViewModel property of type MainViewModel. See Listing 5. We expose the MainViewModel as a property to allow the use of x:Bind binding expressions in XAML. The page’s DataContext property is also set to the MainViewModel for good measure. I find it useful to do this for cases where I need the flexibility of old style Binding expressions. Listing 5. MainPage.xaml.cs public sealed partial class MainPage : Page { public MainPage() { this.InitializeComponent(); DataContext = Dependency.Resolve&lt;MainViewModel&gt;(); } public MainViewModel ViewModel =&gt; (MainViewModel)DataContext; } The MainPage.xaml file is bound to the view-model’s DoWorkCommand. See Listing 6. The ProgressRing and the StackPanel both share row 0 of the parent Grid. The ProgressRing sits on top of the other elements. Listing 6. MainPage.xaml Excerpt &lt;Page x:Class="AsyncCommandsExample.MainPage" ...&gt; &lt;Grid Background="{ThemeResource ApplicationPageBackgroundThemeBrush}"&gt; &lt;StackPanel&gt; &lt;Button Command="{x:Bind ViewModel.DoWorkCommand}" Content="Show Dialog with Timer" /&gt; &lt;ToggleSwitch IsOn="{x:Bind ViewModel.RaiseException, Mode=TwoWay}" Header="Raise Exception during Command Execution" /&gt; &lt;/StackPanel&gt; &lt;ProgressRing IsActive="{x:Bind ViewModel.Busy, Mode=OneWay}" /&gt; &lt;/Grid&gt; &lt;/Page&gt; A ProgressRing control is shown when the view-model’s Busy property is set to true, which occurs for 5 seconds when the button is clicked. See Figure 1. Figure 1. View-model in busy state as command executing. When the DoWorkCommand completes a dialog is presented and the busy state is restored to false. See Figure 2. Figure 2. Command execution complete and busy state restored to false. A ToggleSwitch is bound to the view-model’s RaiseException property. When IsOn is set to true, and the button is clicked, an exception is raised in the DoWorkAsync method of the view-model. See Figure 3. Figure 3. Exception raised during command execution. Conclusion In this post you’ve seen how Codon comes with rich commanding infrastructure. As you’d expect there is a basic ICommand implementation: ActionCommand, that allows you to supply delegates that are called during command execution or when evaluating the command’s Enabled property. There is also a UICommand class that, in addition to the features of the ActionCommand class, provides text, icon, and visibility support. However, in Codon’s Extras package there exists a number asynchronous commands, which are analogous to those in the core library, and offer async support. AsyncActionCommand brings in asynchronous method support, yet also implements the ICommand interface seamlessly, making it compatible with the built-in commanding infrastructure of UWP, WPF, Xamarin Forms, and Codon’s Xamarin Android binding system. You saw how to create a view-model with an asynchronous command that kicks of a potentially long running operation. You also explored how to globally handle exceptions that occur during the execution of an asynchronous operation. Download or View the Sample Code on GitHub I hope you find this post useful. Have a great day!]]></summary></entry><entry><title type="html">Combining the UWP Community Toolkit with Codon FX</title><link href="http://danielvaughan.org/posts/codon/2018/03/26/Using-the-UWP-Community-Toolkit-with-CodonFX/" rel="alternate" type="text/html" title="Combining the UWP Community Toolkit with Codon FX" /><published>2018-03-26T00:00:00+00:00</published><updated>2018-03-26T00:00:00+00:00</updated><id>http://danielvaughan.org/posts/codon/2018/03/26/Using-the-UWP-Community-Toolkit-with-CodonFX</id><content type="html" xml:base="http://danielvaughan.org/posts/codon/2018/03/26/Using-the-UWP-Community-Toolkit-with-CodonFX/"><![CDATA[<ul>
  <li><a href="#introduction">Introduction</a></li>
  <li><a href="#creating-a-custom-dialog-service">Creating a Custom Dialog Service</a></li>
  <li><a href="#leveraging-the-uwp-community-toolkit">Leveraging the UWP Community Toolkit</a></li>
  <li><a href="#conclusion">Conclusion</a></li>
</ul>

<h2 id="introduction">Introduction</h2>

<p><a href="http://www.codonfx.com">Codon FX</a> is a cross-platform framework for building maintainable applications. I use it for all of my .NET based applications.</p>

<p>Codon is built on .NET Standard and uses platform specific assemblies to support various platforms including UWP. Codon has no references to third-party libraries, keeping it light-weight and free from version conflicts. There is, however, nothing preventing you from enriching Codon with your own custom services tailored for a particular platform.</p>

<p>There are various services that can be easily swapped out using Codon’s IoC infrastructure. One such service is Codon’s dialog service (<code class="language-plaintext highlighter-rouge">Codon.Services.IDialogService</code>), which is used to display various dialogs to the user, or to ask the user a question, or to display toast notifications. Currently, there’s an implementation of <code class="language-plaintext highlighter-rouge">IDialogService</code> for UWP, WPF, and Xamarin Android/iOS/Forms.</p>

<p>There are several Codon services that I find indispensable when building apps. <code class="language-plaintext highlighter-rouge">IDialogService</code> is one of these. Being able to quickly ask the user a question or display a message is such a common use case. I couldn’t bear not having a cross-platform dialog service at my fingertips; having to rely on building a platform specific dialog for each interaction would slow down development considerably.</p>

<p>The UWP implementation of the <code class="language-plaintext highlighter-rouge">IDialogService</code>, however, relies on the UWP toast API, which places toast notifications adjacent to the Windows Status bar. This isn’t optimal considering that the notification is not front and center while your app is in the foreground, and displaying toasts down in the status area while your app is in the foreground is generally frowned upon.</p>

<p>We can improve the way toasts are displayed for UWP apps by creating a custom <code class="language-plaintext highlighter-rouge">IDialogService</code>, inheriting from the UWP <code class="language-plaintext highlighter-rouge">DialogService</code>, and overriding its toast related methods. In this article you see how to achieve that, along with leveraging the <a href="https://github.com/Microsoft/UWPCommunityToolkit">UWP Community Toolkit</a>’s <code class="language-plaintext highlighter-rouge">InAppNotification</code> API to display in-app notifications.</p>

<p>All of Codon’s services and many of its other components are designed to be replaceable. If you don’t like the way something works, or you want to provide enhancements to a component, there’s nothing stopping you from swapping it out with your own implementation. For example, want to change how logging is performed? Substitute in your own <code class="language-plaintext highlighter-rouge">ILog</code> implementation. All of Codon’s logging will utilize your <code class="language-plaintext highlighter-rouge">ILog</code> implementation.</p>

<h2 id="creating-a-custom-dialog-service">Creating a Custom Dialog Service</h2>

<p>To create a custom UWP <code class="language-plaintext highlighter-rouge">IDialogService</code> implementation, begin by using the NuGet package manager to reference the package <em>Codon.Uwp</em>. This package brings in Codon’s .NET Standard core library and a UWP platform specific library.
While you’re at it, use the NuGet package manager to reference the UWP Community Toolkit package named <em>Microsoft.Toolkit.Uwp.UI.Controls</em>.</p>

<p>Once you’ve referenced Codon, you can take the default <code class="language-plaintext highlighter-rouge">IDialogService</code> implementation for a spin by using the following:</p>

<div class="language-csharp highlighter-rouge"><div class="highlight"><pre class="highlight"><code><span class="kt">bool</span> <span class="n">userHitOkay</span> <span class="p">=</span> <span class="k">await</span> <span class="n">Dependency</span><span class="p">.</span><span class="n">Resolve</span><span class="p">&lt;</span><span class="n">IDialogService</span><span class="p">&gt;()</span>
                    <span class="p">.</span><span class="nf">AskOkayCancelQuestionAsync</span><span class="p">(</span><span class="s">"Would you like to continue?"</span><span class="p">);</span>
</code></pre></div></div>
<p>Here we resolve the <code class="language-plaintext highlighter-rouge">IDialogService</code> from the IoC container using the static <code class="language-plaintext highlighter-rouge">Dependency.Resolve</code> method.
The <code class="language-plaintext highlighter-rouge">IDialogService</code> implementation has an awaitable <code class="language-plaintext highlighter-rouge">AskOkayCancelQuestion</code> method that returns <code class="language-plaintext highlighter-rouge">true</code>
if the user clicks/taps okay; <code class="language-plaintext highlighter-rouge">false</code> otherwise. There are a bunch of other useful methods that I use a lot 
when I’m building apps. The most frequently used is the good ol’ <code class="language-plaintext highlighter-rouge">ShowMessageAsync</code> method. Though, I especially like the <code class="language-plaintext highlighter-rouge">AskQuestionAsync</code> method, that lets you pass in a question object. For example, here’s one I use in <a href="http://SurfyBrowser.com">Surfy Browser</a> for Windows Mobile and Android:</p>

<div class="language-csharp highlighter-rouge"><div class="highlight"><pre class="highlight"><code><span class="kt">var</span> <span class="n">question</span> <span class="p">=</span> <span class="k">new</span> <span class="nf">TextQuestion</span><span class="p">(</span><span class="kt">string</span><span class="p">.</span><span class="n">Empty</span><span class="p">)</span>
	<span class="p">{</span>
		<span class="n">DefaultResponse</span> <span class="p">=</span> <span class="kt">string</span><span class="p">.</span><span class="n">Empty</span><span class="p">,</span>
		<span class="n">Caption</span> <span class="p">=</span> <span class="n">AppResources</span><span class="p">.</span><span class="n">AppBar_MenuItem_FindOnPage</span><span class="p">,</span>
		<span class="n">InputScope</span> <span class="p">=</span> <span class="n">InputScopeNameValue</span><span class="p">.</span><span class="n">Text</span>
	<span class="p">};</span>

<span class="kt">var</span> <span class="n">questionResponse</span> <span class="p">=</span> <span class="k">await</span> <span class="n">DialogService</span><span class="p">.</span><span class="nf">AskQuestionAsync</span><span class="p">(</span><span class="n">question</span><span class="p">);</span>
</code></pre></div></div>

<p>Here I create a <code class="language-plaintext highlighter-rouge">TextQuestion</code> object that defines a caption to display on a dialog (“Find on Page”), a default value to place in the text box, and even an input scope value, which determines the soft input panel keyboard. Figure 1. shows the dialog displayed within Surfy Browser on Android.</p>

<figure><img src="/assets/images/2018-03-25_FindOnPage.png" /><figcaption>Figure 1. Using the IDialogService to ask the user a text response question.</figcaption></figure>

<h2 id="leveraging-the-uwp-community-toolkit">Leveraging the UWP Community Toolkit</h2>

<p>Let’s turn our attention back at the task at hand: changing the toast notification behavior of the <code class="language-plaintext highlighter-rouge">IDialogService</code> implementation.</p>

<p>The UWP Community Toolkit contains an in-app notification component. You use it by placing an instance of <code class="language-plaintext highlighter-rouge">Windows.UI.Xaml.Controls.ContentControl.InAppNotification</code> on your page or control, as shown in Listing 1.</p>

<p><strong>Listing 1.</strong> Using the InAppNotification on a Page</p>
<div class="language-xml highlighter-rouge"><div class="highlight"><pre class="highlight"><code><span class="nt">&lt;Page</span>
	<span class="na">x:Class=</span><span class="s">"Outcoder.Foo.MainPage"</span>
	<span class="na">xmlns=</span><span class="s">"http://schemas.microsoft.com/winfx/2006/xaml/presentation"</span>
	<span class="na">xmlns:x=</span><span class="s">"http://schemas.microsoft.com/winfx/2006/xaml"</span>
	<span class="na">xmlns:d=</span><span class="s">"http://schemas.microsoft.com/expression/blend/2008"</span>
	<span class="na">xmlns:mc=</span><span class="s">"http://schemas.openxmlformats.org/markup-compatibility/2006"</span>
	<span class="na">xmlns:controls=</span><span class="s">"using:Microsoft.Toolkit.Uwp.UI.Controls"</span>
	<span class="na">mc:Ignorable=</span><span class="s">"d"</span><span class="nt">&gt;</span>
	...
<span class="nt">&lt;controls:InAppNotification</span> <span class="na">x:Name=</span><span class="s">"InAppNotification"</span> <span class="nt">/&gt;</span>
...
<span class="nt">&lt;/Page&gt;</span>
</code></pre></div></div>

<p>While I’m not so keen on the approach that <code class="language-plaintext highlighter-rouge">InAppNotification</code> takes, in that I’d prefer to see the control live independently from the page, placed dynamically in the visual tree, for this example I’m going to live with it.</p>

<p>With the <code class="language-plaintext highlighter-rouge">InAppNotification</code> element on the page you can then call the <code class="language-plaintext highlighter-rouge">InAppNotification</code>’s <code class="language-plaintext highlighter-rouge">Show</code> method; passing in the text to display and the duration before it is hidden again.</p>

<p>What we are going to do is pass the <code class="language-plaintext highlighter-rouge">InAppNotification</code> object to a custom <code class="language-plaintext highlighter-rouge">IDialogService</code>.</p>

<p>The next step is to subclass Codon’s UWP <code class="language-plaintext highlighter-rouge">DialogService</code>. See Listing 2.</p>

<p>We override the <code class="language-plaintext highlighter-rouge">ShowToastAsync</code> method of the base <code class="language-plaintext highlighter-rouge">DialogService</code> class. Our new <code class="language-plaintext highlighter-rouge">CustomDialogService</code> depends on an instance of the <code class="language-plaintext highlighter-rouge">InAppNotification</code> class. Without it, it can’t display notifications and the <code class="language-plaintext highlighter-rouge">CustomDialogService</code> falls back to the default behavior.</p>

<p><strong>Listing 2.</strong> CustomDialogService Class</p>
<div class="language-csharp highlighter-rouge"><div class="highlight"><pre class="highlight"><code><span class="k">public</span> <span class="k">class</span> <span class="nc">CustomDialogService</span> <span class="p">:</span> <span class="n">DialogService</span>
<span class="p">{</span>
	<span class="k">public</span> <span class="n">InAppNotification</span> <span class="n">InAppNotification</span> <span class="p">{</span> <span class="k">get</span><span class="p">;</span> <span class="k">set</span><span class="p">;</span> <span class="p">}</span>
	<span class="k">public</span> <span class="kt">uint</span> <span class="n">ToastHideMS</span> <span class="p">{</span> <span class="k">get</span><span class="p">;</span> <span class="k">set</span><span class="p">;</span> <span class="p">}</span> <span class="p">=</span> <span class="m">3000</span><span class="p">;</span>

	<span class="k">public</span> <span class="k">override</span> <span class="n">Task</span><span class="p">&lt;</span><span class="kt">object</span><span class="p">&gt;</span> <span class="nf">ShowToastAsync</span><span class="p">(</span><span class="n">ToastParameters</span> <span class="n">toastParameters</span><span class="p">)</span>
	<span class="p">{</span>
		<span class="k">if</span> <span class="p">(</span><span class="n">InAppNotification</span> <span class="p">!=</span> <span class="k">null</span><span class="p">)</span>
		<span class="p">{</span>
			<span class="kt">int</span> <span class="n">hiddenMS</span> <span class="p">=</span> <span class="m">0</span><span class="p">;</span>
			<span class="k">if</span> <span class="p">(</span><span class="n">toastParameters</span><span class="p">.</span><span class="n">MillisecondsUntilHidden</span><span class="p">.</span><span class="n">HasValue</span><span class="p">)</span>
			<span class="p">{</span>
				<span class="n">hiddenMS</span> <span class="p">=</span> <span class="n">toastParameters</span><span class="p">.</span><span class="n">MillisecondsUntilHidden</span><span class="p">.</span><span class="n">Value</span><span class="p">;</span>
			<span class="p">}</span>

			<span class="n">InAppNotification</span><span class="p">.</span><span class="nf">Show</span><span class="p">(</span><span class="n">toastParameters</span><span class="p">.</span><span class="n">Caption</span><span class="p">?.</span><span class="nf">ToString</span><span class="p">(),</span> 
				<span class="n">hiddenMS</span> <span class="p">&gt;</span> <span class="m">0</span> <span class="p">?</span> <span class="n">hiddenMS</span> <span class="p">:</span> <span class="p">(</span><span class="kt">int</span><span class="p">)</span><span class="n">ToastHideMS</span><span class="p">);</span>

			<span class="k">return</span> <span class="n">Task</span><span class="p">.</span><span class="nf">FromResult</span><span class="p">(</span><span class="k">new</span> <span class="kt">object</span><span class="p">());</span>
		<span class="p">}</span>

		<span class="k">return</span> <span class="k">base</span><span class="p">.</span><span class="nf">ShowToastAsync</span><span class="p">(</span><span class="n">toastParameters</span><span class="p">);</span>
	<span class="p">}</span>
<span class="p">}</span>
</code></pre></div></div>

<p>The <code class="language-plaintext highlighter-rouge">CustomDialogService</code> <code class="language-plaintext highlighter-rouge">InAppNotification</code> property is populated in the <code class="language-plaintext highlighter-rouge">MainPage</code>’s code-beside file. See Listing 3.</p>

<p><strong>Listing 3.</strong> MainPage Excerpt</p>
<div class="language-csharp highlighter-rouge"><div class="highlight"><pre class="highlight"><code><span class="k">public</span> <span class="k">sealed</span> <span class="k">partial</span> <span class="k">class</span> <span class="nc">MainPage</span> <span class="p">:</span> <span class="n">Page</span>
<span class="p">{</span>
    <span class="k">public</span> <span class="nf">MainPage</span><span class="p">()</span>
    <span class="p">{</span>
        <span class="k">this</span><span class="p">.</span><span class="nf">InitializeComponent</span><span class="p">();</span>

        <span class="n">DataContext</span> <span class="p">=</span> <span class="n">ViewModel</span> <span class="p">=</span> <span class="n">Dependency</span><span class="p">.</span><span class="n">Resolve</span><span class="p">&lt;</span><span class="n">MainViewModel</span><span class="p">,</span> <span class="n">MainViewModel</span><span class="p">&gt;(</span><span class="k">true</span><span class="p">);</span>

        <span class="n">Loaded</span> <span class="p">+=</span> <span class="n">HandleLoaded</span><span class="p">;</span>

        <span class="kt">var</span> <span class="n">dialogService</span> <span class="p">=</span> <span class="p">(</span><span class="n">CustomDialogService</span><span class="p">)</span><span class="n">Dependency</span><span class="p">.</span><span class="n">Resolve</span><span class="p">&lt;</span><span class="n">IDialogService</span><span class="p">&gt;();</span>
        <span class="n">dialogService</span><span class="p">.</span><span class="n">InAppNotification</span> <span class="p">=</span> <span class="n">InAppNotification</span><span class="p">;</span>
    <span class="p">}</span>
    <span class="p">...</span>
<span class="p">}</span>
</code></pre></div></div>

<blockquote>
  <p><strong>NOTE:</strong> If you’re concerned about testability because we are tying the <code class="language-plaintext highlighter-rouge">InAppNotification</code> component to the <code class="language-plaintext highlighter-rouge">IDialogService</code> implementation, set your mind at ease. There exists a <code class="language-plaintext highlighter-rouge">Codon.DialogModel.MockDialogService</code> class within the Codon’s core library, specifically designed for testing purposes. You can register it with the IoC container, instead of your <code class="language-plaintext highlighter-rouge">CustomDialogService</code> when your unit-test project is launching, as demonstrated:</p>
</blockquote>

<div class="language-csharp highlighter-rouge"><div class="highlight"><pre class="highlight"><code><span class="n">Dependency</span><span class="p">.</span><span class="n">Register</span><span class="p">&lt;</span><span class="n">IDialogService</span><span class="p">&gt;(</span><span class="k">new</span> <span class="nf">MockDialogService</span><span class="p">());</span>
</code></pre></div></div>

<p>Likewise, to register your <code class="language-plaintext highlighter-rouge">CustomDialogService</code> for non-unit-testing configurations, place the following somewhere in your app’s startup code:</p>

<div class="language-csharp highlighter-rouge"><div class="highlight"><pre class="highlight"><code><span class="n">Dependency</span><span class="p">.</span><span class="n">Register</span><span class="p">&lt;</span><span class="n">IDialogService</span><span class="p">&gt;(</span><span class="k">new</span> <span class="nf">CustomDialogService</span><span class="p">());</span>
</code></pre></div></div>

<p>Passing an instance of the <code class="language-plaintext highlighter-rouge">CustomDialogService</code> class to the <code class="language-plaintext highlighter-rouge">Register</code> method causes a singleton mapping to be created; that instance will be returned from all requests to <code class="language-plaintext highlighter-rouge">Resolve&lt;IDialogService&gt;</code>.</p>

<blockquote>
  <p><strong>NOTE:</strong> If you have multiple pages or views, you’ll need to assign the <code class="language-plaintext highlighter-rouge">InAppNotification</code> object to the <code class="language-plaintext highlighter-rouge">CustomDialogService</code> when the view becomes visible. I’m not happy with that approach. As I mentioned above, I’d like to see the <code class="language-plaintext highlighter-rouge">InAppNotification</code> component placed dynamically in the visual tree so it is not dependent on being explicitly defined for each page or control.</p>
</blockquote>

<h2 id="conclusion">Conclusion</h2>

<p>In this post you’ve seen how to supplant Codon’s <code class="language-plaintext highlighter-rouge">IDialogService</code> implementation, with a custom implementation that leverages the UWP Community Toolkit’s <code class="language-plaintext highlighter-rouge">InAppNotification</code> component, to display in-app toast messages. You also saw how Codon’s services and components can be replaced to provide new capabilities. Codon is a zero-dependency framework. There are no references to third party libraries, keeping it light-weight and free from version conflicts. There is, however, nothing preventing you from enriching Codon with your own custom services tailored for a particular platform.</p>

<p>You can download the source code for this article from the <a href="https://github.com/CodonFramework/Samples">Codon Samples repository</a> on GitHub.</p>

<p>I hope you find this post useful. Have a great day!</p>]]></content><author><name></name></author><category term="Codon" /><summary type="html"><![CDATA[Introduction Creating a Custom Dialog Service Leveraging the UWP Community Toolkit Conclusion Introduction Codon FX is a cross-platform framework for building maintainable applications. I use it for all of my .NET based applications. Codon is built on .NET Standard and uses platform specific assemblies to support various platforms including UWP. Codon has no references to third-party libraries, keeping it light-weight and free from version conflicts. There is, however, nothing preventing you from enriching Codon with your own custom services tailored for a particular platform. There are various services that can be easily swapped out using Codon’s IoC infrastructure. One such service is Codon’s dialog service (Codon.Services.IDialogService), which is used to display various dialogs to the user, or to ask the user a question, or to display toast notifications. Currently, there’s an implementation of IDialogService for UWP, WPF, and Xamarin Android/iOS/Forms. There are several Codon services that I find indispensable when building apps. IDialogService is one of these. Being able to quickly ask the user a question or display a message is such a common use case. I couldn’t bear not having a cross-platform dialog service at my fingertips; having to rely on building a platform specific dialog for each interaction would slow down development considerably. The UWP implementation of the IDialogService, however, relies on the UWP toast API, which places toast notifications adjacent to the Windows Status bar. This isn’t optimal considering that the notification is not front and center while your app is in the foreground, and displaying toasts down in the status area while your app is in the foreground is generally frowned upon. We can improve the way toasts are displayed for UWP apps by creating a custom IDialogService, inheriting from the UWP DialogService, and overriding its toast related methods. In this article you see how to achieve that, along with leveraging the UWP Community Toolkit’s InAppNotification API to display in-app notifications. All of Codon’s services and many of its other components are designed to be replaceable. If you don’t like the way something works, or you want to provide enhancements to a component, there’s nothing stopping you from swapping it out with your own implementation. For example, want to change how logging is performed? Substitute in your own ILog implementation. All of Codon’s logging will utilize your ILog implementation. Creating a Custom Dialog Service To create a custom UWP IDialogService implementation, begin by using the NuGet package manager to reference the package Codon.Uwp. This package brings in Codon’s .NET Standard core library and a UWP platform specific library. While you’re at it, use the NuGet package manager to reference the UWP Community Toolkit package named Microsoft.Toolkit.Uwp.UI.Controls. Once you’ve referenced Codon, you can take the default IDialogService implementation for a spin by using the following: bool userHitOkay = await Dependency.Resolve&lt;IDialogService&gt;() .AskOkayCancelQuestionAsync("Would you like to continue?"); Here we resolve the IDialogService from the IoC container using the static Dependency.Resolve method. The IDialogService implementation has an awaitable AskOkayCancelQuestion method that returns true if the user clicks/taps okay; false otherwise. There are a bunch of other useful methods that I use a lot when I’m building apps. The most frequently used is the good ol’ ShowMessageAsync method. Though, I especially like the AskQuestionAsync method, that lets you pass in a question object. For example, here’s one I use in Surfy Browser for Windows Mobile and Android: var question = new TextQuestion(string.Empty) { DefaultResponse = string.Empty, Caption = AppResources.AppBar_MenuItem_FindOnPage, InputScope = InputScopeNameValue.Text }; var questionResponse = await DialogService.AskQuestionAsync(question); Here I create a TextQuestion object that defines a caption to display on a dialog (“Find on Page”), a default value to place in the text box, and even an input scope value, which determines the soft input panel keyboard. Figure 1. shows the dialog displayed within Surfy Browser on Android. Figure 1. Using the IDialogService to ask the user a text response question. Leveraging the UWP Community Toolkit Let’s turn our attention back at the task at hand: changing the toast notification behavior of the IDialogService implementation. The UWP Community Toolkit contains an in-app notification component. You use it by placing an instance of Windows.UI.Xaml.Controls.ContentControl.InAppNotification on your page or control, as shown in Listing 1. Listing 1. Using the InAppNotification on a Page &lt;Page x:Class="Outcoder.Foo.MainPage" xmlns="http://schemas.microsoft.com/winfx/2006/xaml/presentation" xmlns:x="http://schemas.microsoft.com/winfx/2006/xaml" xmlns:d="http://schemas.microsoft.com/expression/blend/2008" xmlns:mc="http://schemas.openxmlformats.org/markup-compatibility/2006" xmlns:controls="using:Microsoft.Toolkit.Uwp.UI.Controls" mc:Ignorable="d"&gt; ... &lt;controls:InAppNotification x:Name="InAppNotification" /&gt; ... &lt;/Page&gt; While I’m not so keen on the approach that InAppNotification takes, in that I’d prefer to see the control live independently from the page, placed dynamically in the visual tree, for this example I’m going to live with it. With the InAppNotification element on the page you can then call the InAppNotification’s Show method; passing in the text to display and the duration before it is hidden again. What we are going to do is pass the InAppNotification object to a custom IDialogService. The next step is to subclass Codon’s UWP DialogService. See Listing 2. We override the ShowToastAsync method of the base DialogService class. Our new CustomDialogService depends on an instance of the InAppNotification class. Without it, it can’t display notifications and the CustomDialogService falls back to the default behavior. Listing 2. CustomDialogService Class public class CustomDialogService : DialogService { public InAppNotification InAppNotification { get; set; } public uint ToastHideMS { get; set; } = 3000; public override Task&lt;object&gt; ShowToastAsync(ToastParameters toastParameters) { if (InAppNotification != null) { int hiddenMS = 0; if (toastParameters.MillisecondsUntilHidden.HasValue) { hiddenMS = toastParameters.MillisecondsUntilHidden.Value; } InAppNotification.Show(toastParameters.Caption?.ToString(), hiddenMS &gt; 0 ? hiddenMS : (int)ToastHideMS); return Task.FromResult(new object()); } return base.ShowToastAsync(toastParameters); } } The CustomDialogService InAppNotification property is populated in the MainPage’s code-beside file. See Listing 3. Listing 3. MainPage Excerpt public sealed partial class MainPage : Page { public MainPage() { this.InitializeComponent(); DataContext = ViewModel = Dependency.Resolve&lt;MainViewModel, MainViewModel&gt;(true); Loaded += HandleLoaded; var dialogService = (CustomDialogService)Dependency.Resolve&lt;IDialogService&gt;(); dialogService.InAppNotification = InAppNotification; } ... } NOTE: If you’re concerned about testability because we are tying the InAppNotification component to the IDialogService implementation, set your mind at ease. There exists a Codon.DialogModel.MockDialogService class within the Codon’s core library, specifically designed for testing purposes. You can register it with the IoC container, instead of your CustomDialogService when your unit-test project is launching, as demonstrated: Dependency.Register&lt;IDialogService&gt;(new MockDialogService()); Likewise, to register your CustomDialogService for non-unit-testing configurations, place the following somewhere in your app’s startup code: Dependency.Register&lt;IDialogService&gt;(new CustomDialogService()); Passing an instance of the CustomDialogService class to the Register method causes a singleton mapping to be created; that instance will be returned from all requests to Resolve&lt;IDialogService&gt;. NOTE: If you have multiple pages or views, you’ll need to assign the InAppNotification object to the CustomDialogService when the view becomes visible. I’m not happy with that approach. As I mentioned above, I’d like to see the InAppNotification component placed dynamically in the visual tree so it is not dependent on being explicitly defined for each page or control. Conclusion In this post you’ve seen how to supplant Codon’s IDialogService implementation, with a custom implementation that leverages the UWP Community Toolkit’s InAppNotification component, to display in-app toast messages. You also saw how Codon’s services and components can be replaced to provide new capabilities. Codon is a zero-dependency framework. There are no references to third party libraries, keeping it light-weight and free from version conflicts. There is, however, nothing preventing you from enriching Codon with your own custom services tailored for a particular platform. You can download the source code for this article from the Codon Samples repository on GitHub. I hope you find this post useful. Have a great day!]]></summary></entry></feed>